Share
Cloud Volumes ONTAP provides an industry-standard solution for meeting all your cloud storage management needs in the cloud. It enables customers to make best use of their investments in cloud storage through proprietary capabilities in data protection, data tiering, cloning, high availability, storage efficiency and more.
NetApp Cloud Manager is the single-pane console for deploying and managing your Cloud Volumes ONTAP systems.
This blog will show you how to set up Cloud Manager so that you can run Cloud Volumes ONTAP in Azure.
Use the links below to jump down to the instruction on:
Key Design Considerations
This section highlights the key design considerations which need to be understood and addressed prior to a Cloud Manager and a Cloud Volumes ONTAP deployment.
- Azure Subscription
- Note: Before you start the setup process, you need to have an Azure subscription. Make sure you have your Azure user credentials ready.
- If you don’t have an Azure subscription, you can purchase a pay-as-you-go subscription here.
- Supported Azure regions
- Cloud Volumes ONTAP services are available in the Azure regions listed here.
- Cloud Manager deployment options
Cloud Manager makes use of a Service Connector in order to communicate with the Cloud Volumes ONTAP instance in Azure. When we talk about deploying Cloud Manager, we are actually talking about deploying the Service Connector agent. The first time you log into Cloud Manager and start a Cloud Volumes ONTAP deployment you'll be prompted to create a Service Connector. You have two options for this:
-
- Deploying the Service Connector directly from Cloud Manager (the main focus of this post).
- Deploying Cloud Manager from the Azure marketplace.
The Service Connector deployment from NetApp Cloud Manager requires an Azure account that has rights to deploy the VM. An account with contributor rights can be used to deploy the Service Connector. Otherwise, you can create a custom role and assign it to a user (refer section titled “User Permission configuration” below to understand how to do this).
-
Azure networking considerations
There are a set of networking requirements to successfully deploy Cloud Volumes ONTAP in Azure. These networking requirements are related to Cloud Manager, the Service Connector, and to the Cloud Volumes ONTAP instance:
- Requirements for Cloud Manager:
Since Cloud Manager is the web-based control pane to manage everything in your deployment, the machine in your network running the web browser must have access to the following endpoints for access and for centralized user authentication through NetApp Cloud Central.:- https://cloudmanager.cloud.netapp.com: To connect you to the Cloud Manager SaaS interface.
- https://api.services.cloud.netapp.com: To contact Cloud Central APIs.
https://auth0.com
https://cdn.auth0.com
https://netapp-cloud-account.auth0.com
https://services.cloud.netapp.com - https://widget.intercom.io: For in-product chat that enables you to talk to NetApp cloud experts.
- Requirements for the Service Connector:
- Outbound internet access in order to reach all the required endpoints necessary for the Connector to manage resources within Azure. The specific endpoints in Azure that the Service Connector needs to reach can be found in this list. It is recommended to allow all TCP and UDP outbound traffic from the Service Connector.
- Keep inbound ports 22,80 and 443 open in case direct access to the Service Connector is needed.
- Requirements for Cloud Volumes ONTAP:
- Outbound internet access for Cloud Volumes ONTAP to send AutoSupport messages to NetApp. Outbound access should be allowed to the following endpoints:
- Creating Security Groups is not necessary because Cloud Manager does this for you but in case you need to create a specific one you can find the required rules on creating a security group here.
- If you are going to replicate data from your Cloud Volumes ONTAP instance in Azure to other ONTAP systems outside Azure you will need a VPN between your Azure VNet and the destination network (such as AWS or on-prem).
User Permission Configuration
In this section we’ll show how to create a role with permissions to deploy the Service Connector Virtual Machine from Cloud Manager. Alternatively, if you have a user account with the built-in contributor permission, you can use it to deploy Cloud Manager and skip this section.
- Copy the JSON code from the Cloud Manager Azure policy which will be used to create a custom role called “Azure SetupAsService.”
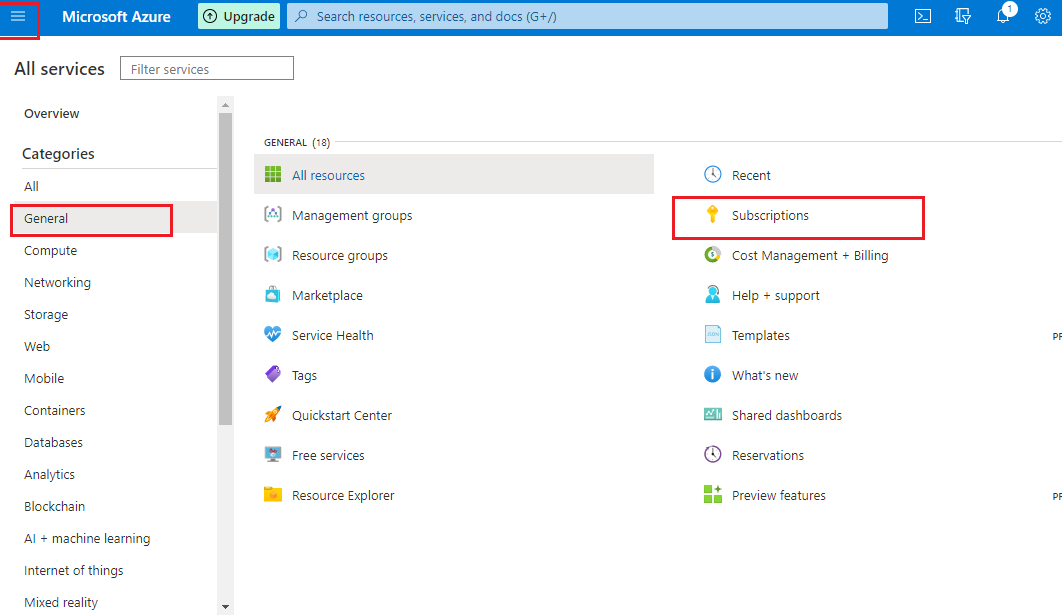
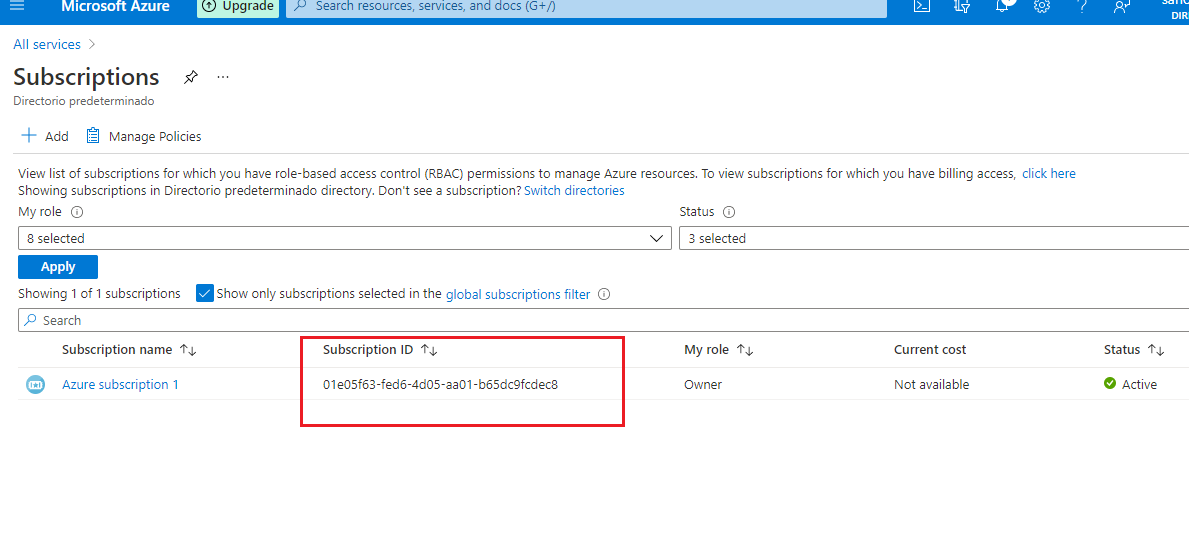
- Now you need to add your Azure subscription ID in the JSON file. Your Azure subscription ID can be found in Azure portal > All Services > Subscriptions > your subscription name.
Now copy the subscription id you find there:
- Edit the JSON file downloaded in Step 1 and update the AssignableScope line at the bottom with your subscription id. Make sure to update it with the following format or else the JSON file will return a parsing error:
"AssignableScopes":["/subscriptions/d640d972-xxxx-xxxx-xxxx-xxxxba3fd502"]
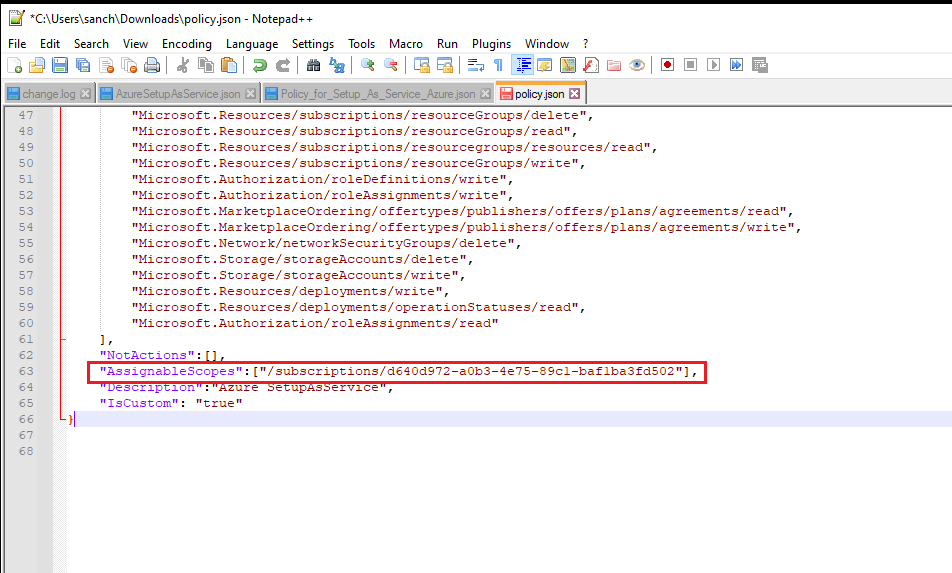
Save the file. You now have a custom role called Azure SetupAsService. In the following steps we will upload the new role to your Azure portal.
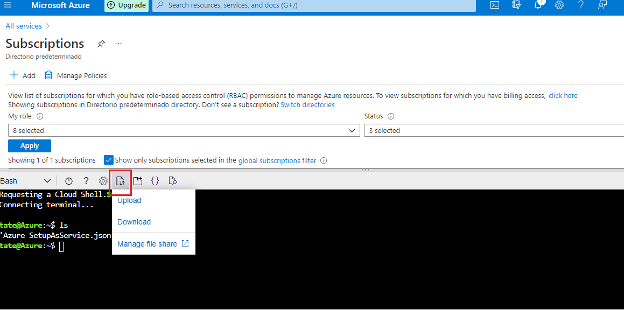
- Click on Azure Cloud Shell in the Azure portal:

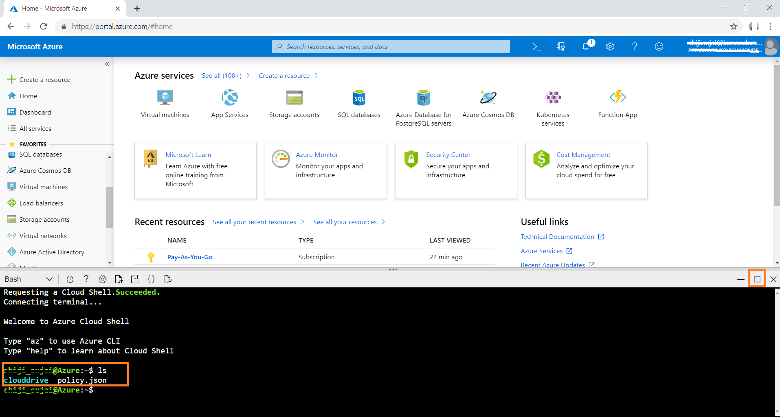
- Click the upload option in the Cloud Shell to upload the JSON file:
- Once the upload is complete, type the command ls in Cloud Shell. The policy file will be available in the home folder. You can click on the maximize icon on the left-hand side to expand Azure Cloud Shell to full screen:
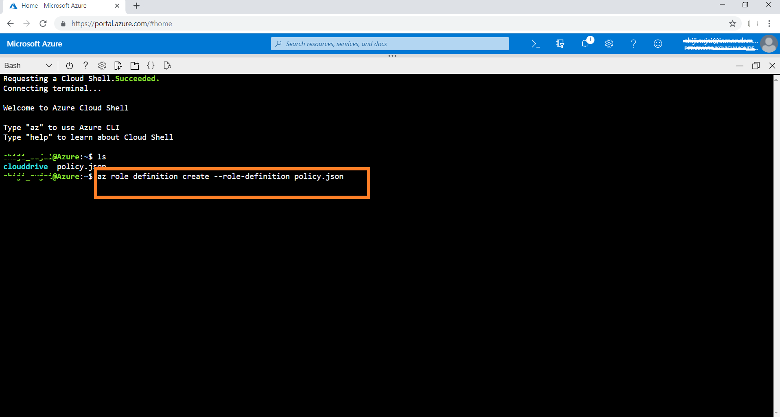
- Run the following command from Cloud Shell:
az role definition create --role-definition your_file_name.json
- On successful execution, the role details will be displayed in Cloud Shell:
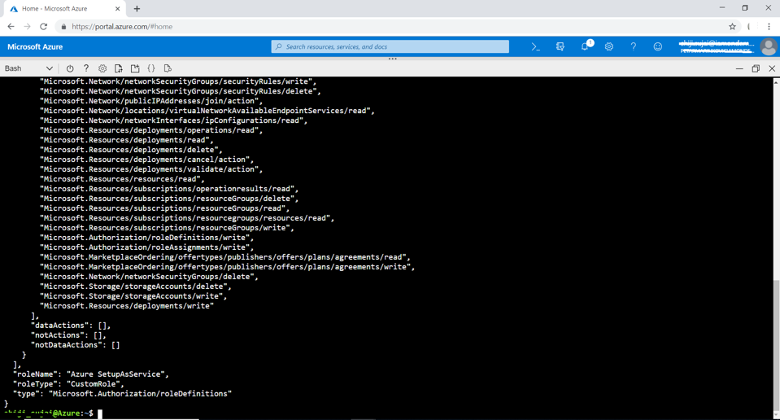
Now that you verified that the new role was uploaded, in the next steps we will assign the new role to the user who will deploy the Service Connector from Cloud Manager.
9. In the Azure portal go to All Services > Subscriptions > Select your subscription > Access control (IAM).
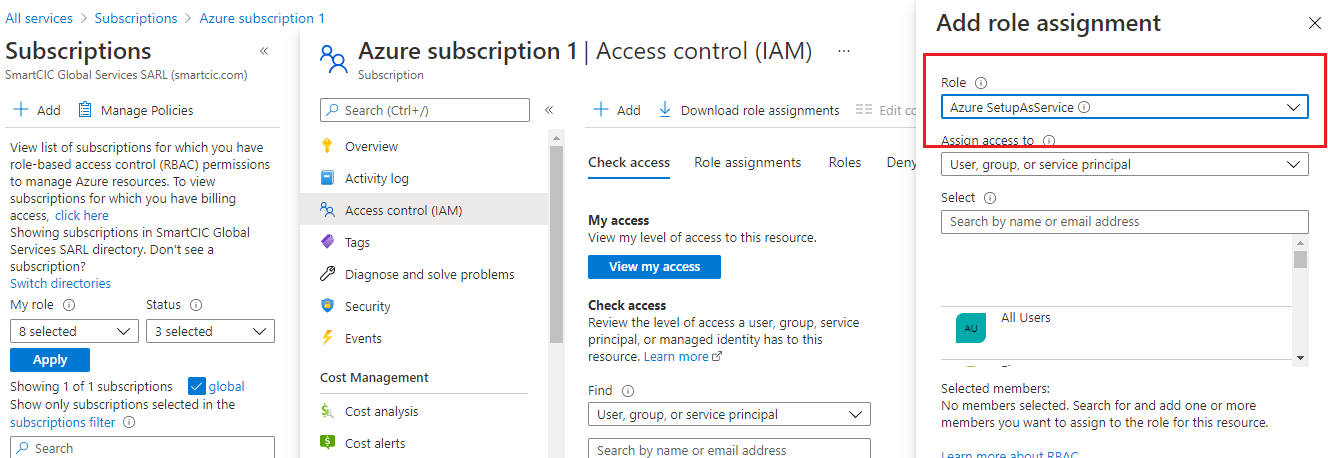
Click “+Add” and select “Add role assignment” from the drop-down menu:
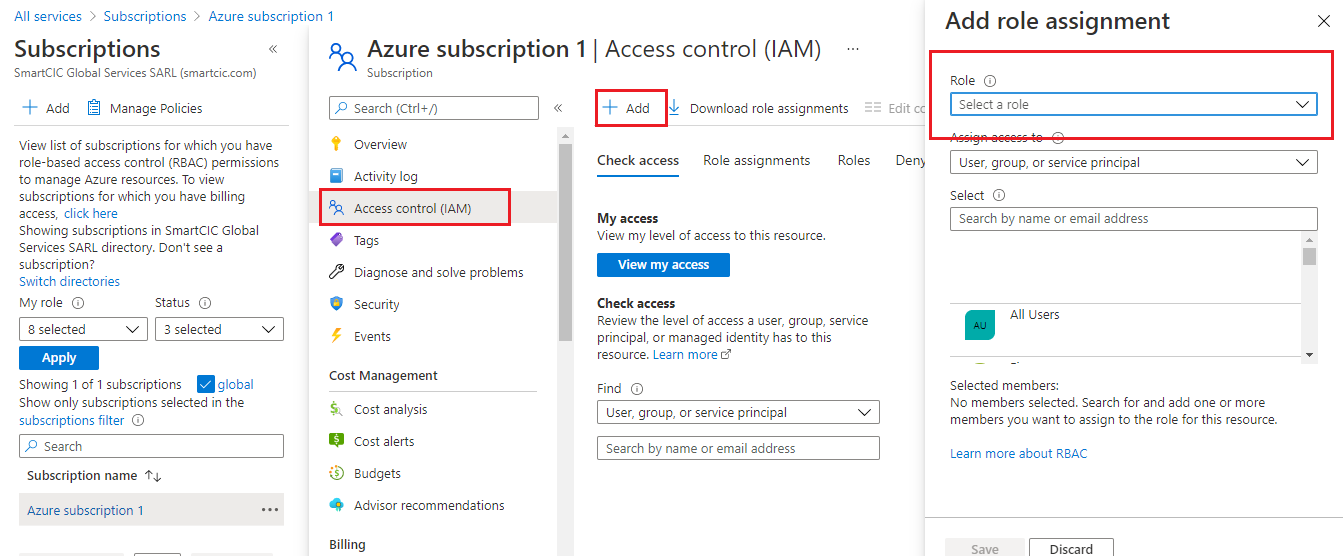
- From the Roles drop-down menu, select the “Azure SetupAsService” role we created in Step 8:
- Search for the Azure user account that you want to use to deploy the Service Connector and click “Save” to complete the role assignment:
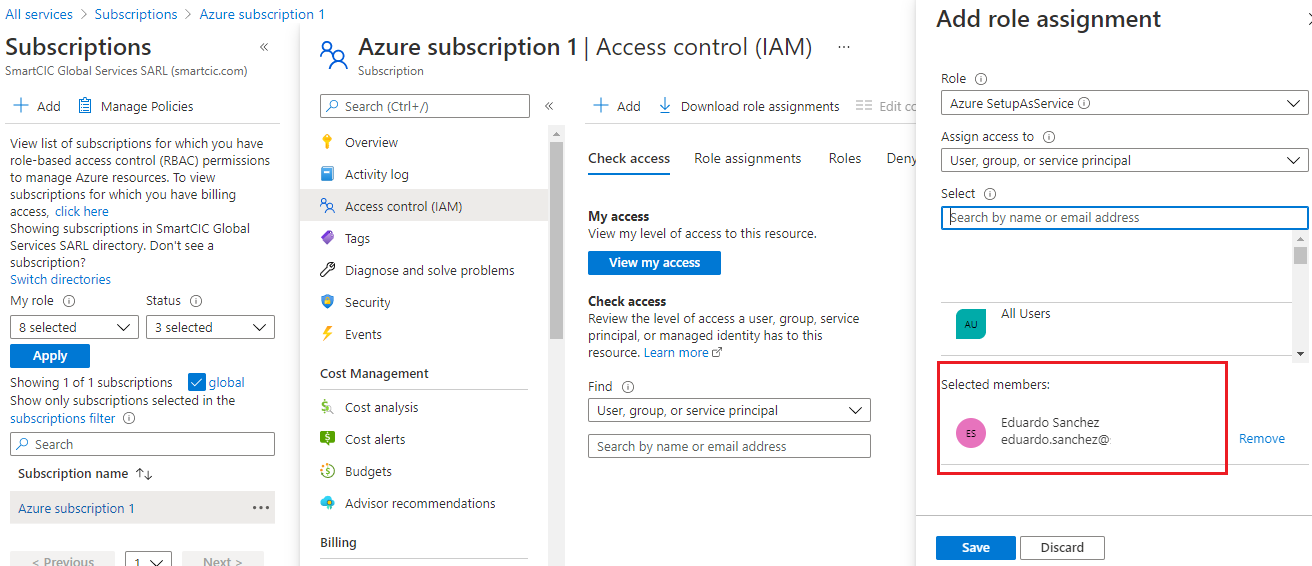
The user now has the permissions needed to deploy the Service Connector instance in Azure.
Cloud Volumes ONTAP Deployment
Now that the prerequisites in Azure are completed, we can initiate the Cloud Volumes ONTAP deployment.
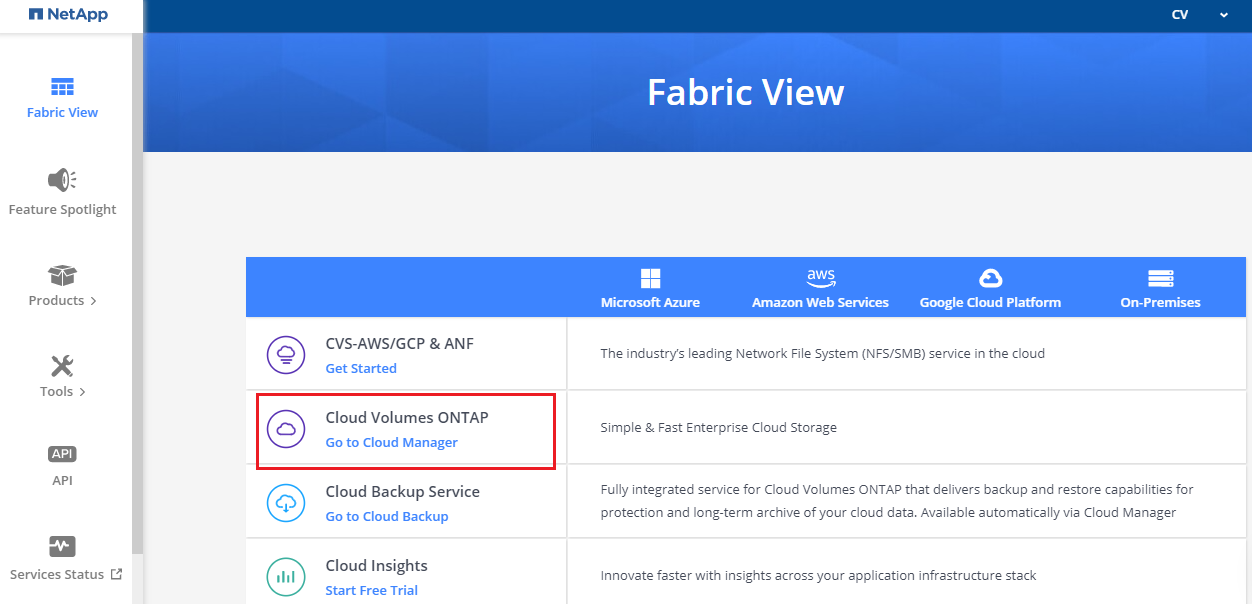
- Sign up and log in to NetApp Cloud Central.
- In the Fabric View, click on “Go to Cloud Manager” under Cloud Volumes ONTAP:
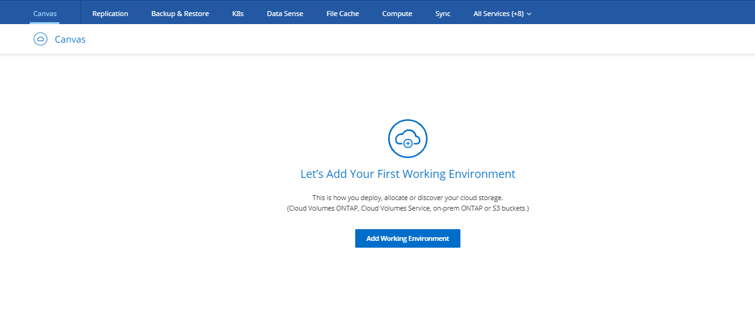
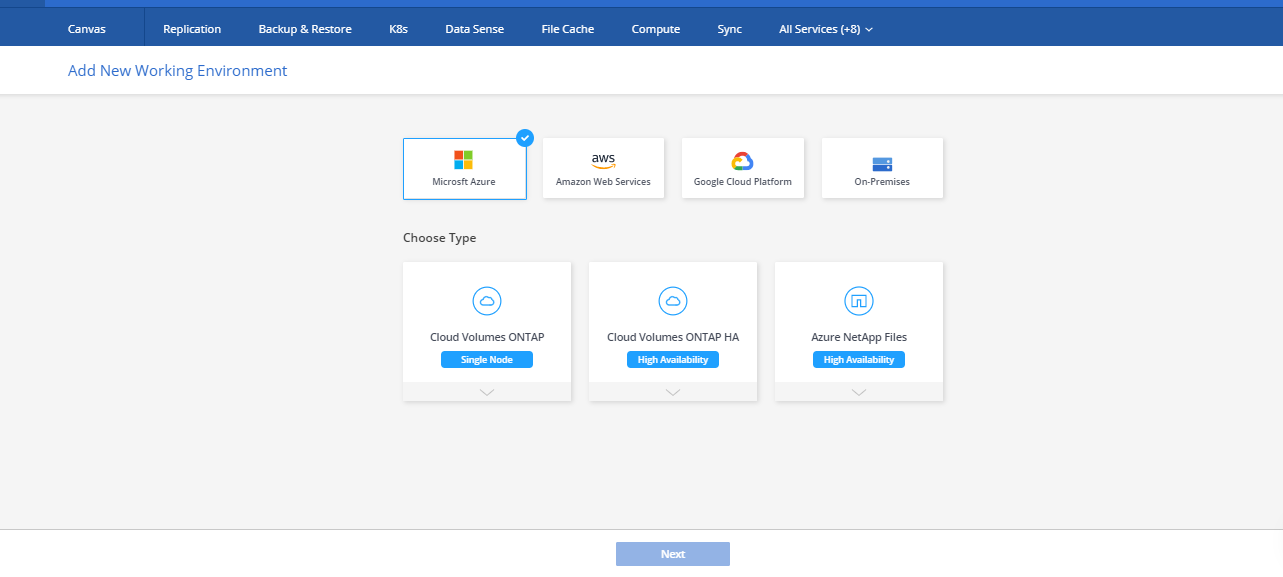
- Click on “Add Working Environment”:
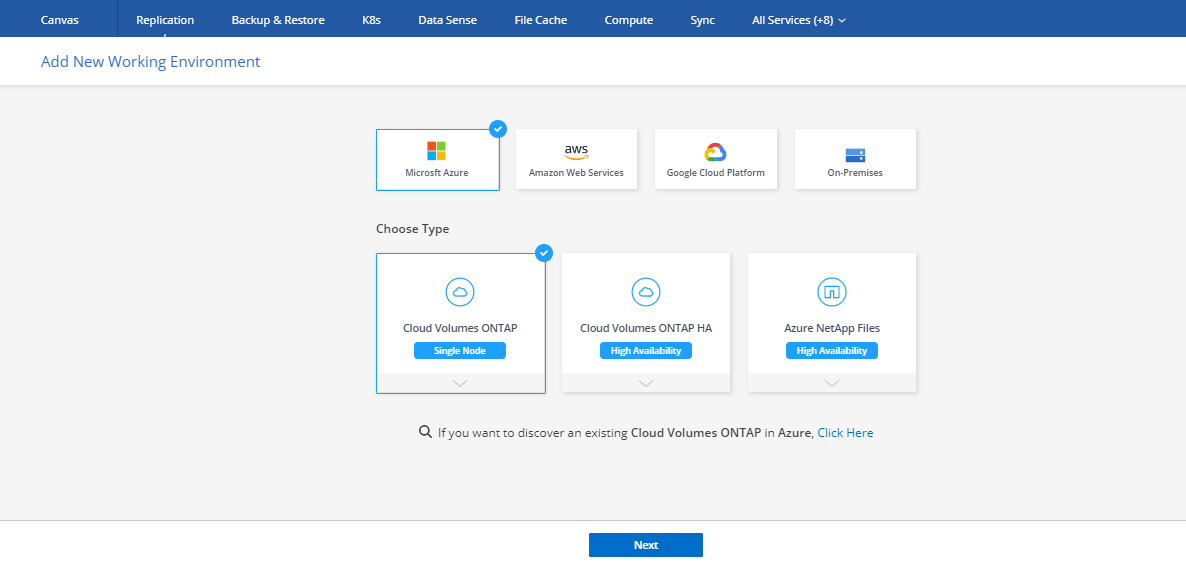
- Select Microsoft Azure as the provider and the Cloud Volumes ONTAP mode you want (either single-node or high availability). Click “Next” to proceed:
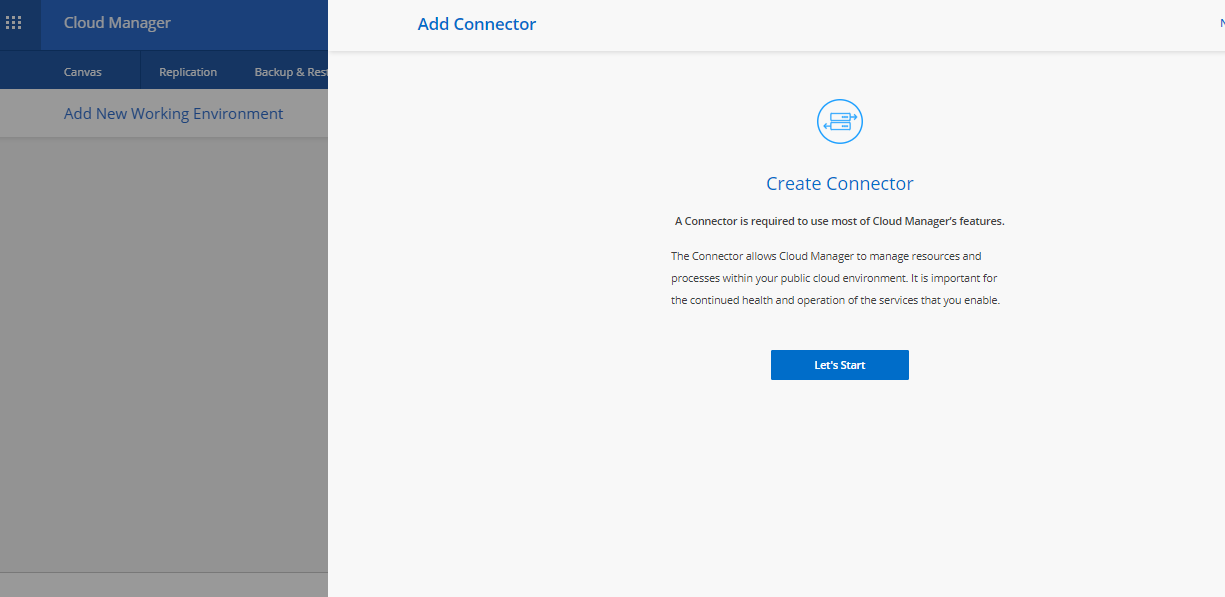
- As mentioned in our prerequisites section, the first time you deploy Cloud Volumes ONTAP, you'll be prompted to create a Service Connector first.
In the previous section we created a custom role that gave us permissions to create this Service Connector instance from Cloud Manager.
Click on “Let's Start”:
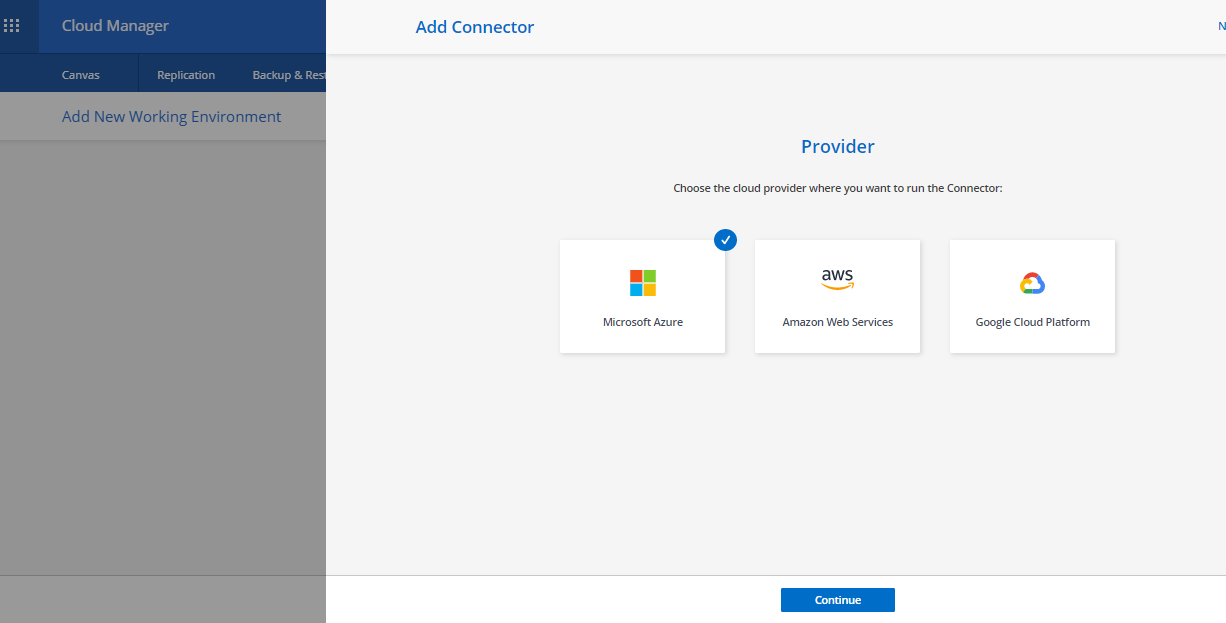
- Select Microsoft Azure as the provider. Click “Continue”:
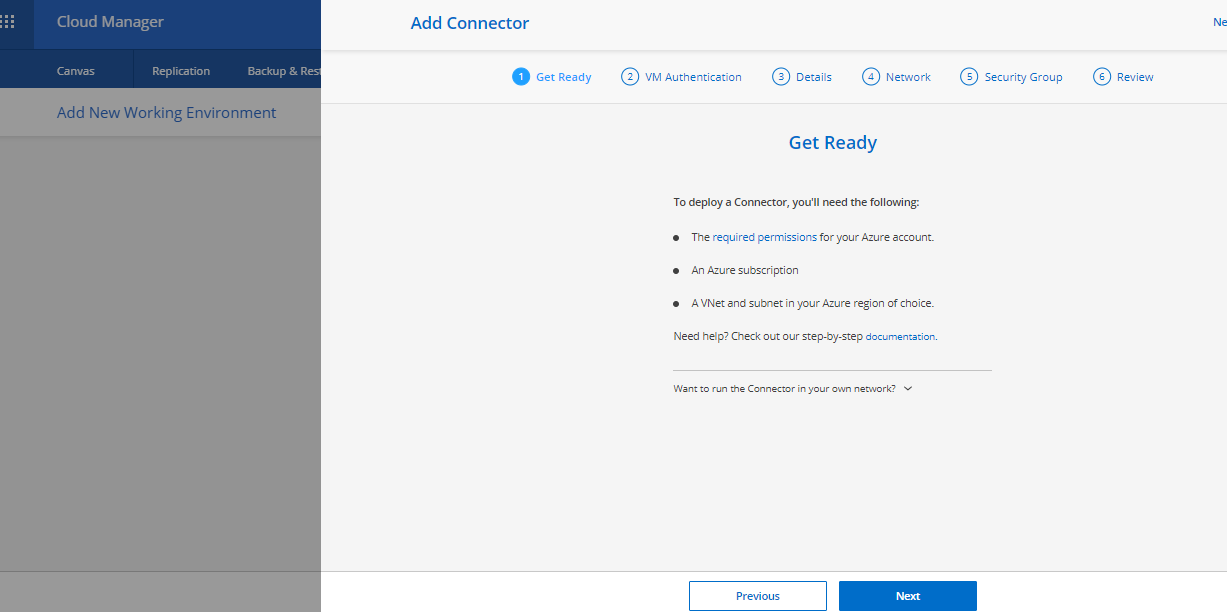
- On the Get Ready screen, click on “Next”:
- Now you will need to select an Azure account in order to log in. After you select the account, a window will pop up prompting you to accept the required permissions. Click on “Accept”:

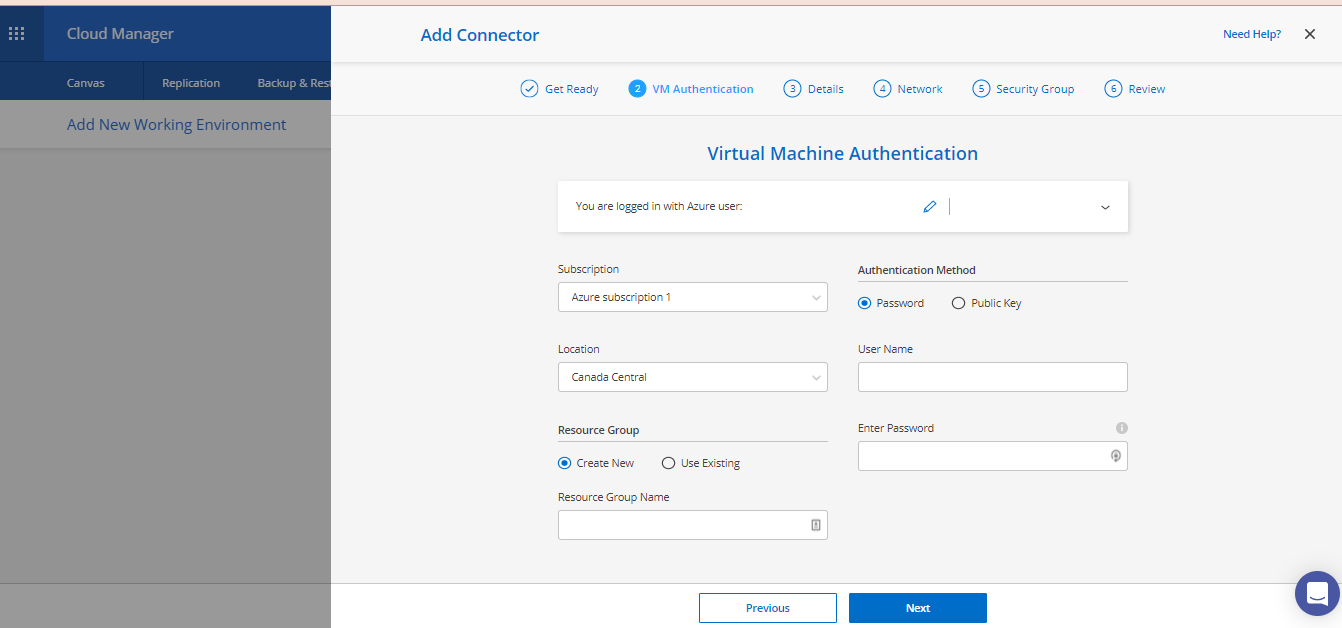
- You will now be directed to the Virtual Machine Authentication screen. Here you need to provide the following details:
- Your Azure subscription
- Azure region
- Authentication method, username, and password for access to the VM, in case it is needed.
- Resource Group: If you select “Create New” in this field, Cloud Manager creates a new Resource Group for you. It is recommended to deploy a new Resource Group only for Cloud Volumes ONTAP because there is potential for data loss if, for example, another Azure user accidentally deletes a Cloud Volumes ONTAP resource from an existing shared Resource Group.
Provide all the details above and click “Next”:
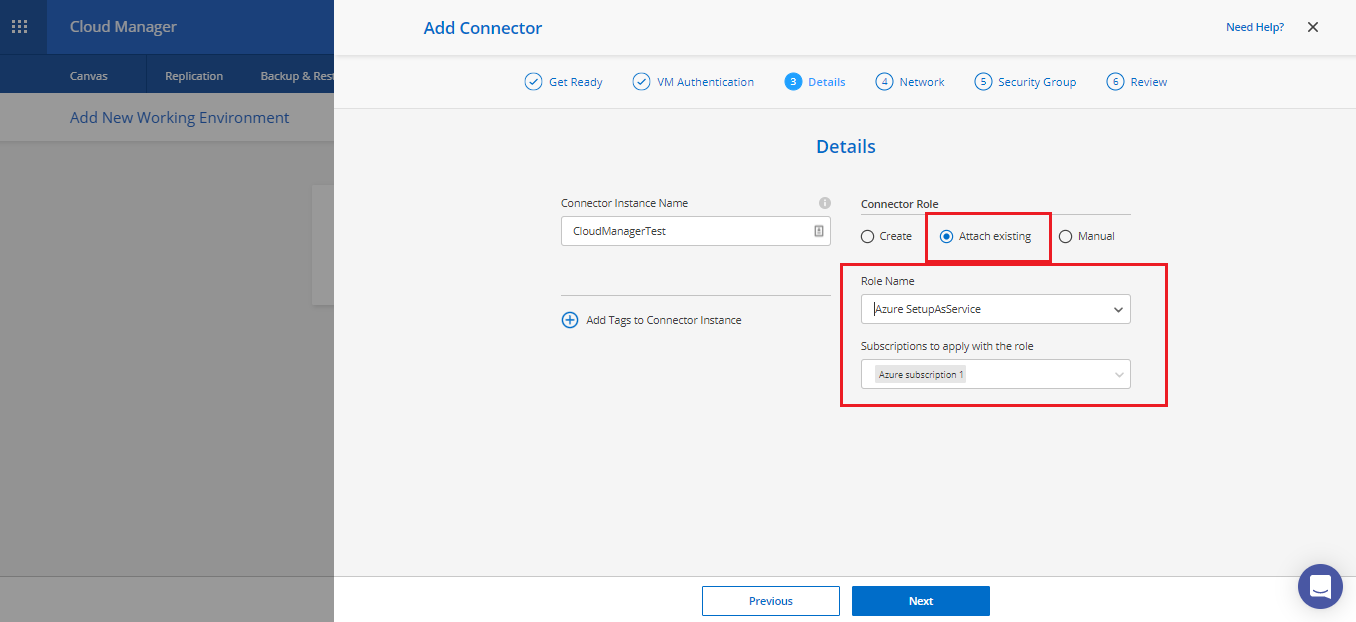
- In this step you need to provide the following details:
- Service Connector instance name
- Connector role: Select the role you created in the previous section of this blog. In our case, we are choosing “Attach existing.”
- Azure subscription associated with the role
- Tags to the Connector instance, if any
When you’re done, click “Next”:
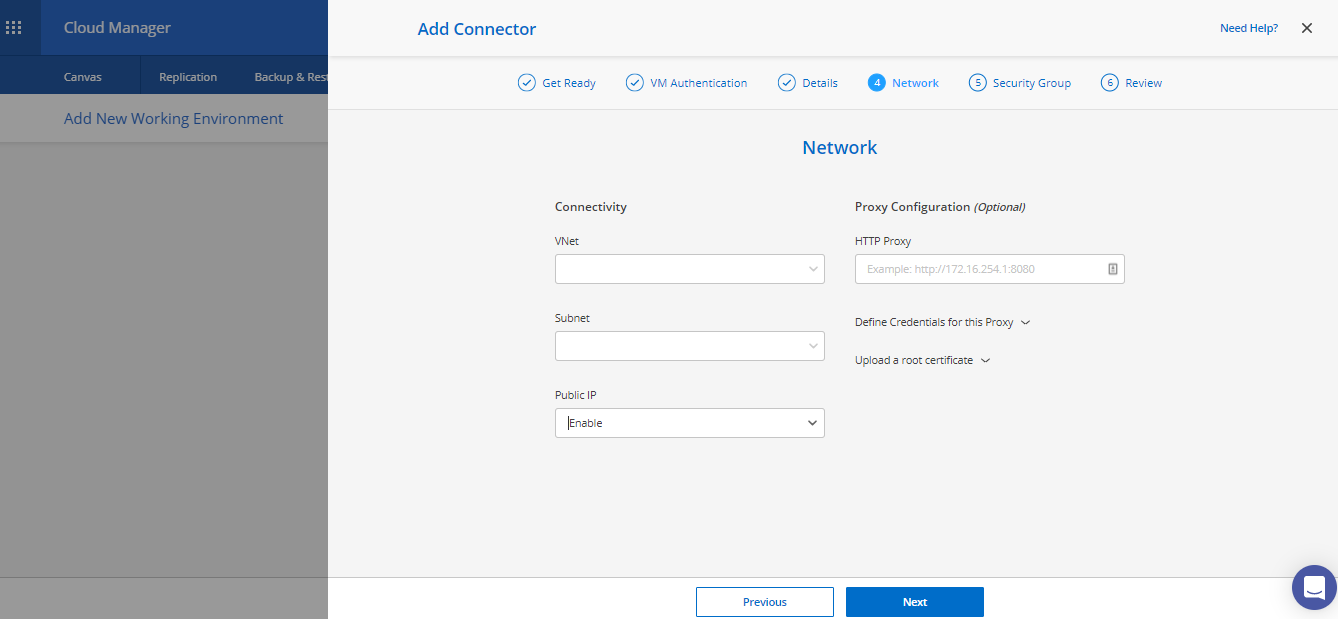
- Select a VNet and subnet, whether to enable or disable a public IP address, and a proxy server, if needed. Then click “Next”:
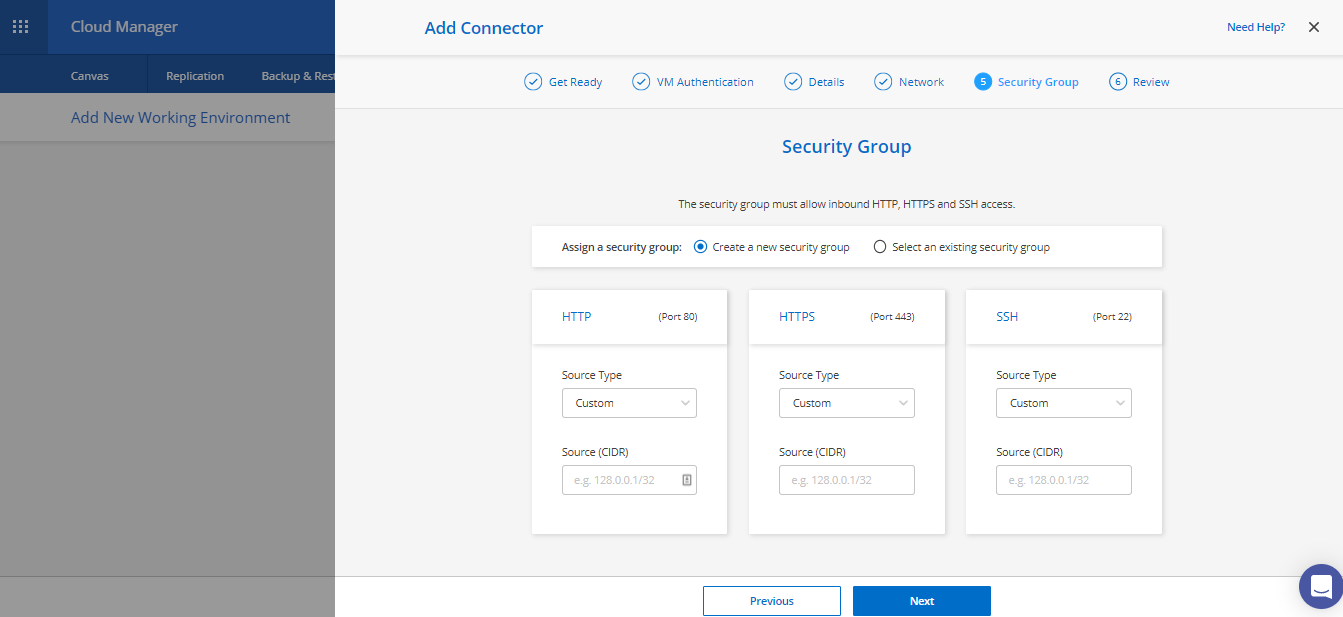
- Choose between adding a new Security Group for the Connector instance (which Cloud Manager creates for you) or select an existing one.
In either case, the Security Group must allow inbound HTTP, HTTPS and SSH. This in case the Connector instance needs to be managed or accessed. When you’re done, click “Next”:
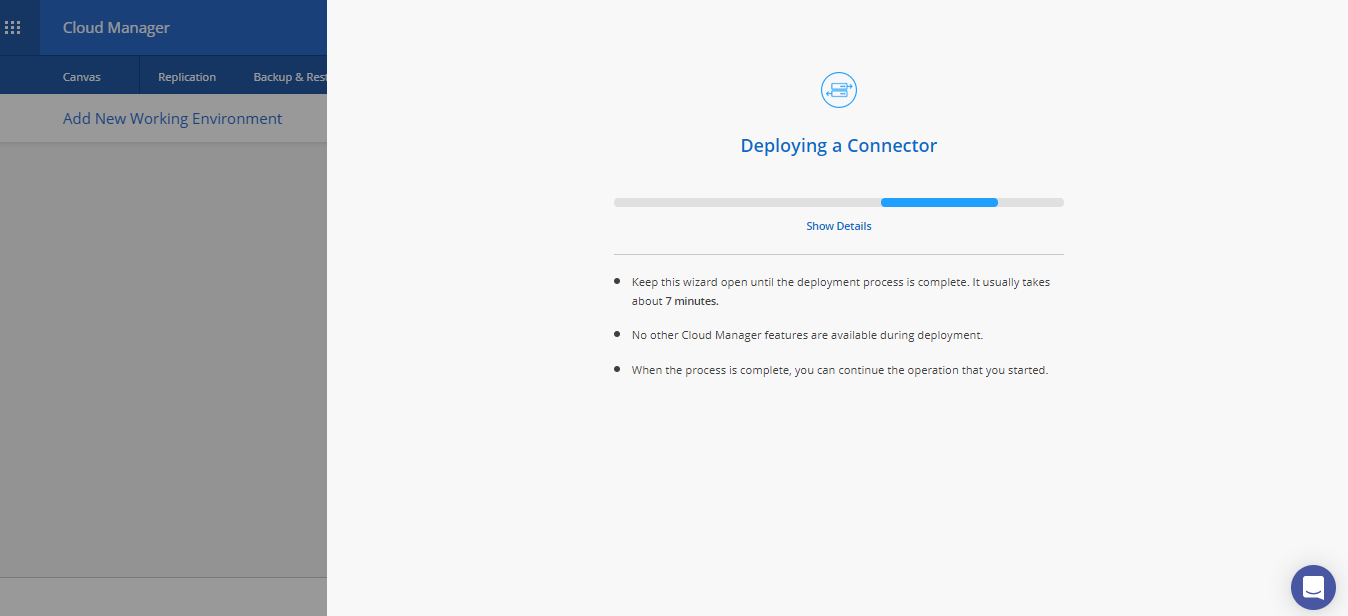
- Review all your settings and click “Add” if everything is correct. This will start the Service Connector instance deployment. Leave the Wizard open during the duration of this process, which can take around seven minutes to complete:
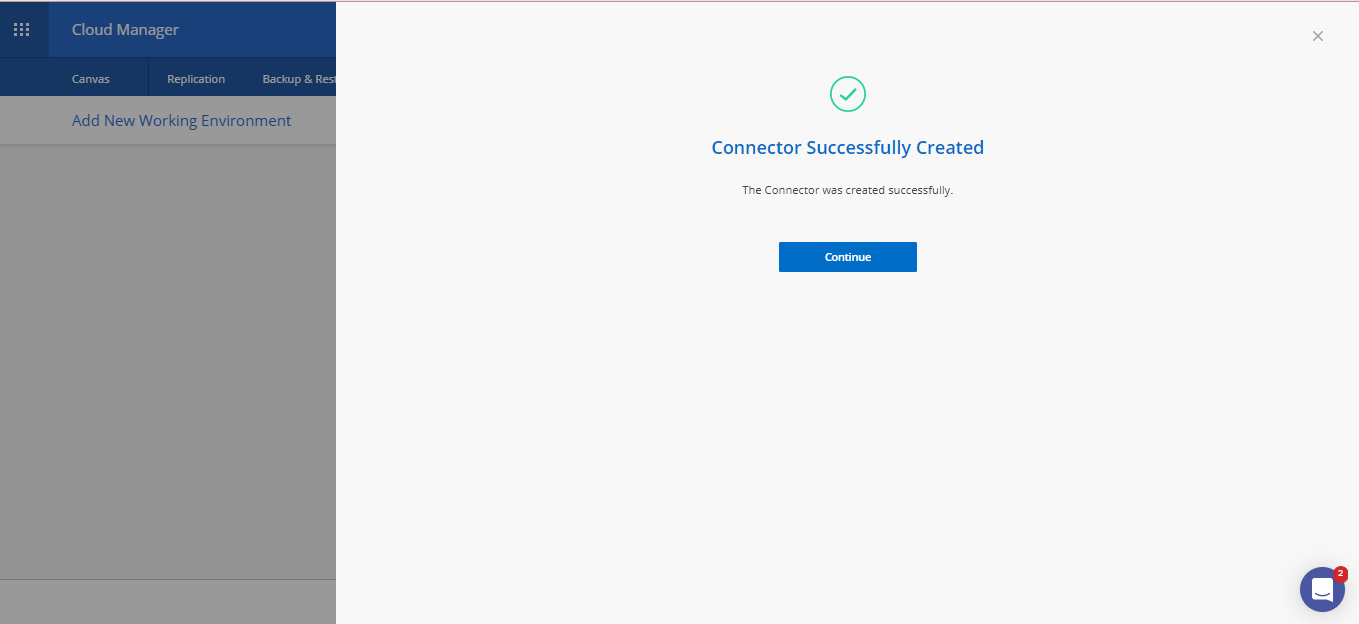
Once finished, click “Continue”:
- You'll be redirected to the Cloud Volumes ONTAP creation wizard. Select whether you want to deploy a Cloud Volumes ONTAP single-node or HA pair. For this example we are choosing single-node. When you’re done, click “Next”:
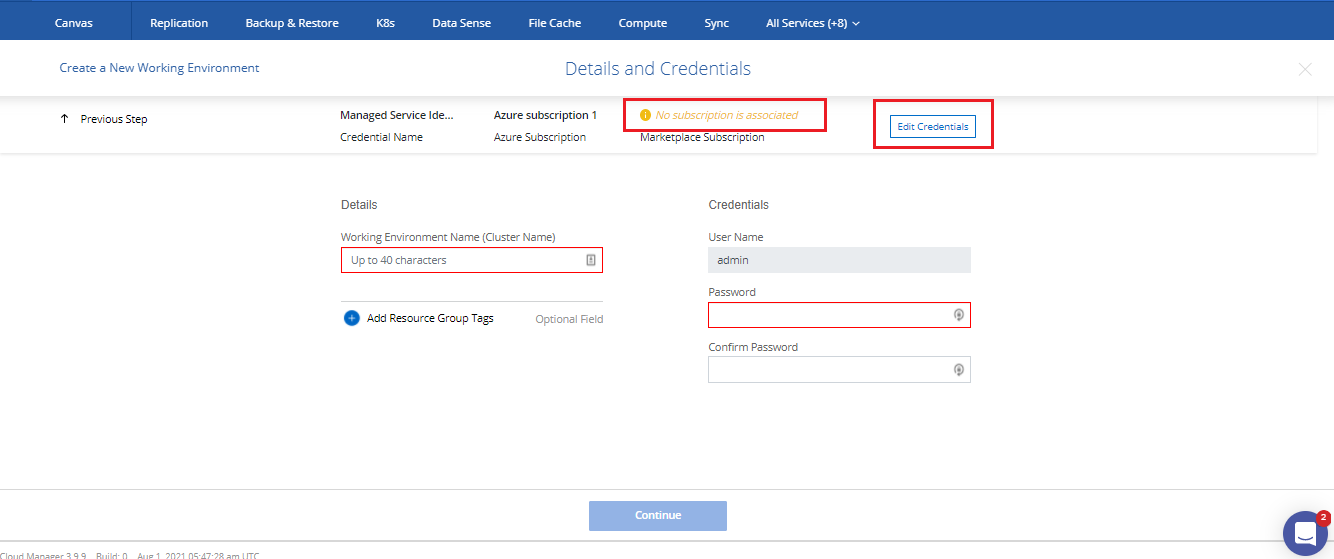
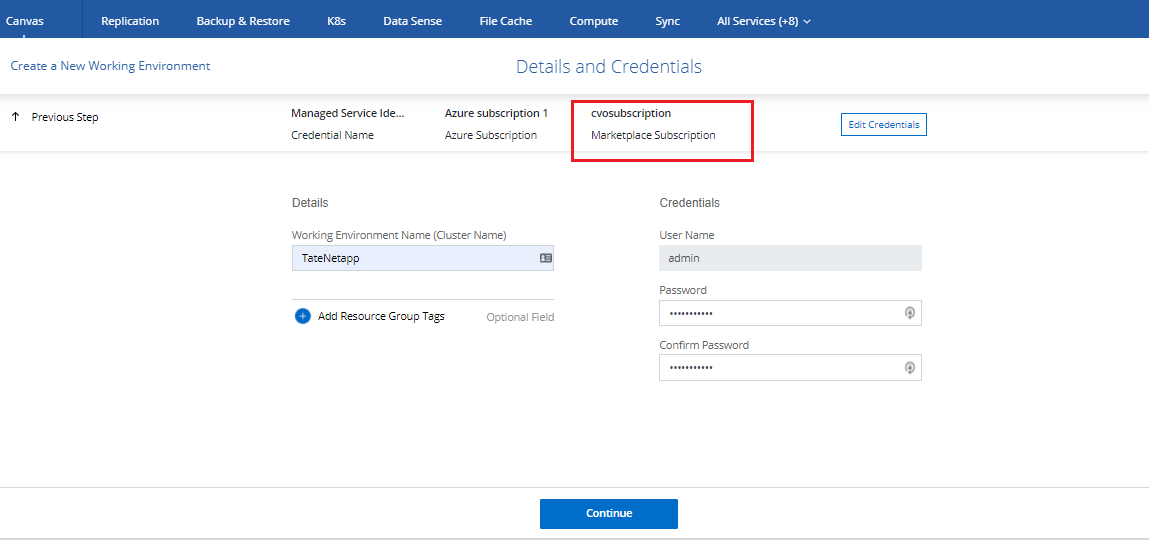
- Besides giving a name for your cluster and the credentials to access it, in this step you need to associate an Azure Marketplace subscription with the selected Azure subscription if you intend to use the Pay-as-you-go model for Cloud Volumes ONTAP.
If no Marketplace subscription is associated, you will see the notification in yellow at the top right. Click on “Edit Credentials”:
Follow this video on how to complete the rest of the Marketplace subscription steps.
After completing the steps shown in the video, you'll be redirected in a separate tab to Cloud Manager, where you'll need to save the subscription:
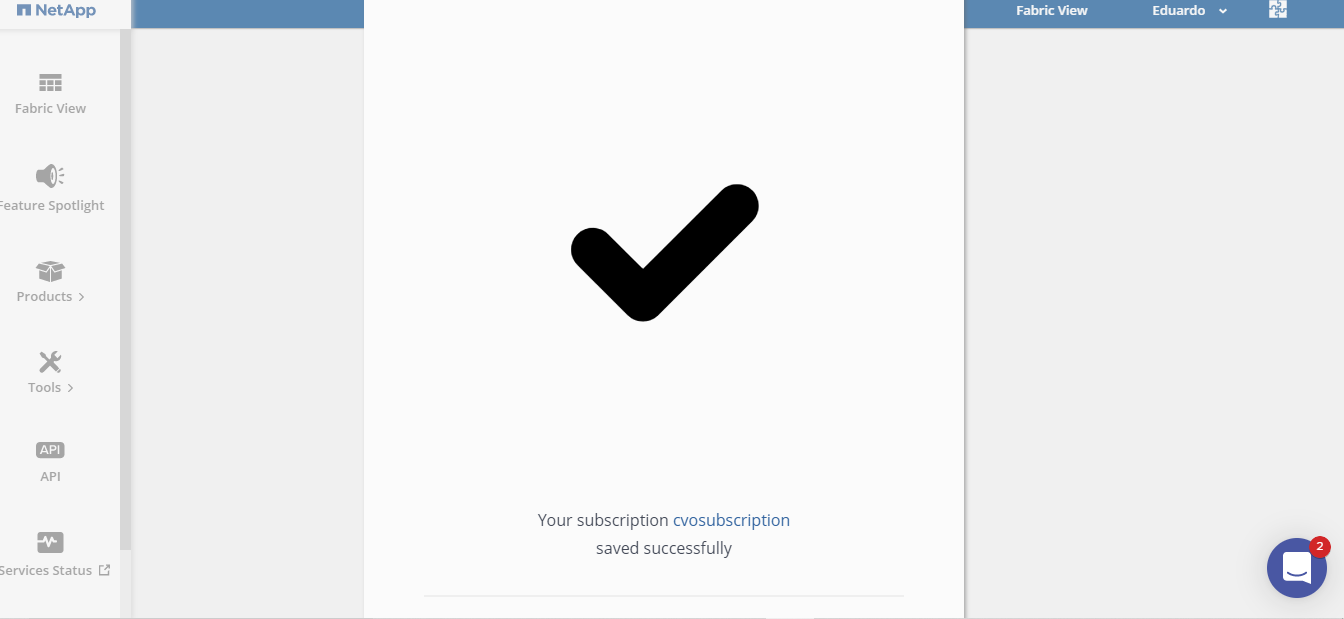
Go back to the Cloud Volumes ONTAP deployment wizard. You'll now see a window prompt with the Marketplace subscription you just created. Click “Apply”:
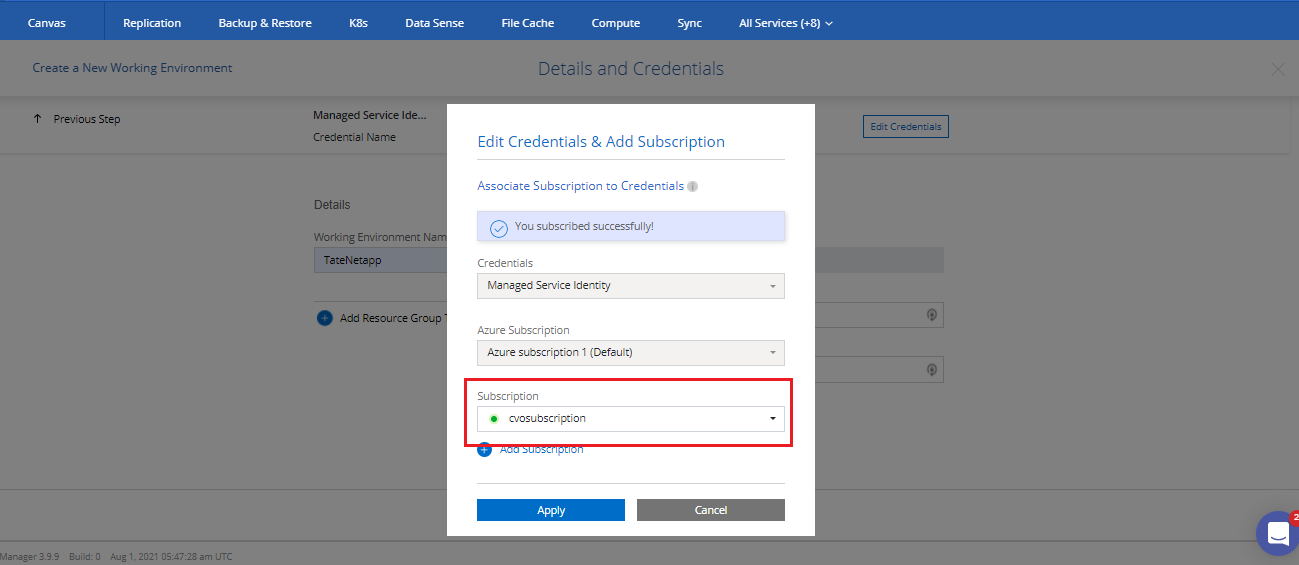
With the subscription now associated, click on “Continue”:
- Choose to enable or disable any of the additional NetApp Cloud services complementary to Cloud Volumes ONTAP and click on “Continue”:

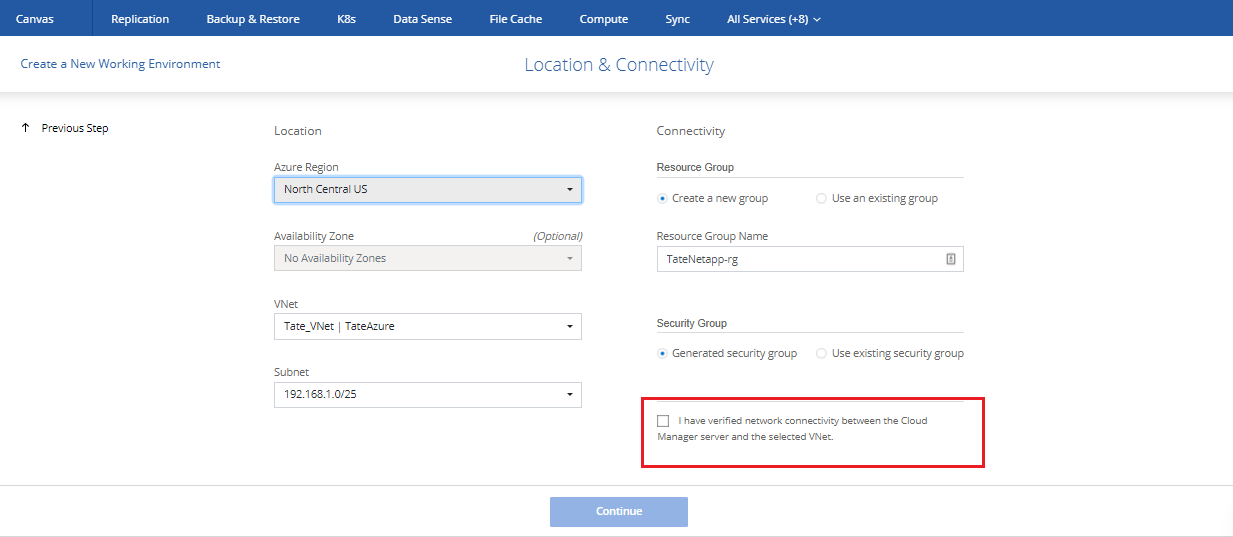
- In this step you need to provide:
- Azure region (make sure it is the same region where you deployed the Service Connector)
- Azure VNet and subnet with connectivity to the Service Connector
- Resource Group (a new one is recommended)
- Security Group. Creating a new security group is recommended. If you select an existing one, make sure it complies with these rules.
Check the box at the bottom right and click “Continue”:
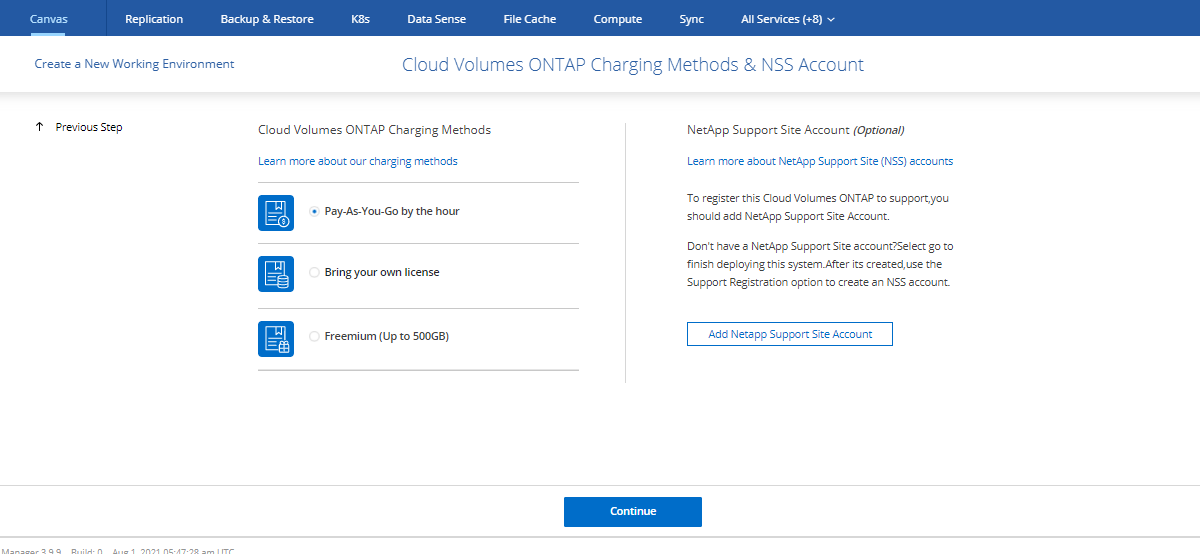
- Choose the ONTAP charging method and, optionally, subscribe to a NetApp Support account (you can also do this one later from the NetApp site). You can learn more about Cloud Volume ONTAP charging methods here.
When you’re done, click “Continue”:
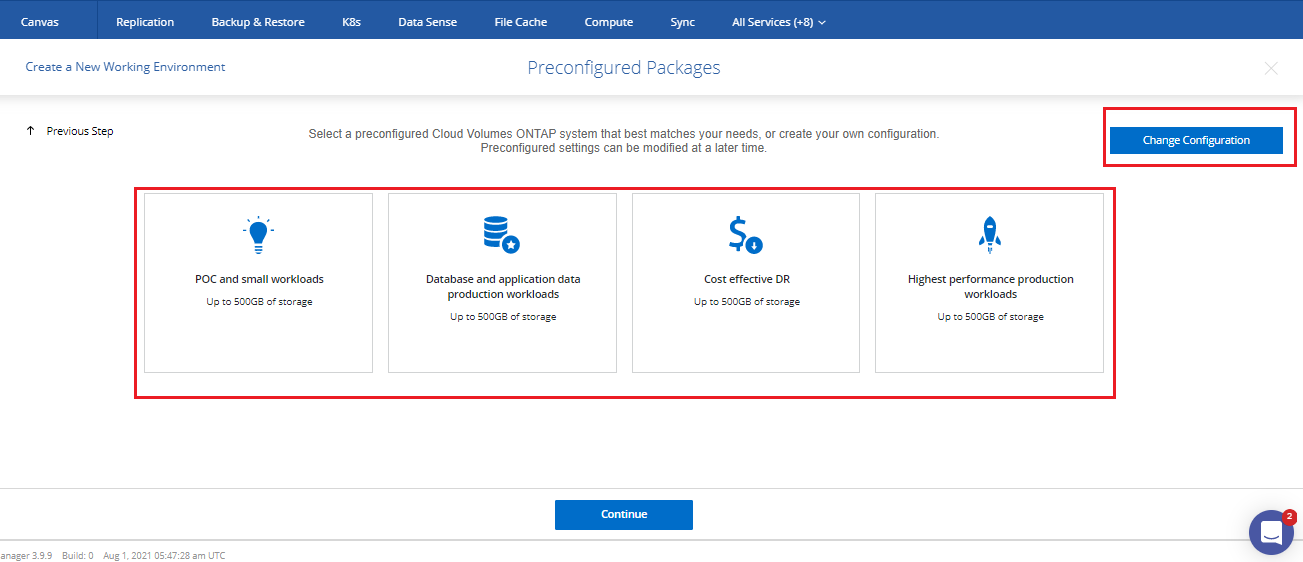
- Select from one of the pre-configured packages that come with optimized disk types, capacity, and VM types for specific workloads. If you select one of these pre-configured packages, you will only need to specify a volume and then review the whole deployment.
If you instead choose “Change Configuration,” you will need to complete a few additional steps by specifying VM Type, SSD type, disk size, data tiering, and write speed:
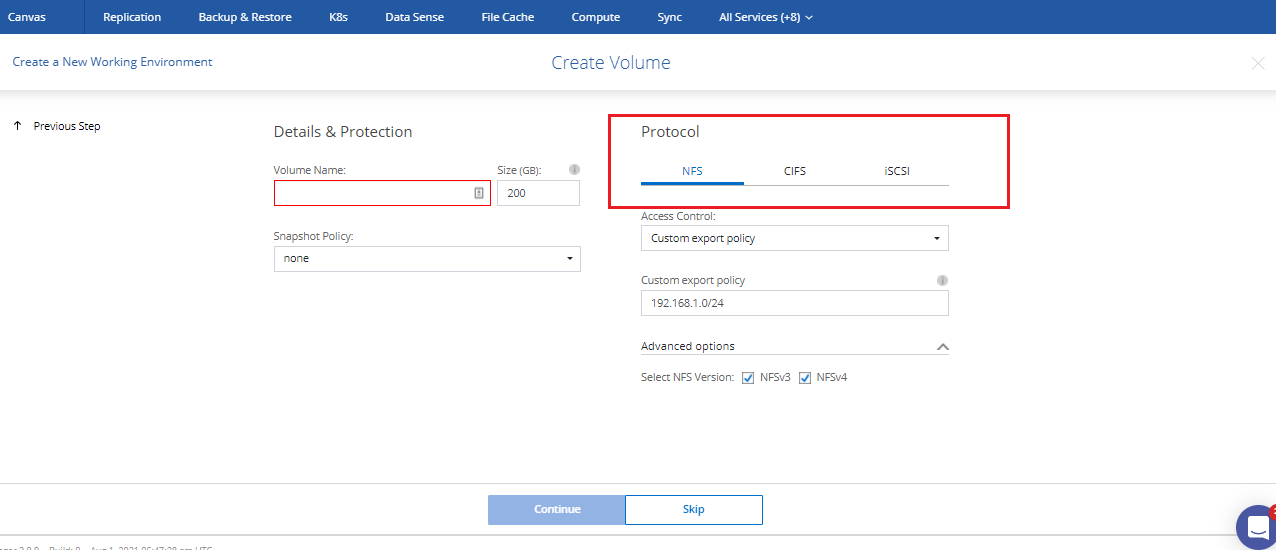
- In this step you can create an initial volume in your Cloud Volumes ONTAP cluster deployment and specify the multi-protocol access control options.
You can also skip this step and create a volume later. Click either on “Continue” or “Skip”:
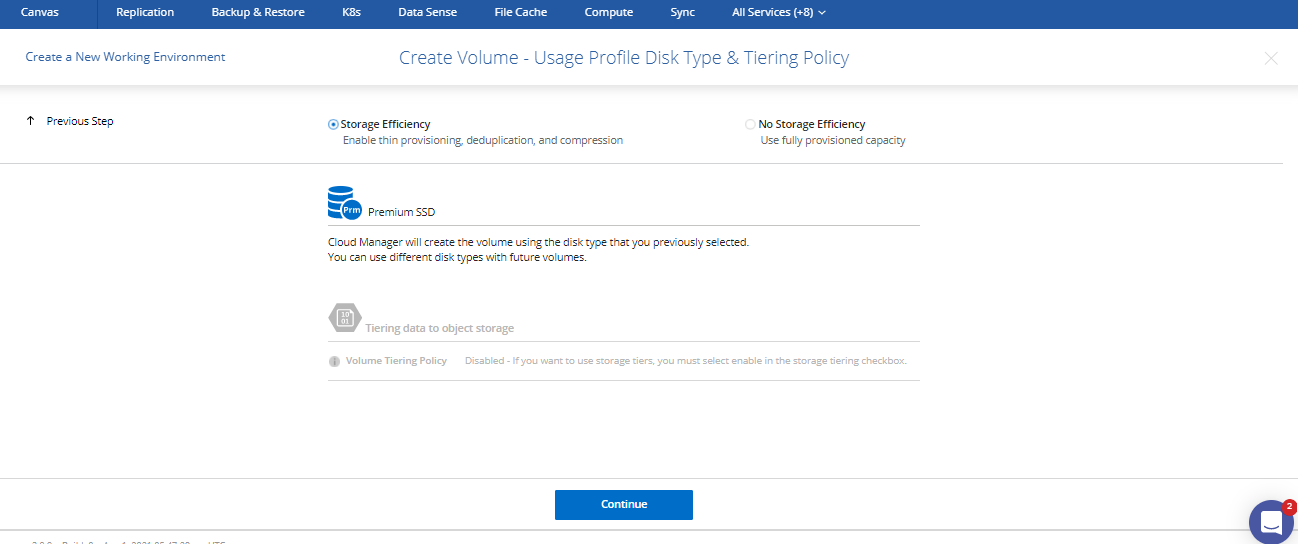
- When creating an initial volume, select whether or not to enable storage efficiencies and data tiering details, if needed:
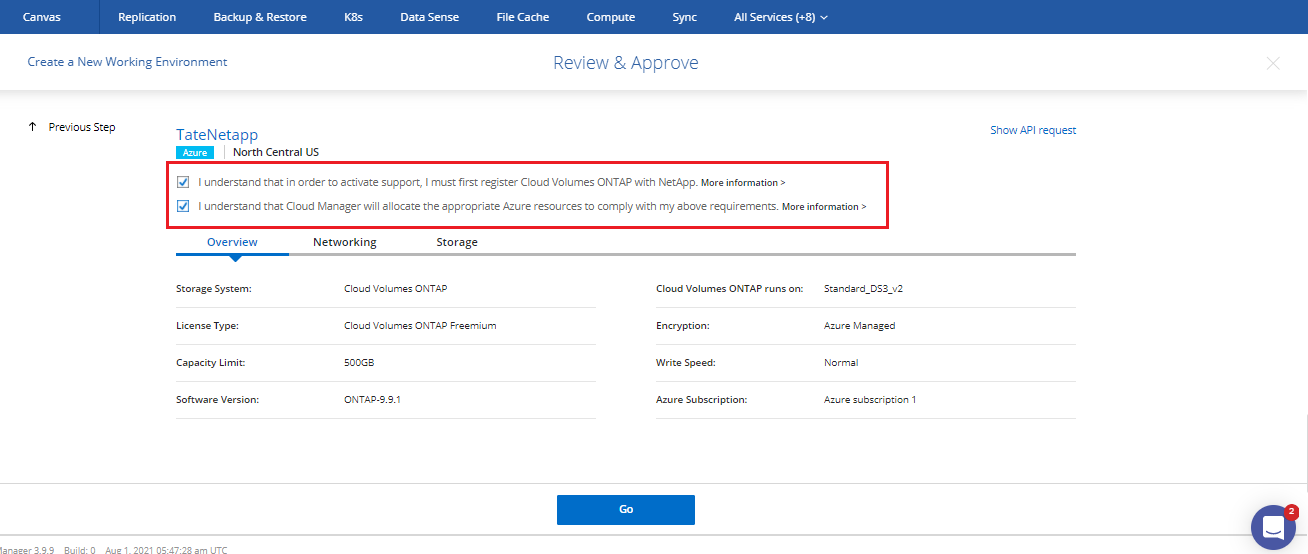
- Review all of your configuration settings for this deployment and check both boxes at the top. Click “Go”. This will start the Cloud Volumes ONTAP deployment:
You will see the screen below as the deployment starts. The entire process should take about 20 minutes.
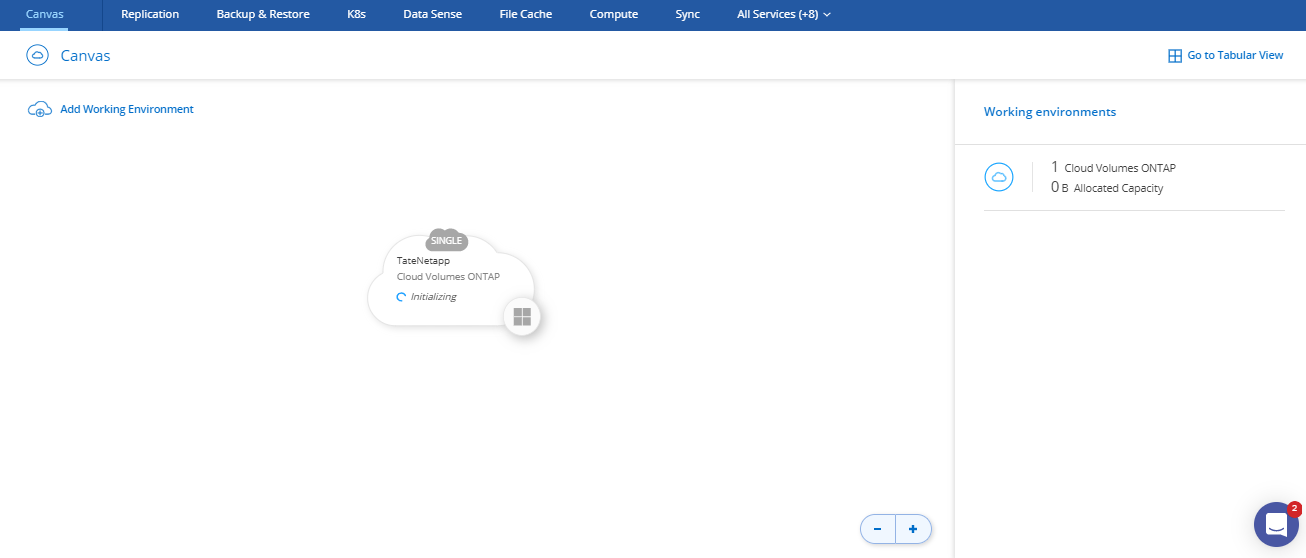
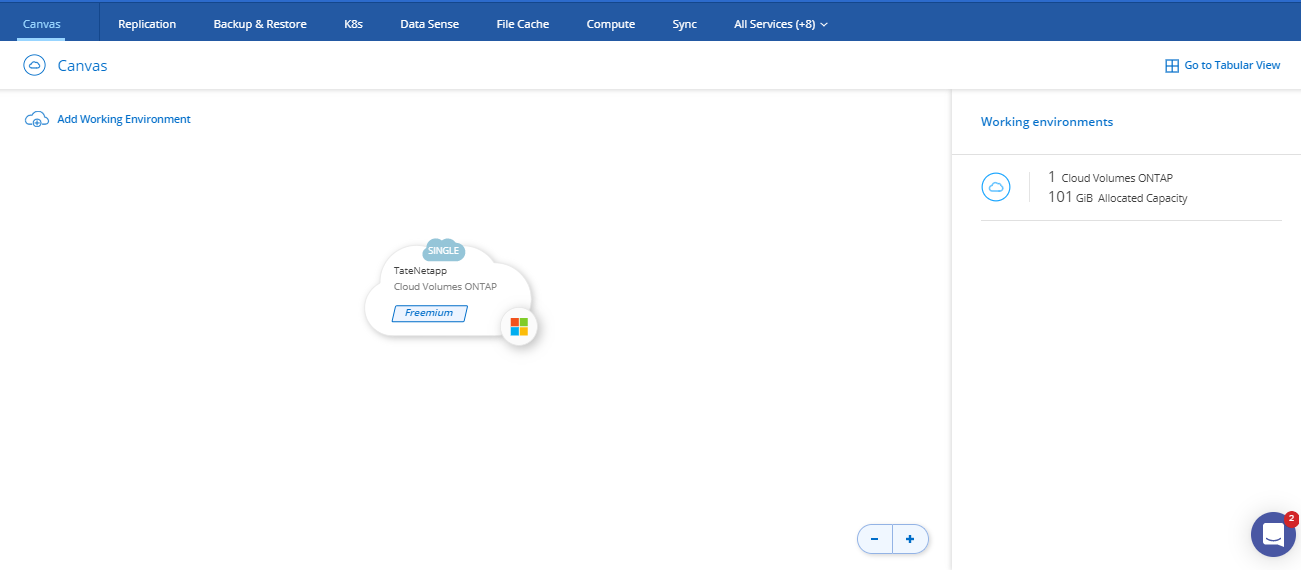
- One the deployment is completed you will be able to see the Cloud Volumes ONTAP instance on the Cloud Manager Canvas page. Click on it to start managing your Cloud Volumes ONTAP server in the Azure Cloud:
Conclusion
Now that you have completed the setup process, you can go ahead and start using Cloud Volumes ONTAP and enjoy the benefits of NetApp’s enterprise class data management features in Azure.
