Share
Introduction
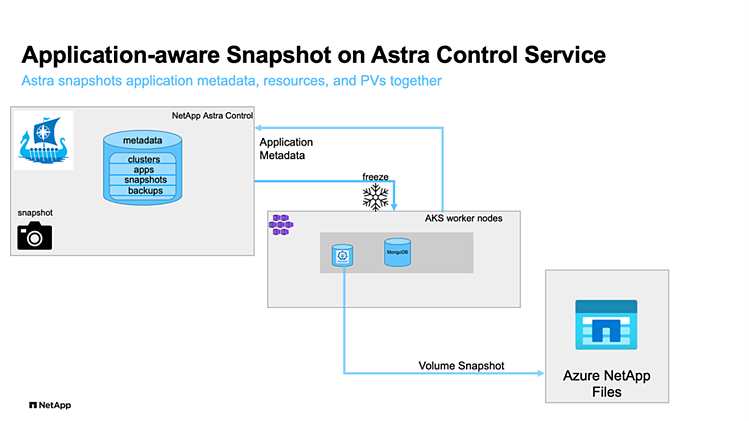
NetApp Astra Control is a solution that makes it easier to manage, protect, and move data-rich Kubernetes workloads within and across public clouds and on-premises. Astra Control provides persistent container storage that leverages NetApp’s proven and expansive storage portfolio in the public cloud and on premises. It also offers a rich set of advanced application-aware data management functionality (like snapshot and revert, backup and restore, activity logs, and active cloning) for local data protection, disaster recovery, data audit, and mobility use cases for your modern apps. Astra Control provides complete protection of stateful Kubernetes applications by saving both data and metadata, like deployments, config maps, services, secrets, that constitute an application in Kubernetes. Astra Control can be managed via its user interface, accessed by any web browser, or via its powerful REST API.
For a set of validated applications (MySQL, MariaDB, PostgreSQL, and Jenkins), Astra Control Service already includes the necessary hooks to guarantee application consistent snapshots and backups. The update of Astra Control in December 2021 allows us to add custom scripts to be executed before and after taking snapshots of applications managed by Astra Control. With Owner, Admin, or Member permissions in ACS, we can define custom execution hooks for non-validated applications. A few templates for execution hook scripts can be found in the ACS documentation.
Astra Control has two variants:
- Astra Control Service (ACS) – A fully managed application-aware data management service that supports Azure Kubernetes Service (AKS), Azure Disk, and Azure NetApp Files® (ANF).
- Astra Control Center (ACC) – application-aware data management for on-premises Kubernetes clusters, delivered as a customer-managed Kubernetes application from NetApp.
Scenario
In this article we will use MongoDB to demonstrate the functionality of adding custom scripts to be executed before and after taking a snapshot of the database. The MongoDB documentation recommends to flush writes to disk and lock the database to prevent further writes (using the db.fsyncLock(); method) before taking a snapshot and unlock the database (db.fsyncUnlock();) after the snapshot completes.
Based on the templates for custom execution hooks in the ACS documentation, we write a simple script to lock and unlock the MongoDB database, add the script as pre- and post-snapshot execution hooks to ACS, and test its functionality.
Preparation
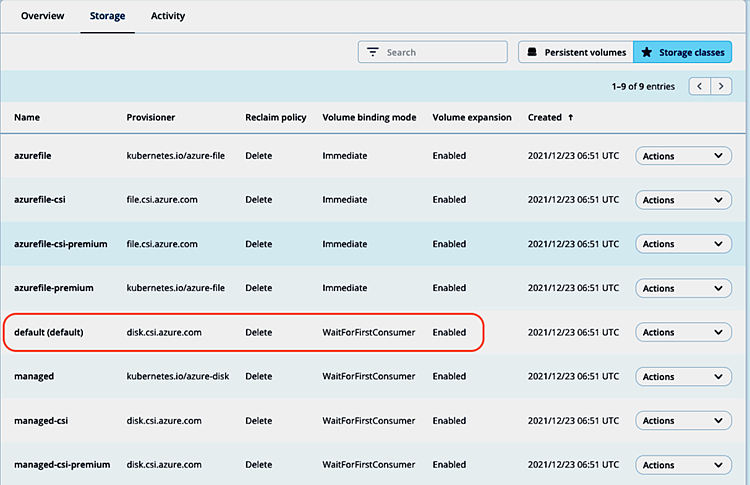
First, we register an AKS cluster demo-aks-pu to our Astra Control Service account and set the default storage class (provisioner disk.csi.azure.com) as default storage class:
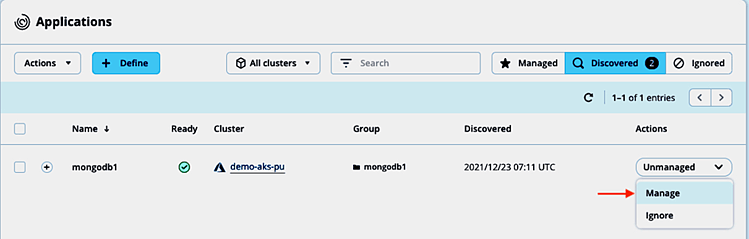
Next, install a MongoDB instance in namespace mongodb1 via helm chart:
~ # helm install mongodb1 bitnami/mongodb --namespace mongodb1 --create-namespace
NAME: mongodb1
LAST DEPLOYED: Thu Dec 23 07:10:14 2021
NAMESPACE: mongodb1
STATUS: deployed
REVISION: 1
TEST SUITE: None
NOTES:
** Please be patient while the chart is being deployed **

MongoDB(R) can be accessed on the following DNS name(s) and ports from within your cluster:

    mongodb1.mongodb1.svc.cluster.local

To get the root password run:

    export MONGODB_ROOT_PASSWORD=$(kubectl get secret --namespace mongodb1 mongodb1 -o jsonpath="{.data.mongodb-root-password}" | base64 --decode)

To connect to your database, create a MongoDB(R) client container:

    kubectl run --namespace mongodb1 mongodb1-client --rm --tty -i --restart='Never' --env="MONGODB_ROOT_PASSWORD=$MONGODB_ROOT_PASSWORD" --image docker.io/bitnami/mongodb:4.4.6-debian-10-r29 --command -- bash

Then, run the following command:
    mongo admin --host "mongodb1" --authenticationDatabase admin -u root -p $MONGODB_ROOT_PASSWORD

To connect to your database from outside the cluster execute the following commands:

    kubectl port-forward --namespace mongodb1 svc/mongodb1 27017:27017 &
    mongo --host 127.0.0.1 --authenticationDatabase admin -p $MONGODB_ROOT_PASSWORD
~ # kubectl -n mongodb1 get all,pvc,volumesnapshots
NAME                            READY   STATUS    RESTARTS   AGE
pod/mongodb1-78bcbbd476-7zsbq   1/1     Running   0          15m

NAME               TYPE        CLUSTER-IP    EXTERNAL-IP   PORT(S)     AGE
service/mongodb1   ClusterIP   10.0.56.133   <none>        27017/TCP   15m

NAME                       READY   UP-TO-DATE   AVAILABLE   AGE
deployment.apps/mongodb1   1/1     1            1           15m

NAME                                  DESIRED   CURRENT   READY   AGE
replicaset.apps/mongodb1-78bcbbd476   1         1         1       15m

NAME                             STATUS   VOLUME                                     CAPACITY   ACCESS MODES   STORAGECLASS   AGE
persistentvolumeclaim/mongodb1   Bound    pvc-a194c2c9-4f05-45bf-8c47-0209d36be71a   8Gi        RWO            default        15m
and manage the discovered application with ACS:
Based on the execution hooks framework examples in the ACS documentation and the snapshot procedure in the MongoDB manual, the below script with arguments pre or post can be used both for a pre- and post-snapshot hook for MongoDB:
# ~ cat hooks_mongodb.sh
#!/bin/sh
#
# hooks_mongodb.sh
#
# Pre and post execution hooks for MongoDB (non-sharded)
#
# args: [pre|post]

#
# Writes the given message to standard output
#
# $* - The message to write
#
msg() {
    echo "$*"
}
#
# Writes the given information message to standard output
#
# $* - The message to write
#
info() {
    msg "INFO: $*"
}
#
# Writes the given error message to standard error
#
# $* - The message to write
#
error() {
    msg "ERROR: $*" 1>&2
}

set_defaults(){
  ebase=100
  eusage=$((ebase+1))
  epre=$((ebase+2))
  epost=$((ebase+3))
}

check_input(){
  if [ $# -ne 1 ]
  then
    error "$0: Usage: $0 [pre|post]"
    exit ${eusage}
  fi

  export ACTION=$1

  if [[ $ACTION != "post" && $ACTION != "pre" ]]; then
    error "$0: Usage: $0 [pre|post]"
    exit ${eusage}
  fi
}
#
# Run prehook steps here
#
prehook() {
    mongo --eval 'printjson(db.fsyncLock())' --authenticationDatabase admin -u root  -p $MONGODB_ROOT_PASSWORD
    return 0
}
#
# Run posthook steps here
#
posthook() {
    mongo --eval 'printjson(db.fsyncUnlock())' --authenticationDatabase admin -u root  -p $MONGODB_ROOT_PASSWORD
    return 0
}
#
# main
#
check_input $@

if [ "${ACTION}" = "pre" ]; then
    prehook
    rc=$?
    if [ ${rc} -ne 0 ]; then
        error "Error during prehook"
    fi
fi

if [ "${ACTION}" = "post" ]; then
    posthook
    rc=$?
    if [ ${rc} -ne 0 ]; then
        error "Error during posthook"
    fi
fi

exit ${rc}
Store the script on your local system, we’ll upload it to ACS later.
Adding custom execution hooks to MongoDB app
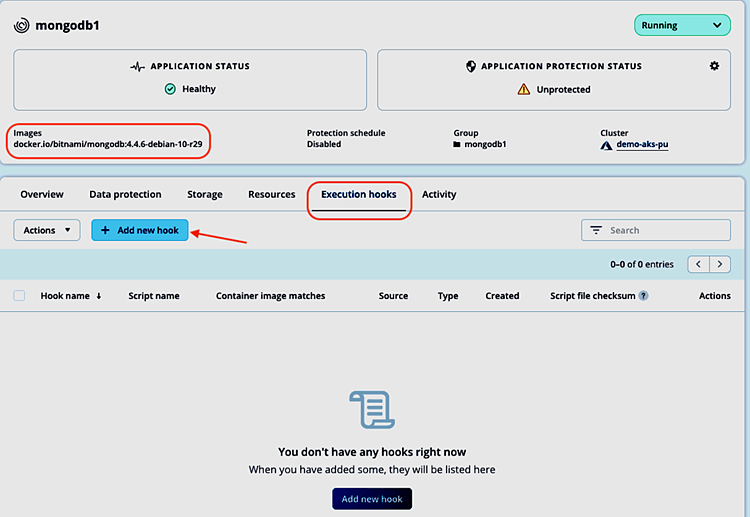
Going to Applications and selecting the mongodb1 app, we can manage its execution hooks settings in the Execution hooks tab. As a non-validated app, there are no execution hooks provided by NetApp for MongoDB. Take a note of the container images displayed and click Add new hook:
Now we can enter the details for the respective custom execution hooks.
Pre-snapshot custom hook
To use the hooks_mongodb.sh script as pre-snapshot hook, we fill in the Add execution hook form accordingly:
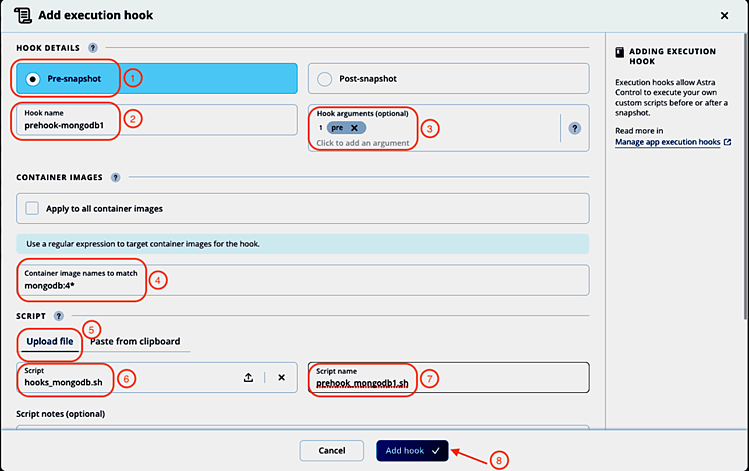
- Select Pre-snapshot.
- Give the hook a name: prehook-mongodb1. Note: The hook name must be unique across all hooks and managed applications.
- Enter pre as argument to be passed to the hook script. Hit Enter after entering the argument to record it.
- Enter the container image name scheme for the mongodb container in the Container image names to match field. We can use regular expressions to describe the matching images (like mongodb:4* in our case).
- Select the Upload file option to upload the hooks_mongodb.sh script and upload it.
- The name of the uploaded script is displayed.
- Change the suggested script name to prehook_mongodb1.sh Note: This script name must be unique across all managed apps and hooks.
- Click Add hook.
The pre-snapshot hook will be added and enabled automatically. In the Execution hooks tab, we can check that the pre-snapshot hook will be applied to the correct container image and start adding the post-snapshot hook by selecting Add hook one more time:

Post-snapshot custom hook
To use the same hooks_mongodb.sh script as post-snapshot hook, we fill in the Add execution hook form again, this time with post as hook argument:
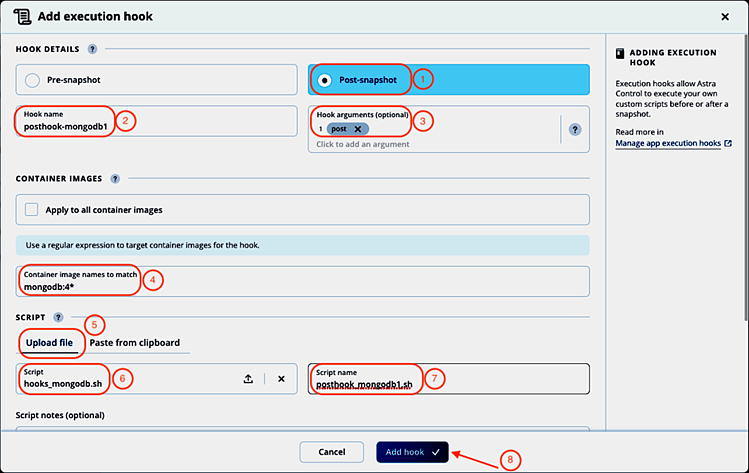
- Select Post-snapshot.
- Give the hook a name: posthook-mongodb1. Note: The hook name must be unique across all hooks and managed applications.
- Enter post as argument to be passed to the hook script. Hit Enter after entering the argument to record it.
- Enter the container image name scheme for the mongodb container in the Container image names to match field. We can use regular expressions to describe the matching images (like mongodb:4* in our case).
- Select the Upload file option to upload the hooks_mongodb.sh script and upload it.
- The name of the uploaded script is displayed.
- Change the suggested script name to posthook_mongodb1.sh Note: This script name must be unique across all managed apps and hooks.
- Click Add hook.
We’re taken back to the Execution hooks tab and can check again for container image matches and that both hooks are enabled:

Changing configured execution hooks
In the Execution hooks tab, each hook can be disabled or deleted (ensure to not accidentally leave a database in locked state after taking a snapshot by only disabling or deleting the post-snapshot hook).
If we want to make changes to one of the newly added hooks, we can select Edit in the actions column for the hook we want to change. In the Edit hook details screen, we could change the hook details, edit the script directly or upload a new version:
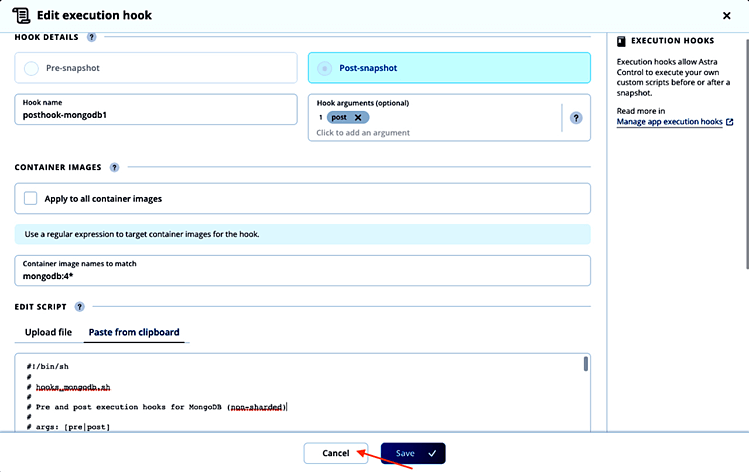
As we don’t want to modify the execution hook, we click Cancel.
Note: For validated apps, one can only disable (not recommended) the execution hooks provided by NetApp, but not modify or delete them. Custom execution hooks can be added to even validated apps, but the ones provided by NetApp will be executed first if both are enabled.
Create a snapshot with custom execution hooks
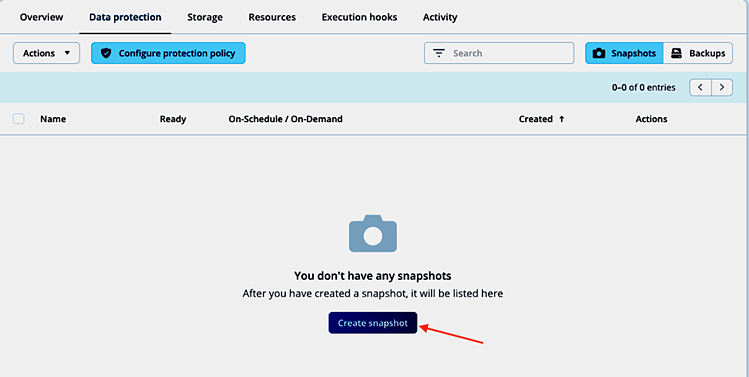
With the custom pre- and post-snapshot execution hooks for MongoDB enabled in ACS, we can now test their functionality. To create a snapshot, we follow the normal snapshot creation workflow in ACS. In the Data protection tab of the application view, we start the snapshot creation:
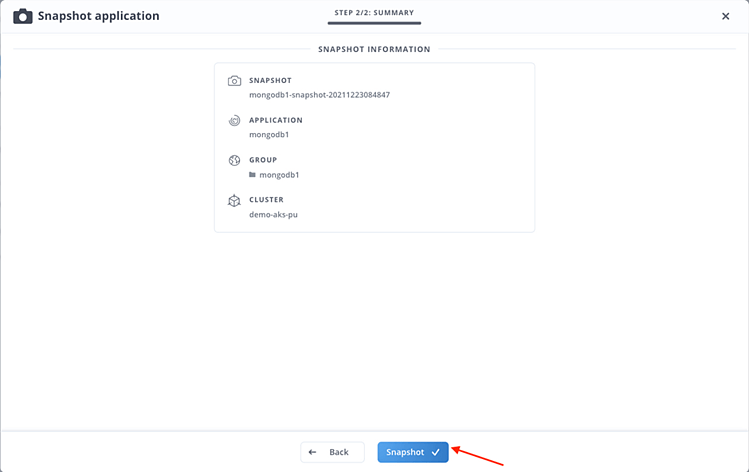
Accept the suggested snapshot name and click Snapshot in the summary view:
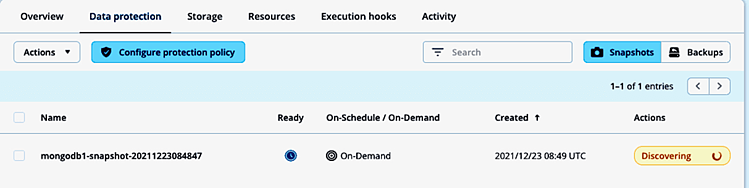
The snapshot process starts immediately:
Checking the logs of the mongodb container, we can confirm that the database writes were flushed, and the database locked (line #6):
~ # kubectl -n mongodb1 logs pod/mongodb1-78bcbbd476-7zsbq
…
{"t":{"$date":"2021-12-23T08:49:12.757+00:00"},"s":"I",  "c":"ACCESS",   "id":20250,   "ctx":"conn1178","msg":"Authentication succeeded","attr":{"mechanism":"SCRAM-SHA-256","speculative":true,"principalName":"root","authenticationDatabase":"admin","remote":"127.0.0.1:52782","extraInfo":{}}}
{"t":{"$date":"2021-12-23T08:49:12.761+00:00"},"s":"I",  "c":"COMMAND",  "id":20461,   "ctx":"conn1178","msg":"CMD fsync","attr":{"lock":true}}
{"t":{"$date":"2021-12-23T08:49:12.762+00:00"},"s":"I",  "c":"STORAGE",  "id":22430,   "ctx":"fsyncLockWorker","msg":"WiredTiger message","attr":{"message":"[1640249352:762423][1:0x7ff713bcb700], WT_SESSION.checkpoint: [WT_VERB_CHECKPOINT_PROGRESS] saving checkpoint snapshot min: 102, snapshot max: 102 snapshot count: 0, oldest timestamp: (0, 0) , meta checkpoint timestamp: (0, 0)"}}
{"t":{"$date":"2021-12-23T08:49:12.797+00:00"},"s":"W",  "c":"COMMAND",  "id":20471,   "ctx":"fsyncLockWorker","msg":"WARNING: instance is locked, blocking all writes. The fsync command has finished execution, remember to unlock the instance using fsyncUnlock()."}
{"t":{"$date":"2021-12-23T08:49:12.797+00:00"},"s":"I",  "c":"COMMAND",  "id":20462,   "ctx":"conn1178","msg":"mongod is locked and no writes are allowed","attr":{"lockCount":1,"seeAlso":"http://dochub.mongodb.org/core/fsynccommand"}}
And after a few seconds, once the snapshot is taken, the post-snapshot execution hook unlocks the database again (line #5):
 ~ # kubectl -n mongodb1 logs pod/mongodb1-78bcbbd476-7zsbq
…
{"t":{"$date":"2021-12-23T08:49:27.289+00:00"},"s":"I",  "c":"ACCESS",   "id":20250,   "ctx":"conn1181","msg":"Authentication succeeded","attr":{"mechanism":"SCRAM-SHA-256","speculative":true,"principalName":"root","authenticationDatabase":"admin","remote":"127.0.0.1:52882","extraInfo":{}}}
{"t":{"$date":"2021-12-23T08:49:27.293+00:00"},"s":"I",  "c":"COMMAND",  "id":20465,   "ctx":"conn1181","msg":"command: unlock requested"}
{"t":{"$date":"2021-12-23T08:49:27.297+00:00"},"s":"I",  "c":"COMMAND",  "id":20466,   "ctx":"conn1181","msg":"fsyncUnlock complete","attr":{"lockCount":0}}
In the mongodb1 namespace, a volumesnapshot does exist now (line #18):
 ~ # kubectl -n mongodb1 get all,pvc,volumesnapshots
NAME                            READY   STATUS    RESTARTS   AGE
pod/mongodb1-78bcbbd476-7zsbq   1/1     Running   0          8h

NAME               TYPE        CLUSTER-IP    EXTERNAL-IP   PORT(S)     AGE
service/mongodb1   ClusterIP   10.0.56.133   <none>        27017/TCP   8h

NAME                       READY   UP-TO-DATE   AVAILABLE   AGE
deployment.apps/mongodb1   1/1     1            1           8h

NAME                                  DESIRED   CURRENT   READY   AGE
replicaset.apps/mongodb1-78bcbbd476   1         1         1       8h

NAME                             STATUS   VOLUME                                     CAPACITY   ACCESS MODES   STORAGECLASS   AGE
persistentvolumeclaim/mongodb1   Bound    pvc-a194c2c9-4f05-45bf-8c47-0209d36be71a   8Gi        RWO            default        8h

NAME                                                                                                                        READYTOUSE   SOURCEPVC   SOURCESNAPSHOTCONTENT   RESTORESIZE   SNAPSHOTCLASS                SNAPSHOTCONTENT                                    CREATIONTIME   AGE
volumesnapshot.snapshot.storage.k8s.io/pvc-a194c2c9-4f05-45bf-8c47-0209d36be71a-snap-b9ea400b-023e-4281-9776-4946b71e36ae   true         mongodb1                            8Gi           astra-netapp-azuredisk-vsc   snapcontent-30de0b0c-6705-430b-9287-24bf7c146e85   7h18m          7h18m
The ACS activity view shows details about the execution phase of the hooks during snapshot creation, like application and cluster name, snapshot name, hooks source, arguments passed to the hook, as well as container and image name:
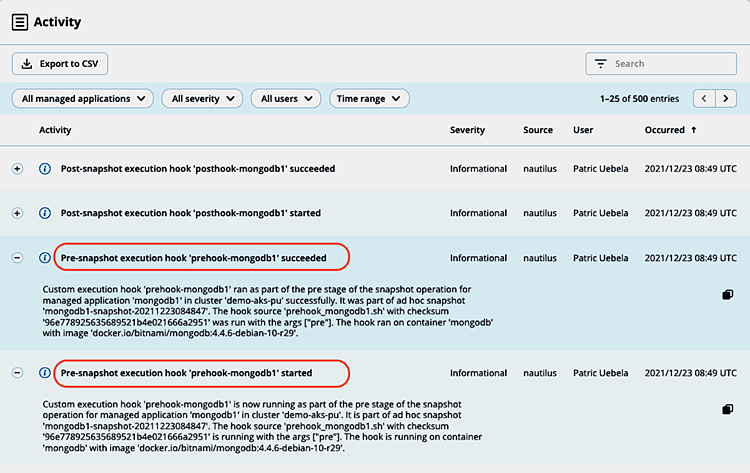
By copying the respective log details, we can also find out the execution time (3s) of the pre-snapshot hook by comparing the timestamps:
Custom execution hook 'prehook-mongodb1' is now running as part of the pre stage of the snapshot operation for managed application 'mongodb1' in cluster 'demo-aks-pu'. It is part of ad hoc snapshot 'mongodb1-snapshot-20211223084847'. The hook source 'prehook_mongodb1.sh' with checksum '96e778925635689521b4e021666a2951' is running with the args ["pre"]. The hook is running on container 'mongodb' with image 'docker.io/bitnami/mongodb:4.4.6-debian-10-r29'.

Timestamp: 2021-12-23T08:49:10.000Z
Custom execution hook 'prehook-mongodb1' ran as part of the pre stage of the snapshot operation for managed application 'mongodb1' in cluster 'demo-aks-pu' successfully. It was part of ad hoc snapshot 'mongodb1-snapshot-20211223084847'. The hook source 'prehook_mongodb1.sh' with checksum '96e778925635689521b4e021666a2951' was run with the args ["pre"]. The hook ran on container 'mongodb' with image 'docker.io/bitnami/mongodb:4.4.6-debian-10-r29'.
Timestamp: 2021-12-23T08:49:13.000Z
The same information can be found for the post-snapshot execution hook:
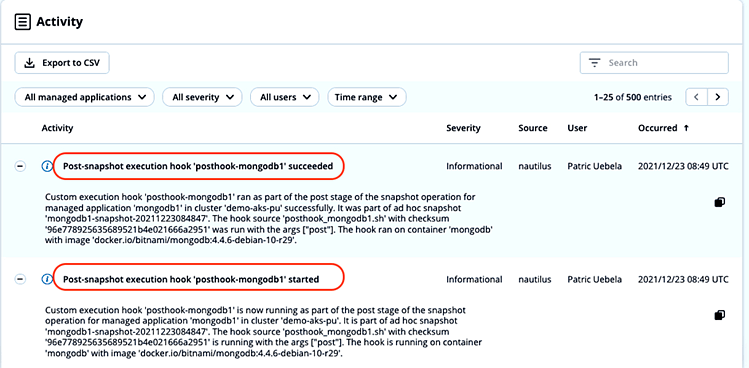
The run time of the post-snapshot hook is 4s:
Custom execution hook 'posthook-mongodb1' is now running as part of the post stage of the snapshot operation for managed application 'mongodb1' in cluster 'demo-aks-pu'. It is part of ad hoc snapshot 'mongodb1-snapshot-20211223084847'. The hook source 'posthook_mongodb1.sh' with checksum '96e778925635689521b4e021666a2951' is running with the args ["post"]. The hook is running on container 'mongodb' with image 'docker.io/bitnami/mongodb:4.4.6-debian-10-r29'.

Timestamp: 2021-12-23T08:49:24.000Z
Custom execution hook 'posthook-mongodb1' ran as part of the post stage of the snapshot operation for managed application 'mongodb1' in cluster 'demo-aks-pu' successfully. It was part of ad hoc snapshot 'mongodb1-snapshot-20211223084847'. The hook source 'posthook_mongodb1.sh' with checksum '96e778925635689521b4e021666a2951' was run with the args ["post"]. The hook ran on container 'mongodb' with image 'docker.io/bitnami/mongodb:4.4.6-debian-10-r29'.
Timestamp: 2021-12-23T08:49:28.000Z
Summary
Astra Control freezes application database transactions before taking a snapshot automatically for validated apps (MySQL, MariaDB, PostgreSQL, Jenkins).
In this article, we demonstrated how the newly added custom execution hooks feature enables you to take application consistent snapshots easily and quickly for custom and home-grown apps by creating custom pre- and post-snapshot hooks using MongoDB as an example.
Resources
Here are some helpful links: