Share
As a newcomer to the tooling market, “Actions” by GitHub quickly became a popular option to develop CI/CD workflows. GitHub was already one of the top code management platforms, thus these additional features were a natural segway to enable end-to-end capabilities throughout your CI/CD pipeline—from writing code to production release.
In this post we’ll introduce GitHub Actions runners and show you how to set up GitHub Actions using self-hosted AWS runners in your Cloud Volumes ONTAP deployment.
Use the links below to get started with the step-by-step walkthrough:
- How Do I Deploy an Action in GitHub? Creating a Basic Workflow
- Prepare and Configure an AWS EC2 GitHub Actions Runner
- Change the GitHub Actions Workflow to Use the Self-hosted Runner
- Create a New Cloud Volume for GitHub Actions
- Set Cloud Volumes ONTAP with AWS EC2 Instance
- Download a Test Dataset to the Cloud Volume
- Start the GitHub Actions Runner Agent
- Switch the GitHub Actions Workflow to Use the Volume Data
What Is a GitHub Actions Runner?
A GitHub Actions workflow is a collection of steps that define what should be done after a new code contribution or change is made. Naturally, those steps require an environment where they can be executed.
GitHub Actions Runners are the virtual machines or containers where that execution happens. These environments can be public (i.e., provided on-demand by GitHub) or self-hosted (i.e., provided by you). The GitHub runner agent software supports multiple operating systems: Linux, Mac OS, and Windows.
Can I Run GitHub Actions Locally?
A CI/CD workflow is not meant to be executed in a developer’s local environment. Since the workflow is triggered every time a new git commit happens, the workflow requires a computational environment that can either be span up on demand or kept always-on waiting for requests. However, there might be situations, especially during the creation of the CI/CD workflow, where it would be indeed useful to run Actions in a local environment.
The public GitHub runners are non-customizable standard environments that are deployed on demand. The alternative is to create and deploy a self-hosted runner. In a self-hosted runner, the agent software can be installed and configured in a machine you provide, such as a cloud server, container, or your local development environment.
The Benefits of Using Self-Hosted GitHub Actions Runners
The self-hosted runner capability is not specifically meant to gain the ability to execute GitHub Action workflows in your local machine. That is however, one of the multiple possibilities it enables. The other benefits of using self-hosted runners include:
- Full control: With self-hosted runners you have full control on the different aspects of the execution workflow: operating system, configuration, installed software, datasets, encryption, access control, physical location, security controls, network access, storage and hardware type.
- Additional flexibility: Using self-hosted runners gives a tremendous amount of flexibility and enables new types of use cases that public runners can’t fulfill. Note that when it comes to cloud-native development, there are a few GitHub Actions best practices that teams should follow.
- Access control: You can limit the exposure and usage of highly privileged accounts outside the cloud environment. As an example, teams can set an IAM user that only allows GitHub to deploy the AWS instance runner. Other needed permissions, such as the ability to access, deploy or create databases, queues and other resources, is only trusted to an IAM role that the AWS runner instance can assume.
- Storage and data persistence: The public runners don’t allow customization and thus, any software or datasets need to be installed and downloaded every time it’s triggered. This slows down the pipeline, makes the code more cumbersome, and limits reusability. With self-hosted runners, the environment can be stored and cloned as needed.
Cloud Volumes ONTAP, the NetApp data management solution, is particularly good at helping to increase reusability to your CI/CD environment, providing data protection capabilities, and enhanced storage performance. Its FlexClone® data cloning technology enables data volumes (e.g., those containing datasets for CI/CD automation) to be rapidly cloned. Cloud Volumes ONTAP’s hybrid and multicloud nature lets data be copied and moved across multiple environments such as on-premises, AWS, Google Cloud, and Microsoft Azure.
Next, we are going to show you how to create and deploy a self-hosted AWS GitHub runner with Cloud Volumes ONTAP.
Steps to Use Self-hosted GitHub Runners in AWS with Cloud Volumes ONTAP
1. How Do I Deploy an Action in GitHub? Creating a Basic Workflow
Deploying Actions in GitHub is a very straightforward process.
1.1. Choose any GitHub project you have created, either public or private, and navigate to the Actions tab. You will be greeted with an option to use one of the getting started examples.
1.2. Select the “set up this workflow” option to create a “Hello World” GitHub Actions workflow.
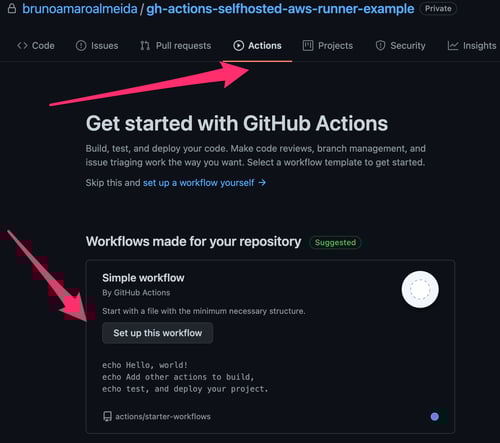 Actions Panel in a GitHub Project
An example pipeline code file will be generated. Before committing the file to your project repository and enabling the workflow, please note how the code is structured.
Written in YAML format, the code has a value runs-on that is currently defined as ubuntu-latest, which means that the workflow will run in a public GitHub runner with the Ubuntu OS.
1.3. Commit the example pipeline file to your project as is, without any changes. Note that there are few steps that are going to be executed. First, it will print out a simple “Hello, world!” text, and then two sentences that are defined in a multi-line script.
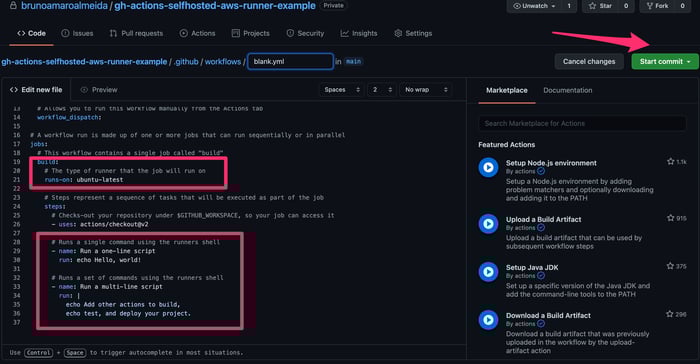 Basic Hello World GitHub Actions workflow example
2. Prepare and Configure an AWS EC2 GitHub Actions Runner
As you might have noticed, the first workflow execution happened in a public runner (as defined in the runs-on value.
2.1. To transform our workflow to use self-hosted runners, we start by creating and deploying a new AWS EC2 instance using the default settings. If needed, you can refer to these simple instructions on how to set up a new EC2 instance.
2.2. In the GitHub project settings, find the Actions section and select the option to add a self-hosted runner located at the end of the page.
2.3. Choose Linux as the runner operating system and copy the commands in the page.
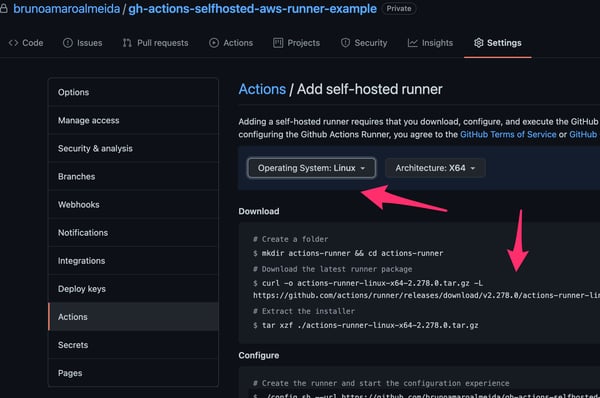 Adding a self-hosted runner in GitHub Actions settings
2.4. Start an interactive SSH session with the AWS EC2 instance you deployed.
2.5. Copy-paste the instructions from the GitHub self-hosted runner setting page into the instance terminal. When bootstrapping the GitHub Actions agent, use all default values for the option prompted, such as the name of the runner, tags, and work folder.
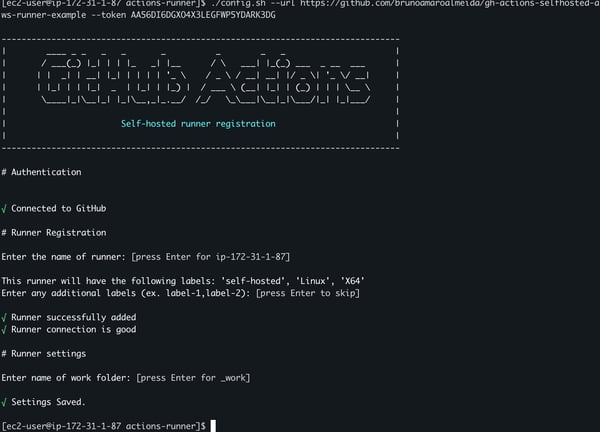 Bootstrapping GitHub Actions runner agent
2.6. Run the agent application in the EC2 instance.
2.7. Go to the GitHub settings page and verify that the self-hosted runner appears in the list and is idling.
 GitHub Actions Self-hosted Runners list
3. Change the GitHub Actions Workflow to Use the Self-hosted Runner
Our newly created self-hosted runner is active and running, however, the GitHub Actions workflow is still not going to take it into use. To enable that, edit the workflow file you created earlier and change the runs-on value to self-hosted.
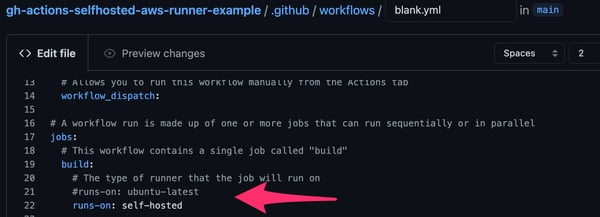 Changing workflow to self-hosted runner
3.1. After you commit the change to the file, the workflow will be executed again.
 GitHub Actions workflow execution
3.2. This time, the workflow is executed in the self-hosted runner. To validate that, look at the instance SSH session. A new line in the output of the agent, stating that the workflow job was successfully completed.
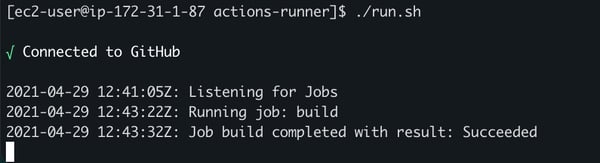 Self-hosted AWS Runner agent output
4. Create a New Cloud Volume for GitHub Actions
To take our self-hosted runner to the next level, we can leverage Cloud Volumes ONTAP.
As a prerequisite to this, you’ll need to connect NetApp Cloud Manager with your AWS Account. If you have done this in the past, you can proceed with creating the new cloud volume. Otherwise, please refer to these step-by-step instructions on provisioning Cloud Volumes ONTAP on AWS.
Make sure this prerequisite step is fully completed before moving forward. Once your AWS account is connected to Cloud Manager, you can create a new cloud volume for GitHub Actions.
4.1. Within NetApp Cloud Manager, add a new working environment and cloud volume. These following steps will focus on provisioning an iSCSI LUN from Cloud Volumes ONTAP to take it into use the EC2 GitHub Runner we set up previously.
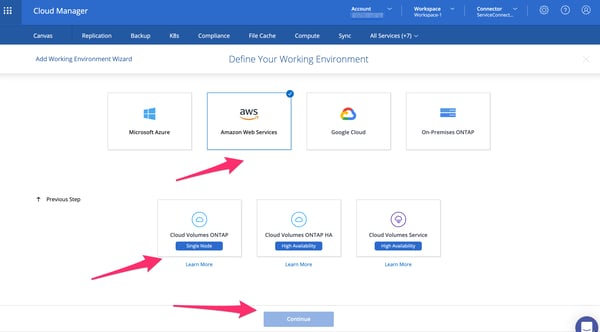 Creating a new environment and volume in NetApp Cloud Manager
4.2. Proceed through the next few Cloud Manager setup wizard steps, choosing the default settings until you reach the panel that asks you to input the volume details and protocol information.
4.3. Give the volume a random name and size.
4.4. In protocol, select iSCSI and Linux as the operating system type.
4.5. Use lvm_initator_group as the value for the new initiator group.
4.6. Under host initiator (IQN) use lvm_host as the alias with the value of the initiator name in your EC2 instance.
 Volume details and protocol panel
4.7. The initiator name value can be retrieved using the command cat /etc/iscsi/initiatorname.iscsi upon installing the initiator utils via yum install iscsi-initiator-utils -y
 Retrieve the iSCSI Initiator Name in EC2 GitHub Runner
4.8. In Cloud Manager, review and approve the new volume creation.
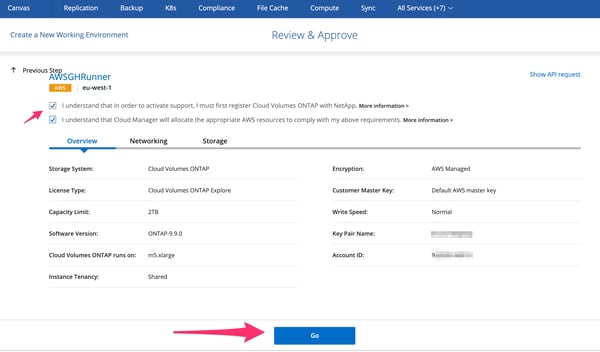 Review and Approve Panel in Cloud Manager
4.9. The creation process might take a few minutes if this is the first time you’re using it. There are a few background preparation tasks that NetApp Cloud Volumes ONTAP is doing in your AWS environment to make it operational.
4.10. Once ready, you will be able to enter the working environment.
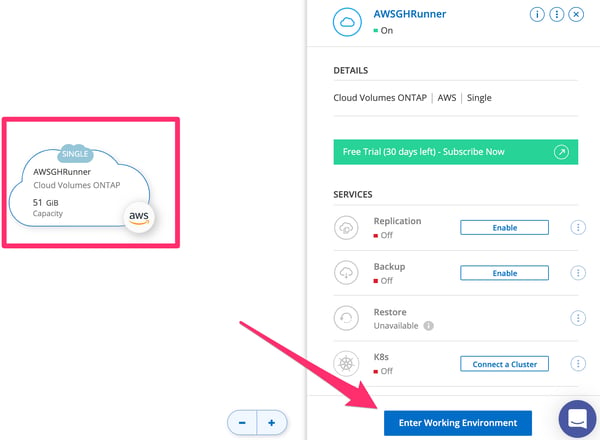 Cloud Volumes ONTAP Environment
4.11. Inside the ONTAP Environment, you can access the created volume and have the ability to change different configuration settings. Also, you can create and manage additional volumes.
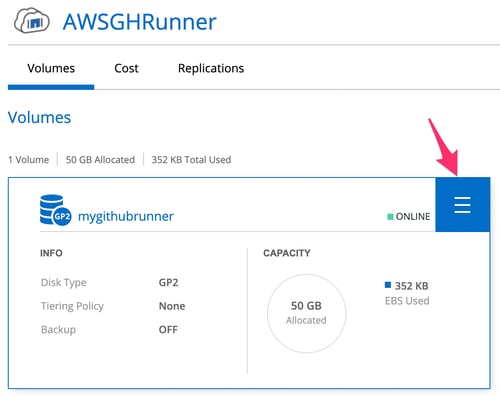 Volume Settings in the Newly Created ONTAP Environment
4.12. In the volume settings, select “Target IQN” to view its iSCSI target information.
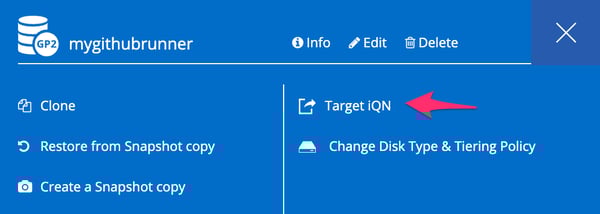 Volume settings menu
4.13. Take note of the target iQN information—it will be needed later to attach the volume to the EC2 instance.
4.14. Next, click the burger menu in the upper righthand corner of the screen and select “Information” from the drop down.
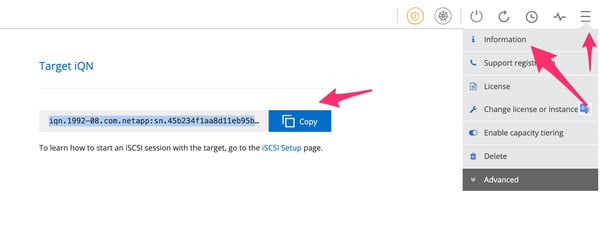 Volume Target IQN
4.15. The information panel will give fine-grained details about the volume and access IP addresses. Take note of the data (iscsi) value—it will also be required later to attach the volume to the EC2 instance.
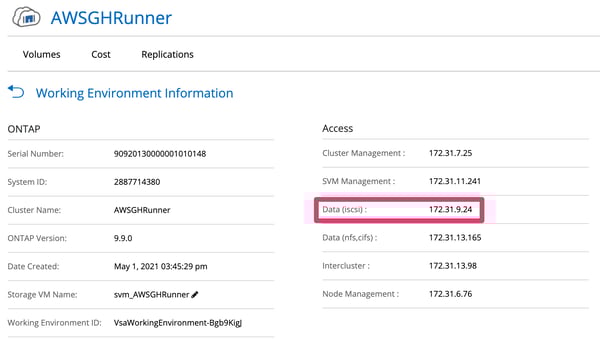 Volume information panel
5. Set Cloud Volumes ONTAP with AWS EC2 Instance
Now we will show you how to set up Cloud Volumes ONTAP with your EC2 instance.
5.1. With the target IQN and data (iscsi) values at hand, login into the AWS GitHub Runner instance deployed earlier.
5.2. Enable the iSCSI service to start automatically on boot, using the commands sudo systemctl enable iscsid and sudo systemctl start iscsid
 Enable iSCSI service
5.3. Next, use the iscsiadm tool to discover and connect to the Cloud Volume deployed earlier. Replace the IP address with the data (iscsi) value retrieved in Cloud Manager and verify that the output of the commands matches the target IQN value.
The following commands will automatically discover and connect the volumes: sudo iscsiadm --mode discovery --op update --type
sendtargets --portal 172.31.9.24
sudo iscsiadm --mode node -l all
sudo iscsiadm --mode session
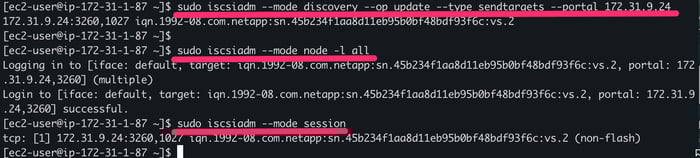 Discovery and Connection to Cloud Volumes ONTAP
5.4. Use the command sudo fdisk -l to verify that the new volume is now present in the Linux system as /dev/sdb.
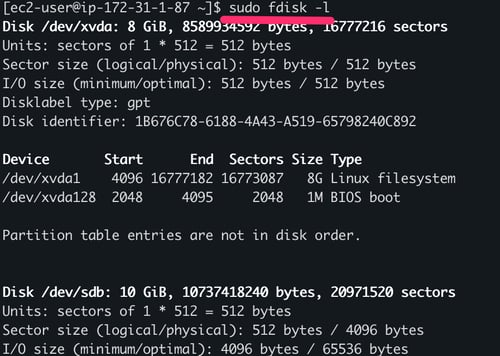 Listing all present disks
5.5. Take the new volume into use by formatting using sudo mkfs.ext4 /dev/sdb and mounting as the working directory for the Actions Runner agent with the command: sudo mount /dev/sdb ~/actions-runner/_work/
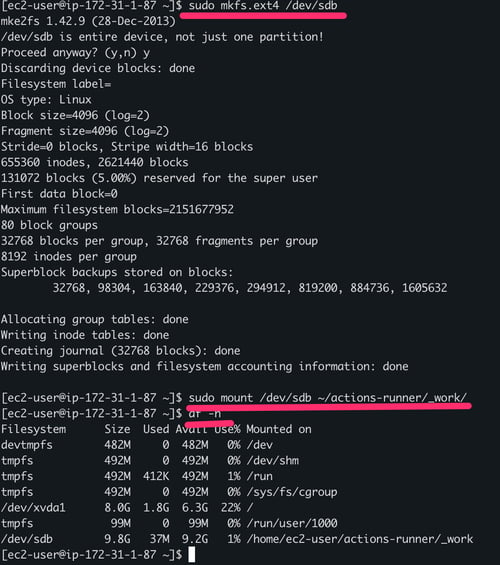 Formatting and Mounting the Cloud Volume
5.6. Change the permissions to enable the local user account to use the volume with the following command: sudo chown -R ec2-user:ec2-user actions-runner/_work/
 Changing the folder permissions
6. Download a Test Dataset to the Cloud Volume
One key advantage of using cloud volumes is that we can store datasets to be used in our CI/CD workflow.
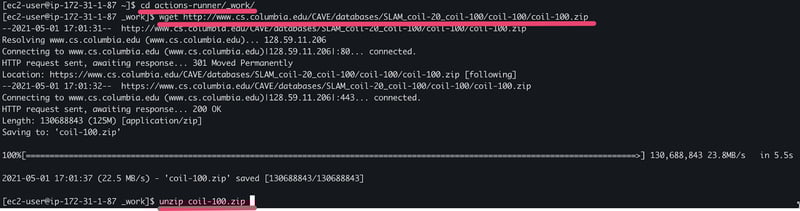
6.1. Download an image collection dataset—in this example we’ll use the Columbia University Image Library(COIL-100), a public dataset for computer vision research—to be able to perform tasks such as conversions, test automation, and data preparation using our GitHub Actions workflow.
6.2. The following steps will download and extract the COIL-100 dataset in our cloud volume working directory: cd actions-runner/_work/
wget http://www.cs.columbia.edu/CAVE/databases/SLAM_coil-
20_coil-100/coil-100/coil-100.zip
unzip coil-100.zip
 Downloading the COIL-100 Image dataset
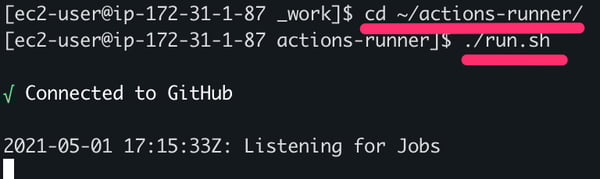
7.Start the GitHub Actions Runner Agent
With the dataset in the runner working directory, we can now start the GitHub Actions runner by going to the agent directory cd ~/actions-runner/ using the command ./run.sh
 Starting the Runner agent
8. Switch the GitHub Actions Workflow to Use the Volume Data
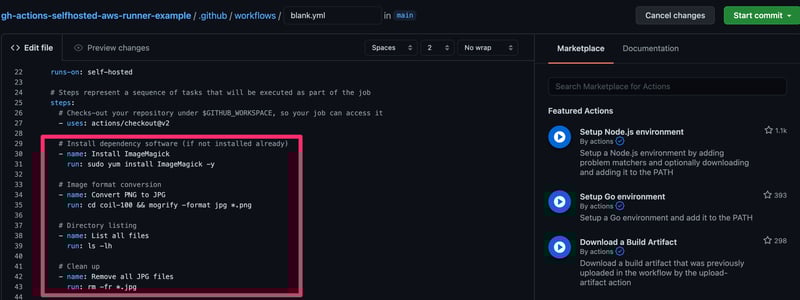
We can now change the steps of the “Hello World” GitHub Actions workflow, that was already pointing to the self-hosted runner, to something more challenging that can make use of the image dataset that we have stored in the Cloud Volume. The next commands should be used in the GitHub Actions workflow YAML code file.
8.1. First, we make sure the ImageMagick software is installed using the command yum install ImageMagick -y
8.2. Convert all images from the PNG to the JPG format using the following command: cd ~/actions-runner/_work/coil-100 && mogrify -format jpg *.png
8.3. Finish by listing the directory content and cleaning up using the commands: cd ~/actions-runner/_work/coil-100 && ls -lh
cd ~/actions-runner/_work/coil-100 && rm -fr *.jpg
See below the image for reference on how the different commands are mapped into independent steps.
 New GitHub Actions Workflow
The new steps are executed upon commit of the new workflow file. The output can be verified in GitHub Actions.
All steps are successfully completed and the format conversion of all images in the Cloud Volume happens automatically.
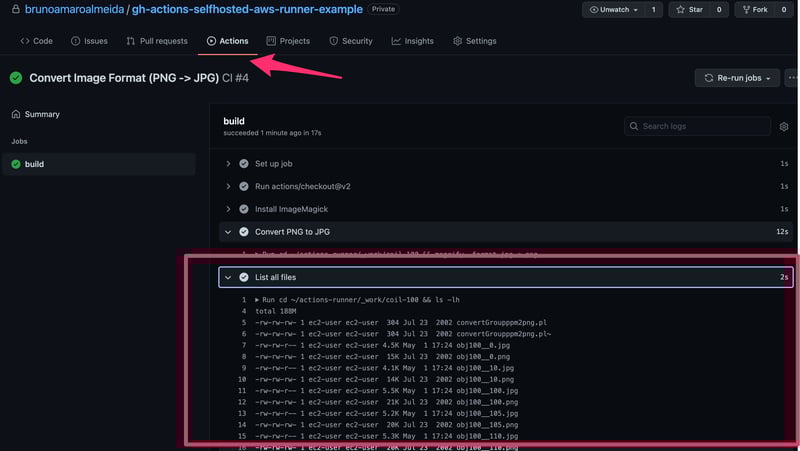 GitHub Actions workflow execution output
Conclusion
Using self-hosted runners in GitHub is a staple cloud automation best practice to follow. Not only will it increase security and give you the ability to control infrastructure as code, you’ll also be able to unlock new opportunities and benefits.
Cloud Volumes ONTAP is a great match to GitHub Actions Runners. As we saw in this step-by-step guide, it can be enabled easily in an existing setup without disrupting the existing workflow.
With the simple introduction of Cloud Volumes ONTAP, the self-hosted runner data can now be made available across different cloud environments, benefit from high availability, cost-cutting storage efficiencies, data protection and many other enterprise grade features that make Cloud Volumes ONTAP a popular choice among DevOps teams.
Read here to learn more about the Cloud Volumes ONTAP benefits for CI/CD.

