Share
It didn't take long for container orchestration tools like Kubernetes to make their jump into the cloud, and this has created a new demand for dynamic persistent storage solutions. With this in mind, NetApp designed Astra Trident as the dynamic provisioner for containerized applications to consume persistent storage on-demand from container orchestration platforms such as Kubernetes on AWS and other providers, OpenShift, Docker EE, and Rancher.
In this article we are going to show you how to deploy Trident into an AWS Elastic Kubernetes cluster so that you can make your Cloud Volumes ONTAP for AWS storage backend available for persistent storage consumption on-demand.
Use the links below to jump down to the sections on:
- Elastic Kubernetes Service (EKS) at a Glance
- The NetApp Components: Trident and Cloud Volumes ONTAP
- Setting Up Trident with EKS to Use Cloud Volumes ONTAP as Persistent Storage
- Conclusion
Elastic Kubernetes Service (EKS) at a Glance
For those of you new to this cloud-based service, AWS offers EKS as a managed Kubernetes-compliant service. By “Kubernetes-compliant” AWS means that any application running on pure Kubernetes is compatible with EKS; by “managed” what AWS means is that the Kubernetes control plane nodes’ health and availability are handled and taken care of by AWS. The AWS high availability is made possible by distributing the nodes across three different Availability Zones and by automatically deploying new nodes if an unhealthy one is detected. EKS also gives users the ability to integrate EKS with all the rest of the services AWS offers.
Starting an EKS Cluster
AWS provides three different options to deploy an EKS cluster with nodes:
- eksctl
- AWS Management Console
- AWS CLI
You can review the AWS Creating an Amazon EKS Cluster guide for more details. NetApp also provides a guide on how to create an EKS cluster.
The NetApp Components: Trident and Cloud Volumes ONTAP
In this scenario, there are two components that NetApp uses to help deploy persistent Kubernetes storage for your EKS deployment: Trident and Cloud Volumes ONTAP.
Trident, a NetApp open-source project, is a CSI- (Container Storage Interface) compliant plug-in for Kubernetes. Kubernetes CSI is the interface through which storage providers can plug in their storage systems to Kubernetes pods a lot easier and without having to submit those plug-ins to the main Kubernetes project source code.
With Trident, NetApp is able to serve the dynamic persistent storage demands presented by container orchestration platforms such as Kubernetes or OpenShift. Using Trident, Cloud Volumes ONTAP serves persistent volume claims (PVCs) coming from your containerized applications quickly and dynamically, with storage from AWS, Azure, or Google Cloud.
Cloud Volumes ONTAP is a software-defined storage system that delivers advanced data management for file and block workloads. With Cloud Volumes ONTAP, you can optimize your cloud storage costs and increase application performance while enhancing data protection, security, and flexibility.
Setting Up Trident with EKS to Use Cloud Volumes ONTAP as Persistent Storage
Prerequisites
We are going to start by installing Trident. Trident has two different options to choose from for deployment:
- With Trident Operator
- With tridentctl
You can review both methods on NetApp's Trident page and compare the options. This same page also enumerates a few general prerequisites before proceeding with the Trident install. We are going through those prerequisites below, but make sure to take a look yourself as well.
The install method that uses tridentctl is for Linux or OSX users. Tridentctl is a command line tool for managing Trident resources. Note: If you are using Windows, tridentctl won't work since its binaries weren’t built for Windows OS. Trident allows installation from Windows by using Helm. Check out the link above for more details.
The next few installation steps are going to follow the first option: Trident Operator using Helm. Confirm the following general prerequisites before proceeding with the Trident installation:
- You have Kubernetes version 1.17 or later
- A working Cloud Volumes ONTAP instance. To set up Cloud Volumes ONTAP for the first time, follow these steps.
- A working EKS cluster with NFS utilities installed on the worker nodes. If you plan to use iSCSI volumes, you can review some considerations you need before installation here.
- Network connectivity to both Cloud Volumes ONTAP and EKS.
- The Linux host has kubectl installed on it. If not, you can follow this link on how to install it.
- Check if you have admin privileges to the EKS cluster by running the command below:
kubectl auth can-i '*' '*' --all-namespacesIf for any reason you don’t have admin access to the EKS Cluster you can follow this guide on how to add users or roles to Kubernetes RBAC.
- Admin access to your Cloud Volumes ONTAP in AWS cluster
Installing Trident with Helm
- If you don’t have Helm already, download Helm here and install it in the client machine that is going to be managing the EKS cluster. There are a few install options depending on the OS of your client machine. We used a script to install it on a Linux AMI:
$ curl -fsSL -o get_helm.sh https://raw.githubusercontent.com/helm/helm/main/scripts/get-helm-3
$ chmod 700 get_helm.sh
$ ./get_helm.sh

- With Helm installed, it’s time to install the Trident Operator into the EKS cluster. As previously mentioned, in this article, we will use the Trident Operator method using Helm to install it.
This method will install Trident with default specs. However, you can opt to manually install the Trident Operator if you want to use customized parameters (such as kubeletDir, namespace, debug, etc.) for your Trident installation.
Read more about customization parameters here.
- Add Trident’s Helm repository locally by running the following command:
helm repo add netapp-trident https://netapp.github.io/trident-helm-chart
- You can run the helm search repo command to verify the Trident chart version:

- Once the repository has been added, we are ready to deploy Trident using the helm install command:
helm install cvotrident netapp-trident/trident-operator --version 22.04.0 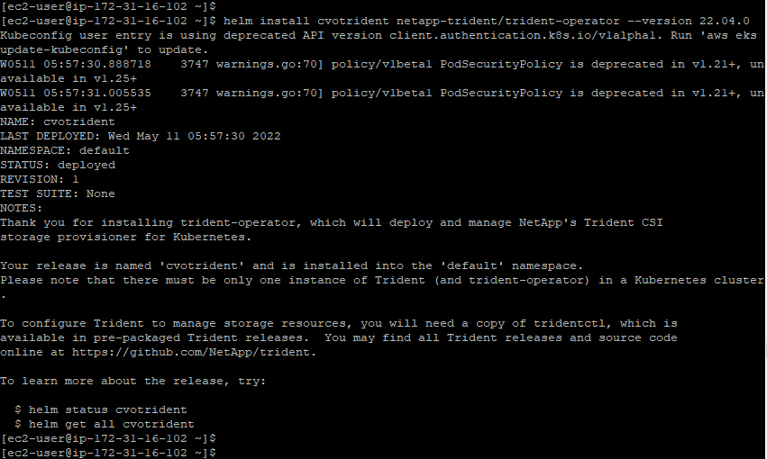
- You can verify the status of the Trident Operator deployment by running the helm list command:

- Running the kubectl get pods command will also show the Trident pods running in the cluster:

Creating a Storage Backend Config File for Trident
With Trident now installed into the EKS cluster our task now consists of creating a storage backend configuration file for Trident to use.
The storage backend depends on the relationship defined between Trident and the storage layer, which in this case will be Cloud Volumes ONTAP for AWS. This is handled by a backend config file which dictates how Trident communicates to the storage system in order to provision storage.
- As a quick step before creating the storage backend config file, we need to create a Kubernetes Secret This file is going to contain the access credentials Trident needs to access the storage system.
You can read more specific information about what Kubernetes Secrets are and how to create them on the Kubernetes project’s official website. In our case we chose the opaque Secret type. The Secrets .yaml file information used in this example was this one below:
---
apiVersion: v1
kind: Secret
metadata:
  name: EKSBackend
stringData:
  password: your_password
  username: your_username
type: Opaque- Next, apply the file to the Kubernetes control plane with the command kubectl apply -f file-path/your_secrets__file.yaml in order to create the Secrets Kubernetes object:

- With the Secrets file already uploaded, we can now move forward to creating the TridentBackendConfig file. As mentioned in the previous step, this is the storage backend configuration file that allows Trident to talk to your Cloud Volumes ONTAP cluster. It's also this file that references the Secrets object created in the previous step.
It's worth mentioning a couple of things about the TridentBackendConfig file. This is the file's general format:
apiVersion: trident.netapp.io/v1
kind: TridentBackendConfig
metadata:
   name: backend-tbc-ontap-san
spec:
   version: 1
   backendName: ontap-san-backend
   storageDriverName: ontap-san
   managementLIF: 10.0.0.1
   dataLIF: 10.0.0.2
   svm: trident_svm
   credentials:
  name: backend-tbc-ontap-san-secret
As you can see, the spec section contains all the information about the ONTAP storage system. It is in this section that we are going to enter our Cloud Volumes ONTAP cluster details and it is here too that you reference the Secrets file name created above.
- Make sure to check the specific spec parameters that adjust to your Cloud Volumes ONTAP environment in order to pass them down to the backend config file. In our case we went with an ontap-nas driver. Below you can see the .yaml file we used in our example:
---
apiVersion: trident.netapp.io/v1
kind: TridentBackendConfig
metadata:
  name: Cloud Volumes ONTAP-aws-backend
spec:
   autoExportCIDRs:
      - 192.168.0.0/16
   autoExportPolicy: true
   backendName: your_Cloud Volumes ONTAP_cluster_name
   credentials:
     name: eksbackend
   dataLIF: "192.168.132.95"
   managementLIF: "192.168.132.187"
   storageDriverName: ontap-nas
   svm: svm_your_Cloud Volumes ONTAP_name
   version: 1
- In case you need some references, the Trident bundle we downloaded earlier comes with a sample-input folder that contains configuration examples, including backend configuration examples as shown below:

- We can use either tridentctl or kubectl to create the storage backend:
./tridentctl -n default create backend -f your_file_path.yaml
or
kubectl apply -f your_file_path.yaml

- The command ./tridentctl -n your_name_space get backend will display the information of your Cloud Volumes ONTAP cluster has now been added as your storage backend:

Adding StorageClass to the EKS Cluster
Now that Trident is connected with the Cloud Volumes ONTAP backend, we are now ready to add a StorageClass to the Kubernetes EKS cluster. Once we submit the StorageClass, Trident is going to make its own copy of the StorageClass object and look for available storage backends that match the provisioning requirements when a PersistenVolumeClaim comes in.
Below is the StorageClass yaml input we used for this walkthrough. As you can see, it is a very basic one. You can pass down specific Trident parameters additional to the official Kubernetes project parameters. You can also check the sample-input folder for more StorageClass examples:
---
apiVersion: storage.k8s.io/v1
kind: StorageClass
metadata:
  name: Cloud Volumes ONTAP419
provisioner: csi.trident.netapp.io
parameters:
  backendType: ontap-nas
  provisioningType: thin
volumeBindingMode: Immediate
reclaimPolicy: Retain
allowVolumeExpansion: true

kubectl apply -f  your_file_path.yaml

Verification
We have now facilitated everything Trident needs to start dynamically provisioning PersistentVolumes. We can verify this by running a small test using a WordPress Helm chart, which will show that Trident is provisioning the requested PVs.
- Edit the StorageClass section of the WordPress Helm chart value’s .yaml file by specifying the StorageClass name as the one we configured above.
- Deploy the chart using Helm:
helm install trident-test -f values.yaml bitnami/wordpress
- If we run the kubectl get pvc command, we can see that the WordPress Helm chart generated two PersistentVolumeClaims that have already been provisioned by Trident:

- For verification, run the command ./tridentctl get volume which will display the volumes that have been provisioned:

Conclusion
Astra Trident provides dynamic storage orchestration services for Kubernetes workloads and allows containers to consume on-demand storage quickly using NetApp's storage systems portfolio.
In this article we saw how to deploy Trident in an EKS Cluster in order to provision storage from Cloud Volumes ONTAP in AWS. We first installed Trident and deployed it using the tridentctl command line tool, configured Cloud Volumes ONTAP as the storage backend, uploaded the Secrets object for authentication, configured a StorageClass, and finally performed a test by running a Wordpress helm chart for us to see Trident in action.
For a much easier method, check out this blog on how to provision persistent storage directly on Cloud Volumes ONTAP.

