Share
Amazon Web Services is a pioneer in the cloud computing space and paved the way for a paradigm shift in how organizations operate their IT infrastructure.
So far, the existing native AWS file storage services—Amazon Elastic File Service (AWS EFS) and AWS FSx for Windows—have provided a good starting point for cloud storage needs, focusing on single protocols and specific operating system / workload types.
Now with the launch of Amazon FSx for NetApp ONTAP, organizations have an important building block capable of addressing complex architectures and meeting today’s demanding data management and protection requirements.
This blog will introduce you to this new service and show you, step by step, how to set it up from the NetApp BlueXP Console GUI.
Jump down using these links to get started:
- What Is Amazon FSx for ONTAP?
- How to Set Up FSx for ONTAP Using BlueXP Console
- 1. Add a New Working Environment
- 2. Provide AWS IAM credentials to provision FSx for ONTAP
- 3. Define Environment Name and Admin Credentials
- 4. Select an AWS Region, VPC and Networking Settings
- 5. Set Up Encryption
- 6. Define and Review the Storage Capacity and Performance Configuration
- 7. Create a BlueXP Console Connector
- 8. Add a New Storage Volume
- 9. Volume Management Options and Validation
What is Amazon FSx for NetApp ONTAP?
FSx for ONTAP is a new managed file and block storage service that provides advanced data management capabilities. FSx for ONTAP gives engineering teams more flexibility to solve complex cloud challenges and support existing architectures in hybrid and multicloud environments.
Developed in collaboration with NetApp, this new native AWS service comes with several out-of-the-box integrations with other existing AWS services, including monitoring, billing and container orchestration services.
This service is a perfect way for existing NetApp ONTAP users to step into the cloud, and for AWS users to gain more flexibility over their storage operations with the full complement of NetApp data management capabilities.
In addition to the AWS Console and APIs, customers can also use FSx for ONTAP via NetApp BlueXP Console, the centralized control portal for all NetApp cloud-based services, gaining additional features to manage their data across different on-premises and cloud environments.
FSx for ONTAP provides several benefits, including:
- Multiprotocol (NFS, SMB and iSCSI) support
- Multi-AZ high availability
- Built-in data protection processes
- Storage efficiencies to reduce footprint and cost
- High performance and low latency
- Data migration and replication with SnapMirror®
- Instant data clone copies with FlexClone®
In this article we will walk you through how to get started with the new FSx for ONTAP using BlueXP Console. Let’s get started now.
How to Set Up FSx for ONTAP Using BlueXP Console
Since we’ll be using BlueXP Console to set up FSx for ONTAP, sign in to BlueXP Console here. You’ll need an existing NetApp account, or you can set one up as you log in. Once you’re logged in, you’ll be ready to begin.
1. Add a New Working Environment
Once you sign into BlueXP Console, you’ll find yourself on the Canvas page.
1.1 Click on the “Add Working Environment” button to get started.
.png?quality=high&width=768&name=staging.cloudmanager.netapp.com_working-environments_view=clouds(AOC).png) Adding a new environment using BlueXP Console
Adding a new environment using BlueXP Console
1.2 From the different NetApp supported infrastructure environments, select the Amazon Web Services option.
.png?quality=high&width=768&name=staging.cloudmanager.netapp.com_add-working-environment_choose-type(AOC).png) Infrastructure environment selection panel
Infrastructure environment selection panel
1.3 Select the newly launched FSx for ONTAP service that appears as an option for the AWS infrastructure environment. Note that in addition to creating a new environment you also have the option to discover existing volumes and environments (e.g. in case they were created via AWS Console or CLI).
%20(2).png?quality=high&width=768&name=staging.cloudmanager.netapp.com_add-working-environment_choose-type(AOC)%20(2).png) Supported AWS environment types in BlueXP Console
Supported AWS environment types in BlueXP Console
2. Provide AWS IAM Credentials to Provision FSx for ONTAP
If this is the first time you are provisioning a new FSx for ONTAP environment, you will need to provide AWS IAM credentials with permissions to allow the deployment and management of the AWS resources needed.
The IAM policy requirements can be checked using the policy requirement link in the panel.
%20(4).png?quality=high&width=768&name=staging.cloudmanager.netapp.com_add-working-environment_choose-type(AOC)%20(4).png) Providing AWS IAM credentials to use FSx for ONTAP
Providing AWS IAM credentials to use FSx for ONTAP
3. Define Environment Name and Admin Credentials
With FSx for ONTAP, customers have access to the underlying ONTAP cluster that hosts the file systems and volumes, and Storage Virtual Machines (SVMs). In this panel you can specify the cluster name and the admin user (fsxadmin) password to manage the cluster.
%20(5).png?quality=high&width=768&name=staging.cloudmanager.netapp.com_add-working-environment_choose-type(AOC)%20(5).png) Defining the ONTAP cluster name and admin credentials
Defining the ONTAP cluster name and admin credentials
4. Select an AWS Region, VPC, and Networking Settings
The FSx for ONTAP file systems are highly available by design, with two nodes per file system in a multi-AZ setup.
4.1 In this next panel you can specify the AWS region and corresponding network settings—VPC, subnets (that the file system would be attached to), and security group—for the deployment.
%20(7).png?quality=high&width=768&name=staging.cloudmanager.netapp.com_add-working-environment_choose-type(AOC)%20(7).png) Selecting the AWS Region and network settings for the cluster
Selecting the AWS Region and network settings for the cluster
4.2 Because a subnet is bound to a specific availability zone, in multi-AZ deployments virtual floating IP addresses (for management and NFS/SMB) are used. These will always be reachable as defined entry points, to facilitate seamless failover and failback in case of AZ failures.
These IP addresses should be from a CIDR range that does not belong to any existing VPC in your AWS account. Optionally, this field can be left blank to have it auto-assigned and generated during deployment.
%20(8).png?quality=high&width=768&name=staging.cloudmanager.netapp.com_add-working-environment_choose-type(AOC)%20(8).png) Defining a floating IP to the cluster
Defining a floating IP to the cluster
4.3 Review the VPC routing table configuration that will be used by the floating IPs and adjust as needed.
%20(9).png?quality=high&width=768&name=staging.cloudmanager.netapp.com_add-working-environment_choose-type(AOC)%20(9).png) Review the routing table configuration
Review the routing table configuration
5. Set Up Encryption
FSx for ONTAP comes with out-of-the-box AWS KMS integration. This enables customers to manage their encryption keys using KMS and use them to automatically encrypt the data in any FSx for ONTAP file systems and volumes.
Select an existing customer managed KMS encryption key or use the default AWS-managed encryption option.
%20(10).png?quality=high&width=768&name=staging.cloudmanager.netapp.com_add-working-environment_choose-type(AOC)%20(10).png) Choosing a data encryption option for cluster and volumes
Choosing a data encryption option for cluster and volumes
6. Define and Review the Storage Capacity and Performance Configuration
In this next section, we need to define what will be the SSD storage capacity and throughput of the FSx for ONTAP file system environment.
6.1 There are important considerations worth noting here. While the throughput value can be changed at any point in time without disruption, the SSD storage capacity currently can’t be changed after the environment is created.
Note that each file system is attached to an unlimited capacity pool tier which can be used to store infrequently-accessed data and scale the file system’s overall capacity.
%20(11).png?quality=high&width=768&name=staging.cloudmanager.netapp.com_add-working-environment_choose-type(AOC)%20(11).png) Choosing the environment capacity and throughput
Choosing the environment capacity and throughput
6.2 Review the FSx for ONTAP environment deployment configuration and press “Add” to initiate the deployment.
%20(12).png?quality=high&width=768&name=staging.cloudmanager.netapp.com_add-working-environment_choose-type(AOC)%20(12).png) Review the file system environment deployment configuration
Review the file system environment deployment configuration
6.3 The newly created FSx for ONTAP environment will be visible in the BlueXP Console Canvas. Keep in mind that it takes several minutes for the deployment to complete.
%20(2).png?quality=high&width=768&name=staging.cloudmanager.netapp.com_working-environments_view=clouds(AOC)%20(2).png) BlueXP Console Canvas
BlueXP Console Canvas
7. Create a BlueXP Console Connector
When the file system environment deployment completes and it becomes available, you can start creating and managing data volumes in the environment. However, if this is the first time you are using BlueXP Console to manage FSx for ONTAP environments, you need to create a new BlueXP Console connector.
The connector enables the BlueXP Console to securely communicate with your private network environment in AWS. In addition, the connector unlocks advanced options, such as the possibility of data replication across hybrid and multicloud environments.
7.1 The connector creation wizard and information are available in the top right menu. The following illustrates how to create a connector in the AWS cloud. Note that a connector can also be deployed on-premises. For more information go to BlueXP Console’s documentation.
%20(25).png?quality=high&width=768&name=staging.cloudmanager.netapp.com_working-environments_view=clouds(AOC)%20(25).png) BlueXP Console connector creation
BlueXP Console connector creation
7.2 Provide AWS IAM credentials and select the region where you want the connector to be placed.
%20(28).png?quality=high&width=768&name=staging.cloudmanager.netapp.com_working-environments_view=clouds(AOC)%20(28).png) BlueXP Console connector AWS credentials and region
BlueXP Console connector AWS credentials and region
7.3 Define the connector name and appropriate IAM role. Leave the default option to automatically create a new IAM role with the required policy.
Click “Next” to proceed.
%20(29).png?quality=high&width=768&name=staging.cloudmanager.netapp.com_working-environments_view=clouds(AOC)%20(29).png) Connector name and IAM role
Connector name and IAM role
7.4 Choose the connector network configuration and SSH key pair. The chosen network settings might differ from the FSx for ONTAP file system; however, the subnets need to have proper connectivity between them.
Click “Next” when you are done.
%20(30).png?quality=high&width=768&name=staging.cloudmanager.netapp.com_working-environments_view=clouds(AOC)%20(30).png) Connector network configuration and SSH key pair
Connector network configuration and SSH key pair
7.5 Create or select a security group for the connector with adequate inbound and outbound traffic rules.
When you are done, click “Next.”
%20(31).png?quality=high&width=768&name=staging.cloudmanager.netapp.com_working-environments_view=clouds(AOC)%20(31).png) Connector security group configuration
Connector security group configuration
7.6 Review the connector configuration and press “Add” to initiate its provisioning.
%20(32).png?quality=high&width=768&name=staging.cloudmanager.netapp.com_working-environments_view=clouds(AOC)%20(32).png) Review the connector configuration before provisioning
Review the connector configuration before provisioning
8. Add a New Storage Volume
With an FSx for ONTAP available and a BlueXP Console connector in place, we are able to start provisioning data volumes and manage its capacity.
8.1 To get started, double click the FSx for ONTAP working environment and go to the Volumes tab in the FSx for ONTAP cluster environment in BlueXP Console where you can initiate the volume creation process.
%20(13).png?quality=high&width=768&name=staging.cloudmanager.netapp.com_working-environments_view=clouds(AOC)%20(13).png) FSx for ONTAP cluster environment overview
FSx for ONTAP cluster environment overview
8.2 Choose an appropriate volume name and size. Review and select a snapshot policy for the volume.
When you are done, click “Next.”
%20(15).png?quality=high&width=768&name=staging.cloudmanager.netapp.com_working-environments_view=clouds(AOC)%20(15).png) Volume name and size
Volume name and size
8.3 In this next panel you can choose the interface protocols and respective versions you need.
Currently, only NFS volumes can be created through BlueXP Console. SMB support in BlueXP Console will be available next month, upon the next release. Meanwhile, SMB volumes can be created through the AWS console or directly through AWS/ONTAP CLI.
Once you’ve chosen your desired protocols, click “Next” to proceed.
%20(16).png?quality=high&width=768&name=staging.cloudmanager.netapp.com_working-environments_view=clouds(AOC)%20(16).png) Volume protocol and interfaces
Volume protocol and interfaces
8.4 Select an adequate usage profile and tiering policy. These options will affect the level of storage efficiency. When a tiering policy is defined, cold data identified in the volume will be automatically and seamlessly moved to the unlimited capacity pool tier attached to the FSx for ONTAP file system.
Click “Next” once you are done.
%20(18).png?quality=high&width=768&name=staging.cloudmanager.netapp.com_working-environments_view=clouds(AOC)%20(18).png) Usage policy and tiering policy
Usage policy and tiering policy
8.5 Review the data volume configuration and press “Add” to create the volume.
%20(19).png?quality=high&width=768&name=staging.cloudmanager.netapp.com_working-environments_view=clouds(AOC)%20(19).png) Review the data volume configuration
Review the data volume configuration
9. Volume Management Options and Validation
The newly created volume will now appear as part of the FSx for ONTAP file system environment.
9.1 There are several operations available in this panel for volume management such as cloning, snapshots and restoration, and details for volume mounting.
%20(23).png?quality=high&width=768&name=staging.cloudmanager.netapp.com_working-environments_view=clouds(AOC)%20(23).png) Volume list and management options
Volume list and management options
9.2 Since FSx for ONTAP is a fully native AWS service, you can also validate the deployment through the AWS management tools such as the AWS console. Your newly created volume can be taken into use right away using the protocol defined for it (NFS, SMB, iSCSI) from the supported AWS compute, containers and end-user-computing services integrations such as EC2, EKS, Workspaces, etc.
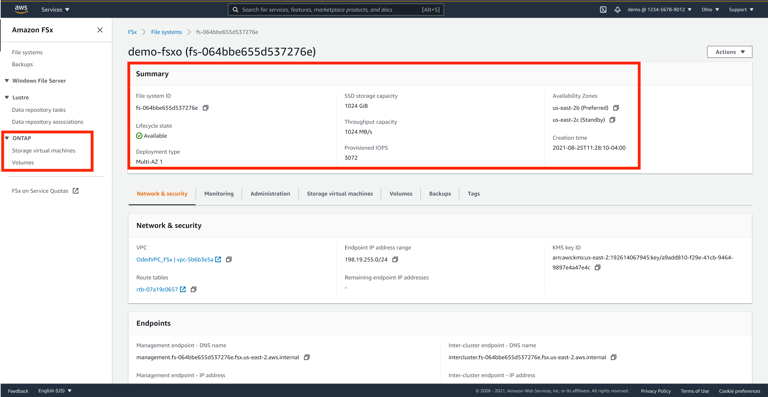 FSx for ONTAP validation in AWS Console
Conclusion
The advanced functionalities available in Amazon FSx for NetApp ONTAP using BlueXP Console speak volumes to the potential applications of this service in organizations of any size. We brushed the surface of these capabilities while walking through the provisioning and volume creation process, but there is a lot more worth exploring, such as hybrid and multicloud complex configurations or leveraging top-notch data protection features like NetApp Snapshot™ copies, disaster recovery, and backup capabilities.
For organizations already using the AWS ecosystem, the native integrations of FSx for ONTAP with existing services such as Kubernetes and container services , monitoring, billing among many others, will be a welcomed surprise. In addition, the support for all NFS, SMB and iSCSI versions provides a smooth adoption and interoperability with existing systems and architectures.
Data governance with NetApp Cloud Data Sense is also available out-of-the-box, making it easy to find out where sensitive data resides through AI-based data mapping. On that note, while FSx for ONTAP data volumes are highly available across availability zones, it is also possible to enable cross-region replication using the SnapMirror technology.
More than a cloud file sharing service, Amazon FSx for NetApp ONTAP is the integrated business-data platform that your organization needs to accelerate its digital transformation journey.
