Share
What is an Azure Migrate Project?
Azure Migrate offers a centralized hub to evaluate and migrate servers based on-premises, applications, data, and other infrastructure to Azure.
An Azure Migrate Project stores assessments and migration metadata gathered from the environment you want to migrate. In a project, you may create assessments, track assets that are discovered in your environment, and manage actual migrations to Azure.
There are three main ways to create an Azure Migrate project:
- Creating a project manually using the Azure portal.
- Creating a project automatically using an Azure Resource Management (ARM) template
- Creating projects across multiple customer tenants using Azure Lighthouse
We’ll discuss each of these methods with detailed step-by-step instructions.
Learn more about Azure Migrate in our detailed guide to azure migrate
In this article:
- Creating and Managing Azure Migrate Projects in Azure Portal
- Creating an Azure Migrate Project Using an ARM Template
- Managing Azure Migrate Projects at Scale with Azure Lighthouse
- Azure Migration with NetApp Cloud Volumes ONTAP
Creating and Managing Azure Migrate Projects in Azure Portal
Below we explain how to create the new type of Azure Migrate project. There is an older type of Azure Migrate project, known as a Classic project. If you used Azure Migrate in the past, you may have already created Classic projects.
As of February 2024, Classic Azure Migrate will be retired by Microsoft. Following February 2024, Classic projects won’t be supported and metadata of the inventory in Classic projects will no longer be accessible. If you are using Classic projects at the moment, Microsoft advises to delete and recreate them. You cannot upgrade components or Classic projects to the new Azure Migrate format.
To verify permissions for an Azure Migrate project:
- Open the applicable subscription, in the Azure portal. Choose Access control (IAM).
- Go to Check access, locate the right account, and choose it via view permissions. You will likely have Owner or Contributor permissions.
To create your first project via an Azure subscription:
- Look for Azure Migrate, within the Azure portal.
- Choose Azure Migrate from Services.
- Choose Assess and migrate servers from Overview.
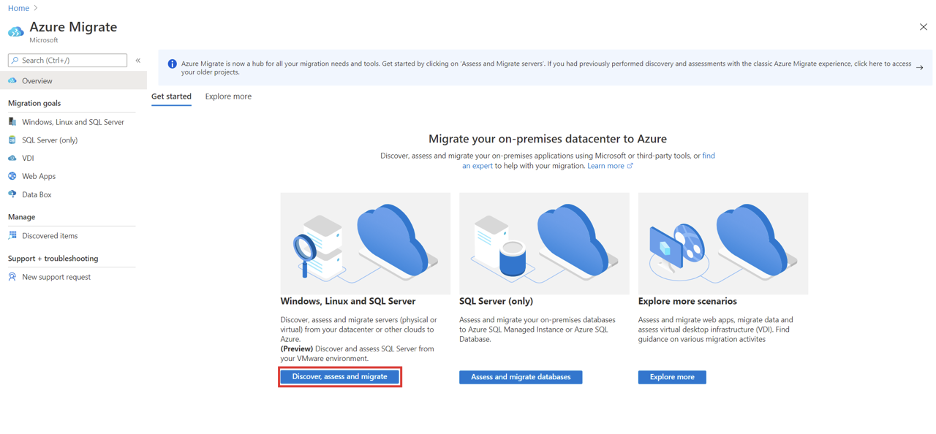
Image Source: Azure
- Choose Create project from Servers.
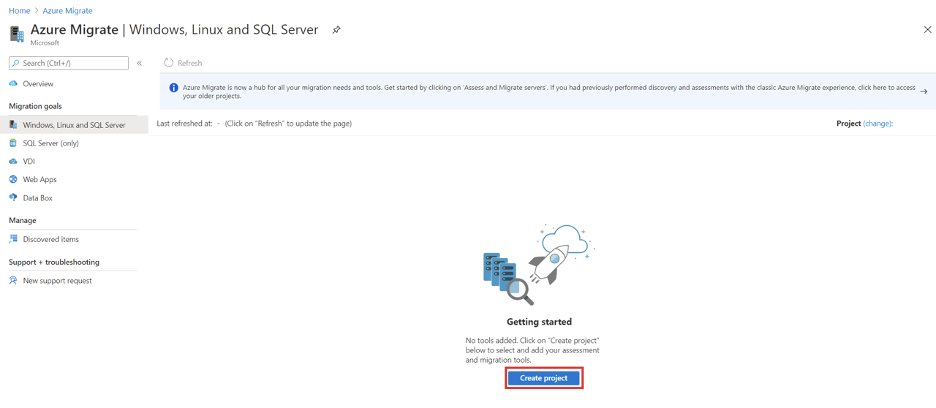
Image Source: Azure
- Choose the Azure resource and subscription group from Create project. Develop a resource group, if you haven’t already created one.
- Within Project Details, give the project a name and specify the geography you want to use to develop the project.
- Choose Create.
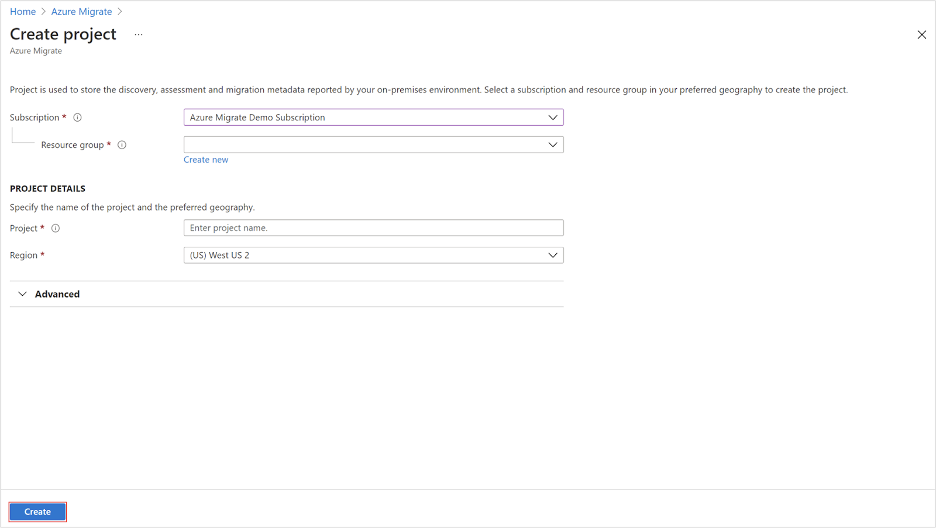
Image Source: Azure
To create additional Azure Migrate projects:
- Look for Azure Migrate, within the Azure Government or Azure public portal.
- In the Azure Migrate dashboards, select Servers, and choose change, found in the top-right corner.
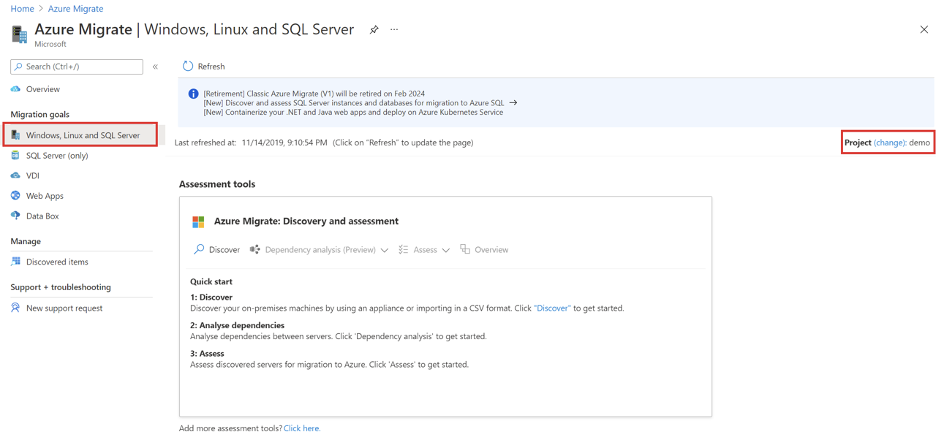
Image Source: Azure
- Choose click here to create a new project.
To delete a project:
- Go to the Azure resource group used to create the project.
- Choose Show hidden types within the page of the resource group.
- Choose the project you wish to delete, and its connected resources.
Please note that after you delete, the project as well as the metadata with the discovered servers will be deleted. You cannot reverse project deletion. Objects that have been deleted cannot be recovered.
Creating an Azure Migrate Project Using an ARM Template
Azure Resource Manager (ARM) template allows you to automatically create an Azure Migrate project, which can be used to migrate and assess your on-premises Azure servers, applications, data and infrastructure.
An ARM template is a JavaScript Object Notation (JSON) file which specifies the configuration and infrastructure of your project. The template employs declarative syntax. With declarative syntax you outline your intended deployment, however, you don’t write a sequence of programming commands to produce a deployment.
You can find the template employed in this quickstart here: Azure Quickstart Templates.
To use the template, ensure you have a resource group, location, subscription, and project name.
To define a template:
- Sign into Azure and use the ARM Quick Start template Deploy to Azure. Here is a direct link to the template.
- Enter or choose these values:
- Subscription—choose your Azure subscription
- Resource group—choose a group that already exists or choose create new to make an additional group
- Region—defaults to the location of the resource group and is no longer available once the resource group is chosen
- Migrate project name—choose a name to give the vault
- Location—choose the location where you wish to deploy the Azure Migration project and its corresponding resources
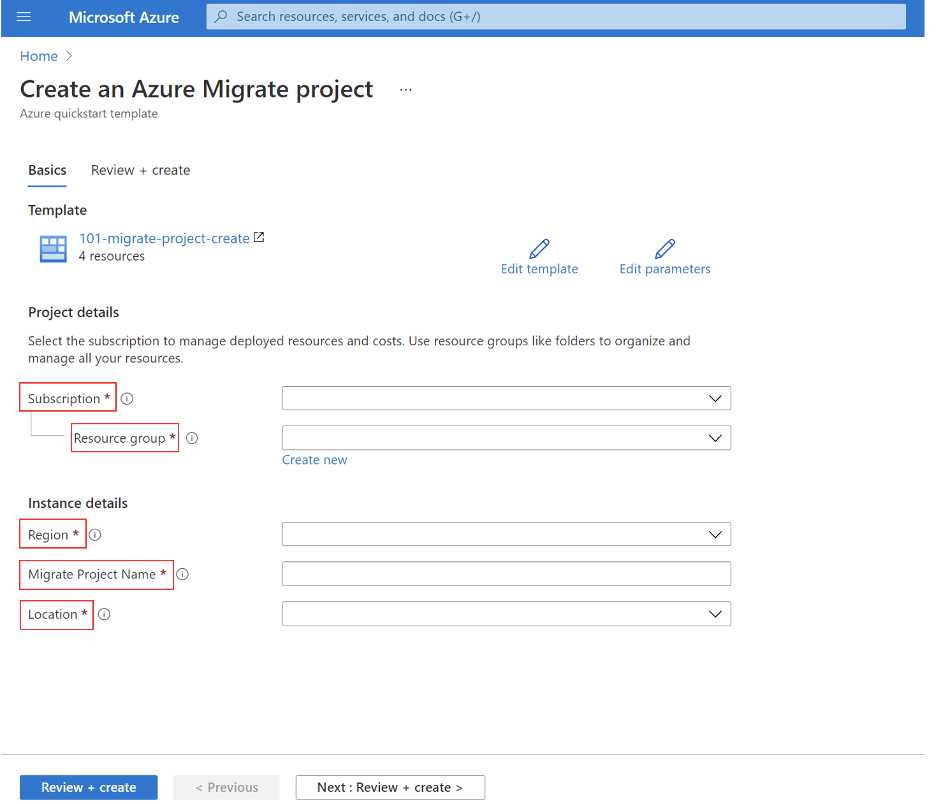
Image Source: Azure
- Select Review + create to begin the deployment.
To validate the deployment:
- Go to Azure Migrate by looking for Azure Migrate via the search bar located on the Azure portal.
- Select the Discover, Assess, and Migrate control under the SQL, Linux, and Windows Server title.
- Choose the Azure subscription and Project according to the values stated in the deployment.
Managing Azure Migrate Projects at Scale with Azure Lighthouse
Azure Lighthouse lets service providers carry out operations at scale via multiple tenants at the same time, so management tasks become more efficient.
Azure Migrate integration with Azure Lighthouse lets service providers migrate, assess, and discover workloads from various customers at scale, whilst letting customers have full control and visibility over their environments. Via Azure delegated management resources, service providers retain one view of every Azure Migrate project they control over several customer tenants.
Make an Azure Migrate Project in the Customer Tenant
One possibility, when you use Azure Lighthouse, is to make the Azure Migration project using the customer tenant. People in the management tenant may then choose the customer subscription when they create a migration project. The service provider can then carry out the needed migration operations, via the managing tenant.
For example, they can deploy the Azure Migrate appliance on customer sites, to find the workloads, analyze workloads, calculate expected cloud costs, evaluate VM readiness, and perform the migration.
No resource is stored or created in the managing tenant, although the assessment and discovery processes may be executed and initiated from that tenant. All the resources, including assessment information for on-prem workloads, migration projects, and migration resources at the destination, can be carried out via the customer’s Azure subscription. Yet, the service provider may access every customer project from their central portal.
This strategy limits context switching when service providers are working across several customers, at the same time it lets customers retain all their resources in their tenants.
Here is how the workflow for this strategy typically works:
- Customer users are onboarded to Azure Lighthouse. The Contributor built-in role is needed in relation to the identity which will be employed with Azure Migrate.
- The selected individual logs into the managing tenant via the Azure portal, and then continues to Azure Migrate. The user develops an Azure Migrate project, choosing the right customer subscription.
- The user then undertakes steps for assessment and discovery.
- Once the target client subscription is prepared, go ahead with the migration via the access given by Azure Lighthouse. The migration project featuring migrated resources and assessment results will be created within the customer tenant. It will be a part of the targeted subscription.
Make an Azure Migrate Project in the Managing Tenant
Operations that are migration-related, including assessment and discovery, continue to be performed by users via the managing tenant. Yet, the migration project and all the connected resources can be found in the partner tenant, also the customer won’t have insight into the project directly (however assessment may be provided to the customer if needed). The migration destination for every end user will remain the Azure subscription of the customer.
This approach lets service providers begin assessment projects and migration discovery projects fast, drawing those first steps from customer tenants and subscriptions.
Here is how the workflow for this strategy typically works:
- Customer users are onboarded to Azure Lighthouse. The Contributor role is needed for the identity which will be employed with Azure Migrate.
- The specified individual signs into the Azure portal via the managing tenant, and then proceeds to Azure Migrate. The user develops an Azure Migrate project using a subscription connected to the managing tenant.
- The user then undertakes steps for assessment and discovery. The on-premises VMs can then be assessed and discovered in the migration project developed in the managing tenant, and then migrated from the managing tenant.
- Continue using the migration by choosing the assigned subscription as the target destination for migrating and replicating the workloads. The recently created resources can be found in the subscription, yet the resources and assessment data relating to the migration project can stay in the managing tenant.
Azure Migration with NetApp Cloud Volumes ONTAP
NetApp Cloud Volumes ONTAP, the leading enterprise-grade storage management solution, delivers secure, proven storage management services on AWS, Azure and Google Cloud. Cloud Volumes ONTAP capacity can scale into the petabytes, and it supports various use cases such as file services, databases, DevOps or any other enterprise workload, with a strong set of features including high availability, data protection, storage efficiencies, Kubernetes integration, and more.
In particular, Cloud Volumes ONTAP assists with lift and shift cloud migration. NetApp’s data replication tools SnapMirror® and Cloud Sync service will get your data to the cloud.
Learn more about how Cloud Volumes ONTAP helps with lift and shift cloud migration.
NetApp Cloud Manager is the Cloud Volumes ONTAP UI and APIs for management, automation and orchestration, supporting hybrid & multi-cloud architectures.

