Share
What is Elasticsearch on Azure?
Elastic Stack on Azure is a deployment template that lets you deploy Elasticsearch clusters, including the full ELK Stack (Elasticsearch, Logstash and Kibana) in a fully automated manner.
It provides a user interface that guides you through the required steps and feeds your inputs to an Azure Resource Manager (ARM) template, which then deploys the required resources to a resource group.
You can also access the ARM template independently, either from the Azure portal, or using Azure’s command-line interface (CLI) or PowerShell command-line tools.
In this article, you will learn:
- Elasticsearch Azure Resource Manager (ARM) Template
- Elasticsearch on Azure: Reference Architecture
- Getting Started with Elasticsearch on Azure
- Elasticsearch on Azure Q&A
- Elasticsearch on Azure with NetApp Cloud Volumes ONTAP
Elasticsearch Azure Resource Manager (ARM) Template
Deploying the required Azure resources for running an Elasticsearch cluster requires Azure’s Resource Manager API. This is an infrastructure-as-code solution that deploys infrastructure as a service (IaaS) resources within the Azure environment using a consistent API.
The ARM template provided by Elasticsearch can create the resources needed for an Elasticsearch cluster, either an incremental deployment targeted at an Azure resource group with existing Elasticsearch workloads, or as a full deployment, which replaces Elasticsearch resources that are currently deployed.
Related content: read our guide to Azure Resource Manager (ARM) Benefits and Best Practices
Elasticsearch on Azure: Reference Architecture
This reference architecture was provided by contributors to the Azure documentation.
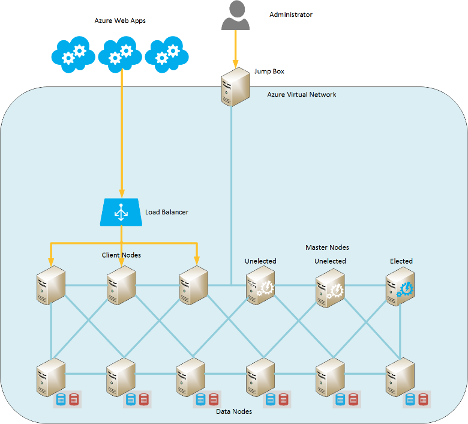 Image Source: GitHub
Here is how this topology is generated automatically using an ARM template:
- Data nodes—the template deploys three data nodes by default. These are virtual machines (VMs) that perform search, aggregate, and other data-related operations and connect to the backend load balancers.
- Master nodes—in this topology, the dataNodesAreMasterEligible parameter is set to No, meaning that data nodes cannot be elected as master nodes. The system will deploy three dedicated master nodes—a recommended option for larger clusters.
- Coordinating nodes—for clusters that deploy more than 100 data nodes, coordinating nodes can optionally be added to help gather incoming requests from clients, forward them to data nodes, and aggregate results.
- Ingest and machine learning nodes—by default, all deployed nodes function as Ingest Nodes. If machine learning features are included in your Elasticsearch license, these nodes can double as Machine Learning Nodes.
- Incremental deployment—by default, the template uses incremental deployment mode. This means that existing Elasticsearch resources in the resource group, whose settings are not modified by the template, will stay the same. New resources, or those for which the template specifies different settings, will be added or modified. The Elasticsearch deployment script updates elasticsearch.yml, and if a node uses the temporary disk, updates the data directory and permissions.
Related content: read our guide to Elasticsearch architecture
Getting Started with Elasticsearch on Azure
- Log into the Azure Marketplace portal, locate Elasticsearch and click on Get it now. Once activated, click on Create.
- In the first tab—Basic—set credentials which later allow you to access the solution’s virtual machines (VMs). Your username should be a valid Ubuntu username. For authentication, select either a password or a Secure Socket Shell (SSH) key.
- Select a subscription, resource group, and a location where the solution should be deployed.
- Click the Cluster Settings tab, select your desired Elasticsearch version, and name the cluster.
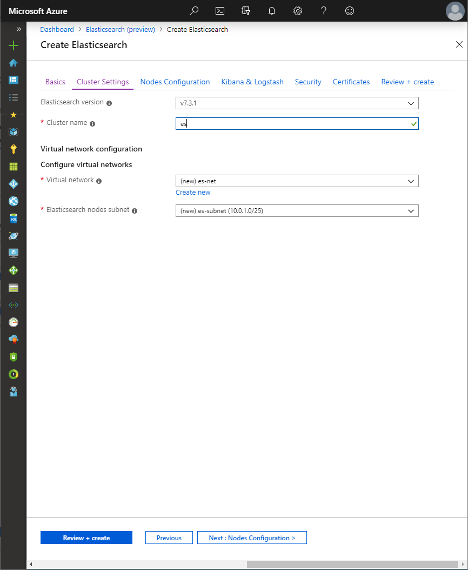 Image Source: Elastic
5. Select whether you are deploying a new virtual network (VNet) or using an existing one. If networking resources exist in a resource group, and you want the cluster to access resources on the same network, deploy them to an existing VNet.
6. Click on the Nodes Configuration tab to determine the number of nodes of each type you require for the cluster. You may specify the disk size and type, as well as the number of disks for data nodes. If there are two or more disks, the system will create a RAID 0 array across them for improved performance.
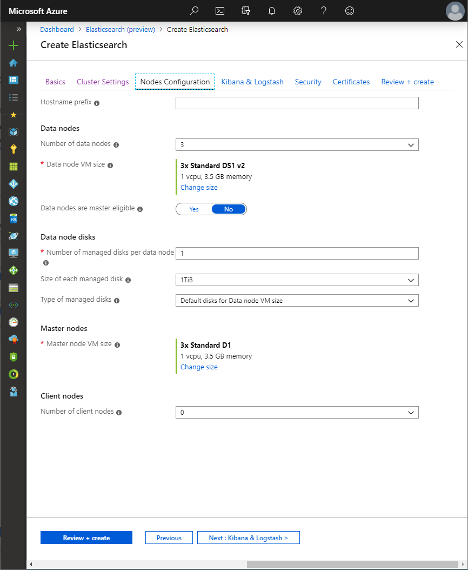
Image Source: Elastic
7. Click on the Kibana & Logstash tab. Here you can decide whether you wish to deploy Kibana and/or Logstash alongside Elasticsearch. You can also determine the cluster access mode from outside the virtual network.
Note: Kibana deploys to a separate VM, which receives a public IP address and network security group. It is accessible over TCP using ports 5601 and 22. Logstash also installs to a separate VM, deployed in an Availability Set. You can use a custom Logstash configuration file and install additional Logstash plugins.
8. Define users and role configuration by clicking on the Security tab. This feature is only available during the 30-day trial period offered by the Azure Marketplace. Here you can set up six built-in user accounts, providing credentials for each:
● Elastic user account—the built-in account for the superuser
● Kibana user account—the Kibana account for connecting and communicating with Elasticsearch (from version 7.8.0 andkibana_system)
● Logstash system user account—the Logstash account for saving monitoring data in Elasticsearch
● Beats system user account—used by Beats, an open source data shipper that sends data to Logstash or Elasticsearch
● APM system user account—the application performance monitoring (APM) server’s account for saving APM data to Elasticsearch
● Remote monitoring user system user account—used by Metricbeat to collect monitoring data
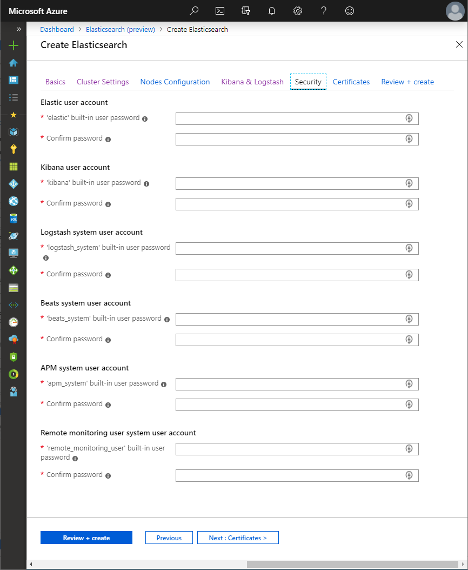 Image Source: Elastic
9. Click on the Certificates and Review + Create tabs to confirm your input values and click OK to launch your new deployment.
Congratulations: you are now running an Elasticsearch cluster on Azure!
Elasticsearch on Azure Q&A
What is the Cost of the Azure Marketplace Elasticsearch Solution?
Deployment prices through Azure’s marketplace depend on your desired deployment, as well as the VM types (SKU) used to deploy the cluster. Prices also depend on the selected Azure region.
You should take into account the resources deployed by the template—Elastic Stack Gold, Enterprise and Platinum features, and their required licenses. Azure calculates the final cost on a case-by-case basis, which can be estimated using Azure’s pricing calculator.
How Do You Connect to Elasticsearch in Azure?
Within Azure, connect to the virtual network that contains the desired cluster, through an internal load balancer. This will round robin requests directly to data nodes, or to coordinating nodes, if these are deployed. From outside Azure, you can access Elasticsearch through an external load balancer, configured using the External access tab in the Marketplace solution configuration.
How Do You Connect to the VMs to Troubleshoot?
After configuring your Elasticsearch deployment using the tab steps above, you will be able to access all virtual network deployed VMs through a Kibana or Jumpbox VM. Both of these operate in a network security group, which can be accessed via TCP through port 22. This allows you to use SSH to securely connect to VMs.
You can use either a password or SSH key to connect, as defined in Basics step of configuration. You will need to know the private IP address, or the hostname, if DNS is defined, to connect to the VMs.
Related content: read our guide to Elasticsearch in production
Elasticsearch on Azure with NetApp Cloud Volumes ONTAP
NetApp Cloud Volumes ONTAP, the leading enterprise-grade storage management solution, delivers secure, proven storage management services on AWS, Azure and Google Cloud. Cloud Volumes ONTAP supports up to a capacity of 368TB, and supports various use cases such as file services, databases, DevOps or any other enterprise workload, with a strong set of features including high availability, data protection, storage efficiencies, Kubernetes integration, and more.
Cloud Volumes ONTAP supports advanced features for managing SAN storage in the cloud, catering for NoSQL database systems, as well as NFS shares that can be accessed directly from cloud big data analytics clusters.
In addition, Cloud Volumes ONTAP provides storage efficiency features, including thin provisioning, data compression, and deduplication, reducing the storage footprint and costs by up to 70%.
For more on optimizing Elasticsearch deployment with NetApp, download our free eBook Optimize Elasticsearch Performance and Costs with Cloud Volumes ONTAP today.

