Share
Azure SQL Database is a managed version of the widely used Microsoft SQL Server database. There are a variety of Azure database options for running SQL Server in the cloud, from a standalone database deployed to an Azure VM, to an elastic pool of databases with automatic scalability, to a managed instance with infrastructure fully managed by Azure.
In this post, we’ll shed light on Azure SQL Server’s deployment options and provide practical advice on how to set up and use it in an enterprise environment. In addition, we’ll show how NetApp Cloud Volumes ONTAP can help optimize and manage storage for Azure databases.
In this article, you will learn:
- What is Azure SQL Database
- 18 deployment models for running SQL Server on the cloud
- Creating a single database
- Addressing common security requirements with Azure SQL Database
- Optimizing Azure Database Storage with Cloud Volumes ONTAP
What Is Azure SQL Database?
Azure SQL Database is a database as a service (DaaS) offered by Azure. It enables you to implement a SQL database without worrying about software or hardware installations.
Key features of the service include:
- Long-term backup retention; allows you to store backups for up to 10 years.
- Geo-replication of data for disaster recovery and data loss prevention.
- Automated performance tuning features to optimize resources.
- High-availability that reduces concerns for service disruptions.
- Scaling capabilities that help reduce costs and ensure that resources match data needs.
- Automated backups that simplify data recovery.
Azure SQL Services: 18 Deployment Models for Running SQL Server on the Cloud
Azure SQL is available via three deployment models:
- Single Database—a single database, deployed to an Azure VM and managed with a SQL Database server. This is the most basic deployment model.
- Elastic Pool—a group of connected databases that share pooled resources.
- Managed Instance—a fully-managed database instance. It is designed to enable easy migration of on-premises SQL databases.
In these deployments, you can choose from three different service tiers:
- General Purpose—designed for standard workloads. This is the default tier.
- Business Critical—designed for high-throughput, online transactional processing (OLTP) applications. It offers high resilience and low latency performance.
- Hyperscale—an expansion of the Business Critical tier. It is designed for massive OLTP implementations and enables auto-scaling of compute and storage.
In your deployment, you can also choose from two compute models:
- Provisioned—your database uses Azure resources dedicated to the Azure SQL service.
- Serverless—your database is operated as a serverless component. You can auto-scale your compute volumes and they are billed per second.
Creating a Single Database in Azure SQL Database
Here are instructions on how to deploy a single DB in Azure SQL Database via the Azure console.
1. Create the databaseSelect Azure SQL from the left-hand menu in Azure portal. Select + Add and choose the Select SQL deployment option page. Click Create.
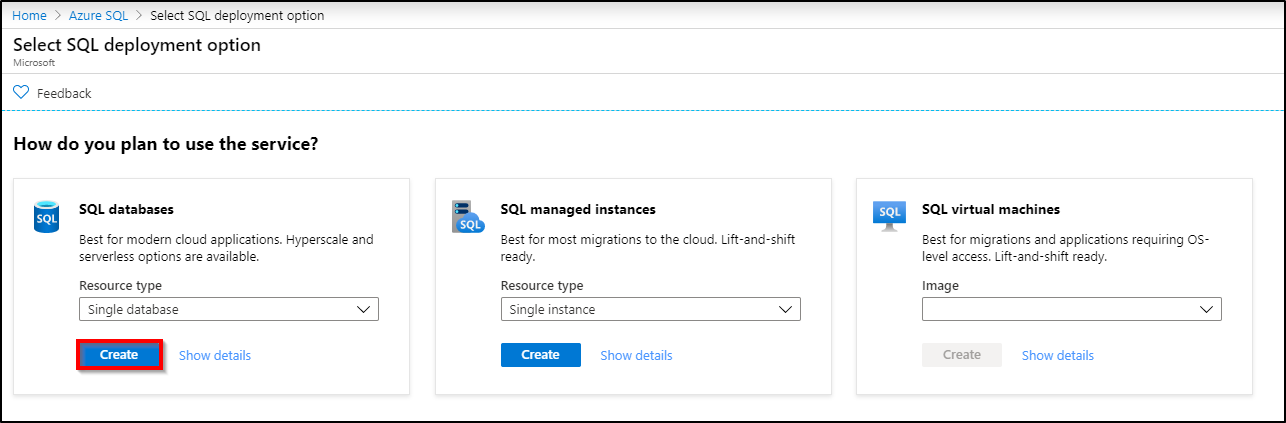 Source: Microsoft Azure
In the Project Details section, on the Basics tab, configure the following:
- Subscription: click the drop-down and select the appropriate subscription.
- Resource group: click Create new, enter your resource group name, and click OK.
In the Database Details section, configure the following:
- Database name: enter a unique name.
- Server: select Create new, configure the following values, and then click Select.
- Server name: choose a unique ID for your database server.
- Server admin login: choose an admin username for your database.
- Password: choose a secure password you will use to access your database.
- Location: choose the location in which you want to run the database.
- Want to use SQL elastic pool: click No to create a single database.
- Compute + storage: select Configure database and choose your preferred deployment options: Provisioned or Serverless. Select your desired options for Data max size and vCores. You can learn more about the options here.
- Select Apply.
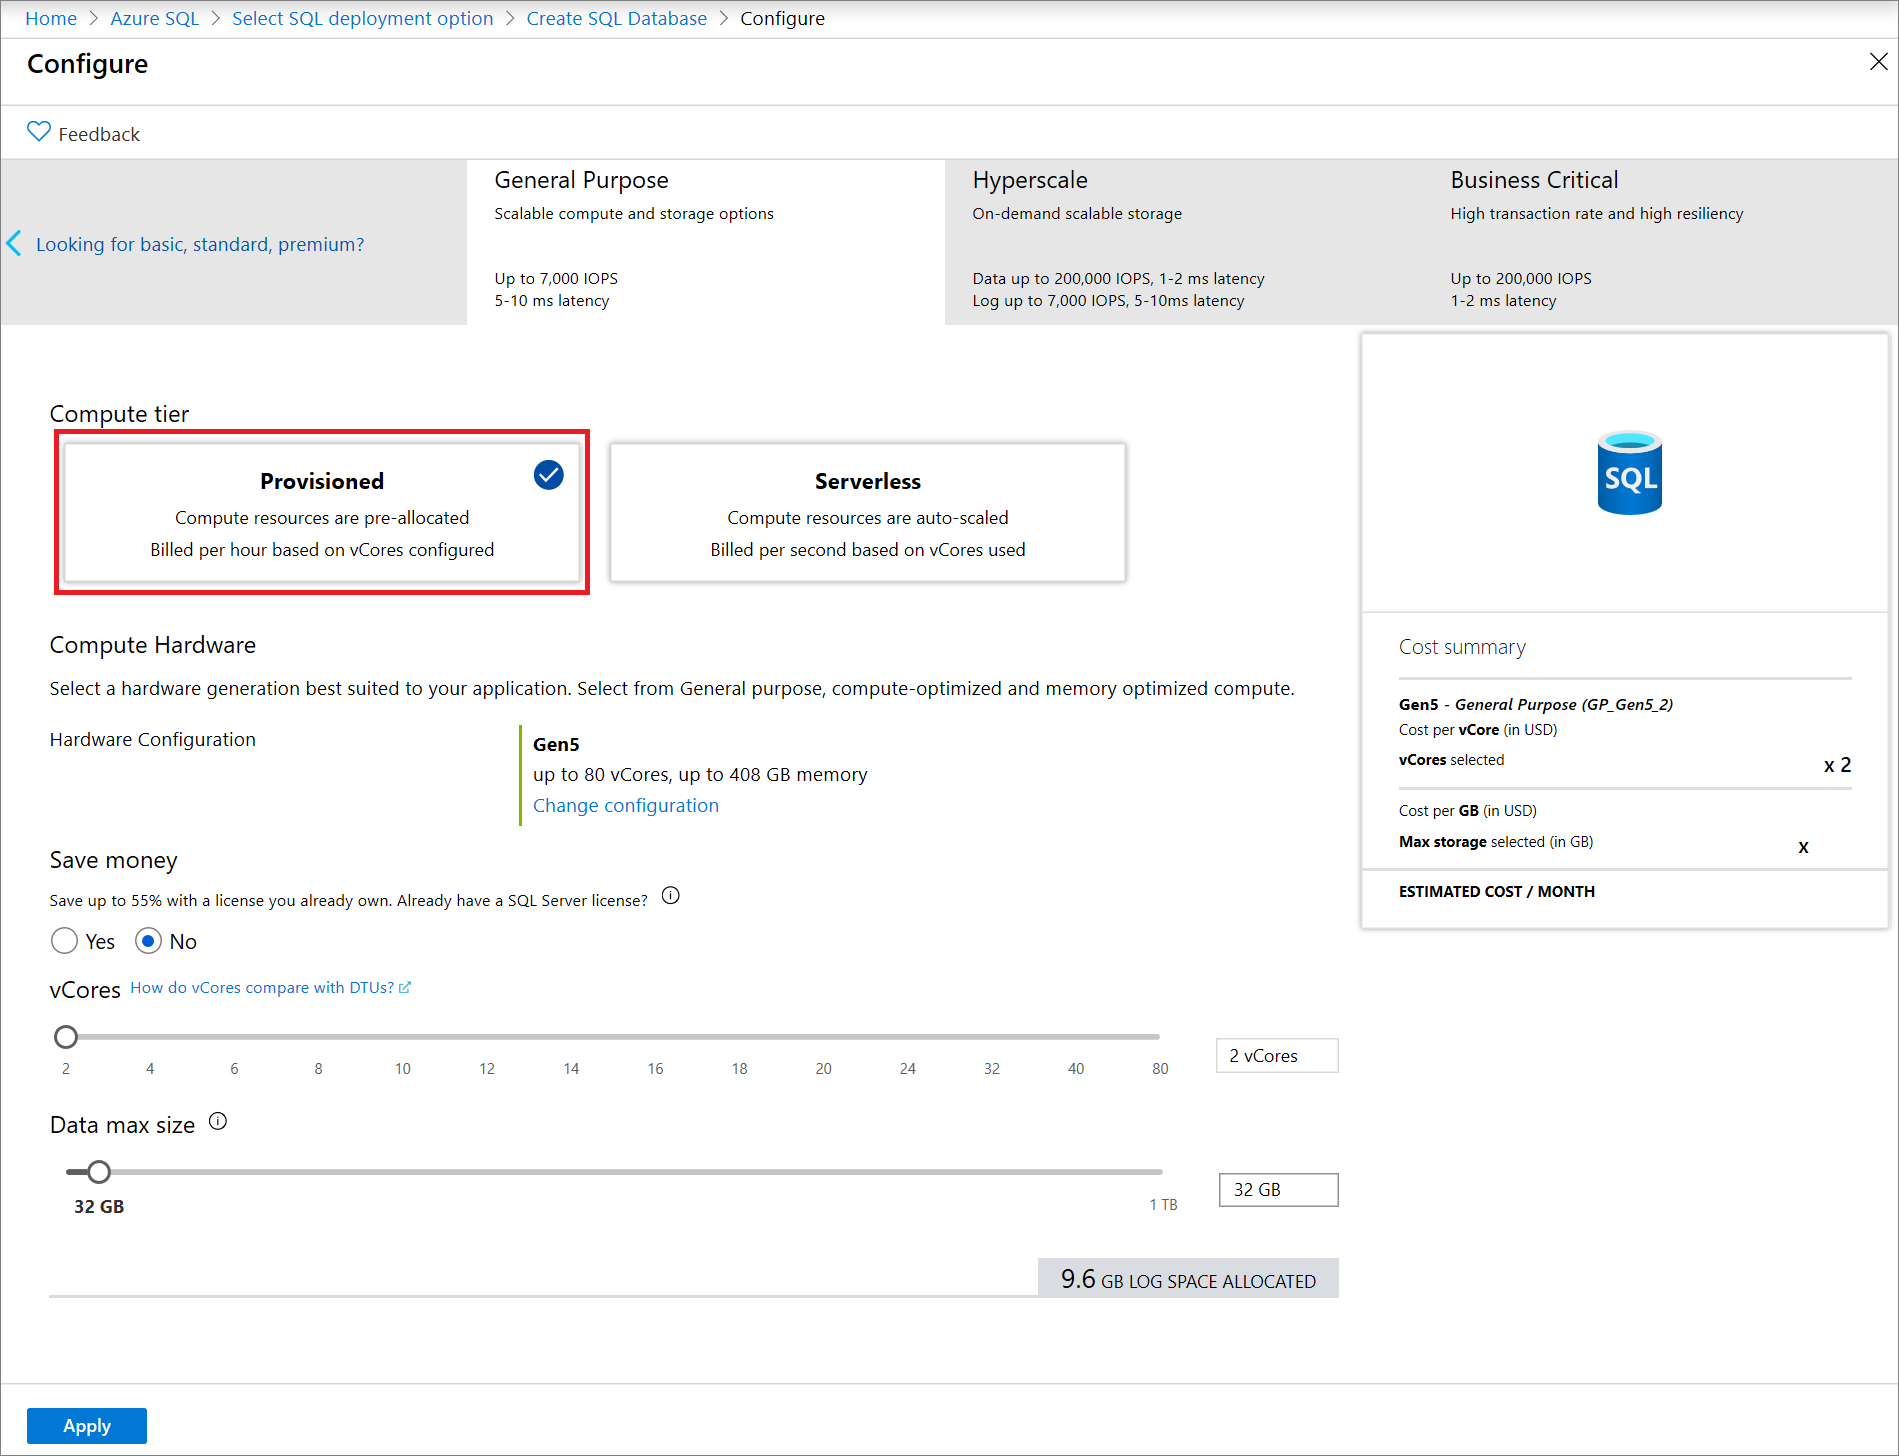
Source: Microsoft Azure
3. Select advanced settings
In the Networking tab, determine if you want to create a private endpoint or allow external access to the database.
In the Additional settings tab, under Data source, choose if you want to create a blank database, or import the data from a backup.
Review your final configurations and click Create.
Addressing Common Security Requirements with Azure SQL Database
Once you’ve selected how you want to implement your SQL database, there are a few steps you can take to ensure that your data remains secure. Make sure to implement the following practices for the greatest protection.
Protect sensitive data
You should enable the Always Encrypted feature to ensure that sensitive data isn't exposed as plaintext. This feature protects data even for data in-memory or in-use. Always Encrypted can also protect against database administrators (DBAs) or cloud admins who are acting outside their permissions or whose credentials have been compromised.
You should not use this feature as a substitute for encrypting data-at-rest or in-transit. It is intended for sensitive data and can create performance issues if used for all data. Always Encrypted should be used in combination with transparent data encryption (TDE) and Transport Layer Security (TLS).
When possible, use Azure Key Vault for master key storage rather than Windows Certificate Store. Using distributed key store solutions can make key management difficult as opposed to centralized, integrated solutions.
To prevent third-party access, ensure that any users or applications with plaintext access to keys or data run outside your cloud. This reduces Internet accessibility to this data and contains your risk.
Enable multi-factor authentication (MFA)
MFA requires multiple pieces of identification before access is granted. It can significantly reduce your risk of brute force entry or the use of compromised credentials. Make sure that you enable MFA in Azure Active Directory (Azure AD). Your configuration should include setting up Conditional Access and should implement interactive authentication.
When configuring MFA, you should create Azure AD groups for easier management and standardization. You can enable MFA policies for your groups via Azure AD Conditional Access. Depending on your system set-up, you can enable MFA for Azure AD or for your entire federated directory.
Protect against attack
Advanced Threat Protection for SQL enables you to detect suspicious events and identify potential attacks. This feature can help you identify credential theft, privilege abuse, SQL injection attacks, and data exfiltration. Enabling this feature can improve your detection and response time to these threats.
In addition to Advanced Threat Protection, you should enable Advanced Data Security (ADS). ADS provide features for data discovery and classification, vulnerability assessments, and advanced threat protection. You can configure it for a specific database instance or across your instances via a subscription to Azure Security Center.
Enabling SQL Database Auditing is also helpful. This service enables you to audit database events and log activity to your storage account. You can also forward this data to an Azure Log Analytics workspace for analysis.
Optimizing Azure Database Storage with Cloud Volumes ONTAP
NetApp Cloud Volumes ONTAP, the leading enterprise-grade storage management solution, delivers secure, proven storage management services on AWS, Azure and Google Cloud. Cloud Volumes ONTAP supports up to a capacity of 368TB, and supports various use cases such as file services, databases, DevOps or any other enterprise workload.
In particular, Cloud Volumes ONTAP helps in addressing database workloads challenges in the cloud, and filling the gap between your cloud-based database capabilities and the public cloud resources it runs on.

