Share
DevOps methods can automate and simplify building the environment for cloud-based demo environments for Kubernetes-based services and creating the Kubernetes cluster. Still, the costs for each demo environment's compute and storage can be considerable. NetApp FlexClone® and Astra Trident can help a great deal in that respect, reducing provisioning time and cloud storage costs in DevOps CI/CD Pipelines.
This blog will describe how to use FlexClone and Trident to instantly clone an existing clean Kubernetes demo environment.
Use the links below to jump down to see:
- How We Currently Provision Demo Environments
- How Can FlexClone Help?
- Astra Trident, Flexclone, and Kubernetes
- How to Set Up a Demo Environment with GitHub, Trident, and FlexClone
- Conclusion
How We Currently Provision Demo Environments
There are several tools for deploying applications to Kubernetes clusters, from the simple kubectl to composite application tools like Kustomize and Helm. There are even tools such as GitKube and Skaffold that run in your Kubernetes cluster and build and deploy containers from dockerfiles and code in git repositories.
All these tools can deploy applications to your Kubernetes environment in minutes, but loading demo data into your application's database will take time. Usually, the time to load data and the cost of storage and compute are proportional to the size of the data set, which can leave your potential customers waiting even longer.
The storage for application artifacts such as images, animations, and binary data files, can also consume large amounts of storage and require replication to each demo environment.
But it doesn't have to be that way. Let’s discuss the solution, FlexClone.
How Can FlexClone Help?
NetApp FlexClone allows you to create a writable storage volume using the snapshot of a persistent volume (referred to as the parent volume). The new clone volume shares all the parent volume’s data blocks on the physical storage, which means the clone volume is a virtual copy, and consumes no space until you write to it.
Cloning takes only pointers and metadata copy and therefore consumes very little data and it's created instantly. It’s writable, but you’re paying only for the deltas of the data that you are writing. If one environment becomes corrupted, all you need to do is delete the clone, create another one, and your environment is back online.
Consider that you have a database with data files consuming 5 GB of a storage volume called db_vol1. You create a FlexClone volume called db_vol2 from db_vol1, start a second database using db_vol2 as its storage volume, and then insert 100 MB of new data to the second database. The insert will not affect db_vol1, and db_vol2 will consume only 100 MB of storage, despite the second database being 5.1 GB in size.
The creation of a FlexClone is virtually immediate, irrespective of volume size, saving time provisioning storage, the cost of storage, and the potential cost of computing resources waiting for the storage provisioning.
You can read more about FlexClone and how it’s used here.
Astra Trident, FlexClone, and Kubernetes
NetApp has developed a Container Storage Interface (CSI) provisioner for Kubernetes called Astra Trident. Once Trident is installed and configured, Kubernetes can provision iSCSI and NFS storage on any ONTAP environment for use by containers running on the Kubernetes cluster.
Trident integrates with Kubernetes completely, meaning no changes to existing Kubernetes manifests, except you no longer have to provision persistent volumes (PVs). Instead, configure a Trident backend and create a storage class on your Kubernetes cluster using the Trident backend. Then, whenever you create a persistent volume claim (PVC) using the storage class, Trident will automatically provision a new volume on NetApp storage and a new PV in Kubernetes for the PVC.
You can read more about Kubernetes Dynamic Provisioning with Cloud Volumes ONTAP and Astra Trident here.
It is so well integrated into Kubernetes that API calls to ONTAP by Trident replace operations such as cloning PVCs. These API calls create a FlexClone of the PVs volume, and then a new PV and PVC are provisioned on Kubernetes. All automatically and all virtually instantly.
You can read more about Kubernetes Volume Cloning with Cloud Volumes ONTAP here.
How to Set Up a Demo Environment with GitHub, Trident, and FlexClone
In this section, we’ll show you a working example for how to set up a demo environment in a Kubernetes cluster using a GitHub Action, including cloning an existing Trident backend-based PVC.
To keep this example simple, we will use phpMyAdmin as the web-based graphical frontend to a MySQL backend, and MySQL will store its data files on a Trident provisioned PV.
We assume that the container has been built and tested before reaching this stage of the CI/CD process.
We install the GitHub runner on the Kubernetes master node, and the CI/CD scripts will use the Kubernetes default Service Account token for authentication.
Prerequisites
A Kubernetes cluster has been created in AWS with kOps, as kOps can build Kubernetes clusters in a few commands. For a quick start guide on kOps click here. You can also find the S3 bucket for kOps configuration and state storage setup here. Defaults were kept everywhere, except for the node minimum and maximum were increased to 2, and an existing AWS key pair was used for SSH access later.
AWS Spot Instances
The nodes of a Kubernetes cluster could be spot instances, as they are completely ephemeral when using Cloud Volumes ONTAP for persistent storage. If a node is interrupted, the pods will be restarted on other nodes, reconnecting to persistent storage if required.
The cluster will continue to operate if you have a standard Amazon EC2 instance for the master and a percentage of the workers, depending on your application.
Traefik
Traefik was deployed on the Kubernetes cluster as an ingress controller, which enables environments to add their URL to Traefik and use the same IP. Entries can be added to the /etc/hosts file on your local machine.
Enter http://traefik-ui.corp.com into a browser to check that everything is working, and we should see the following Traefik UI.
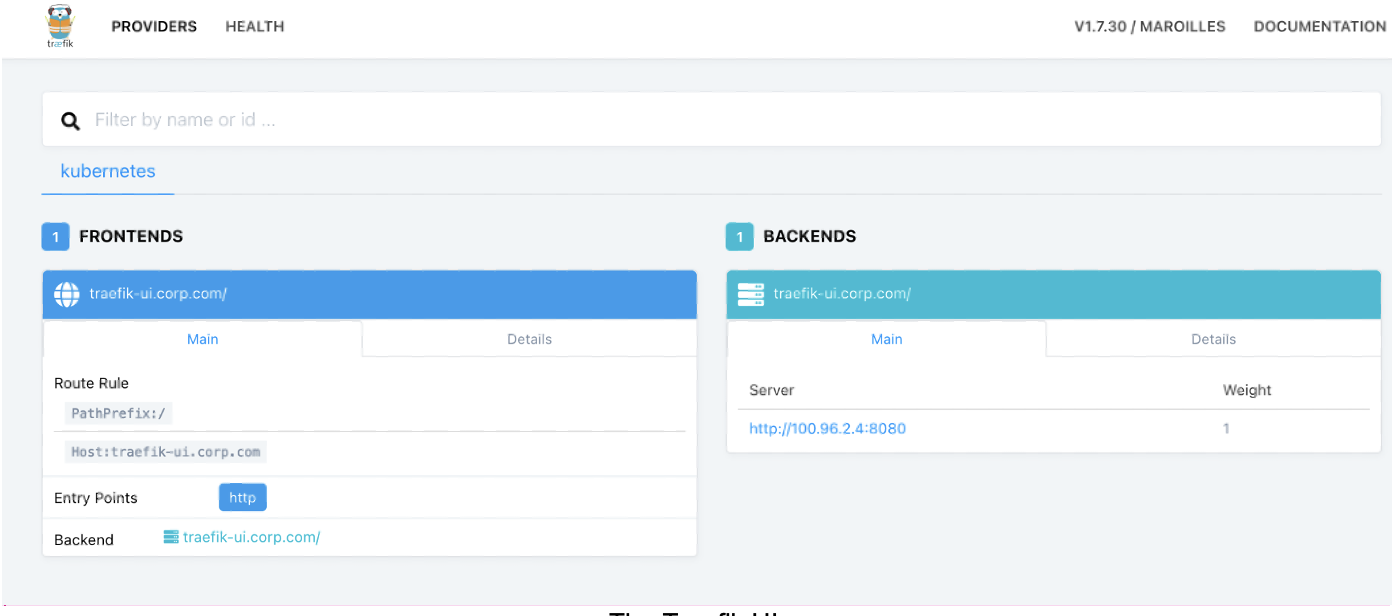 The Traefik UI.
Now that the prerequisites are taken care of, let’s get started with the setup process.
Connecting BlueXP Console to a Kubernetes Cluster
To have NetApp Trident provision volumes on Cloud Volumes ONTAP when you create PVCs in your Kubernetes cluster, you will need to connect the Kubernetes cluster to NetApp BlueXP Console and your Cloud Volumes ONTAP working environment.
If you don't have a Cloud Volumes ONTAP instance running in Cloud Manager, this is a good guide on the set up process.
Now follow the steps in this blog: How to Provision Persistent Volumes for Kubernetes with the NetApp BlueXP Console.
Building Out the Production Environment
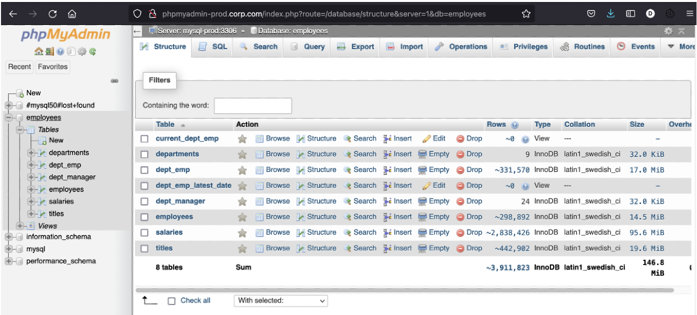
We need to build the environment for cloning to new demo environments, which will consist of one MySQL database using a Trident provisioned PVC for data files and a phpadmin web-based GUI as the frontend. The front end will also add itself to Traefik. Finally, with 4 million records across six tables, the MySQL Employees Sample Database will be loaded onto the production MySQL database.
- First, provision the production MySQL storage. For this we create a file called pvc-iscsi-csi-mysql.yaml containing the following configuration which creates the persistent volume claim:
kind: PersistentVolumeClaim
apiVersion: v1
metadata:
  name: mysql-prod
spec:
  accessModes:
     - ReadWriteOnce
  resources:
     requests:
     storage: 1Gi
  storageClassName: iscsi-csi
- Using this configuration file we create the PVC:
bash:> kubectl create -f pvc-iscsi-csi-mysql.yaml
persistentvolumeclaim/mysql-prod created
- Then confirm the PVC creation was successful:
bash:> kubectl get pvc

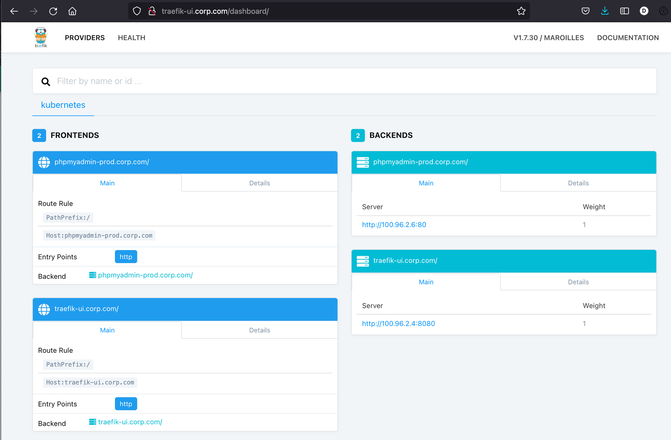
- After deploying MySQL and myphpadmin, the phpadmin frontend will be reachable via Traefik.
- In the screen below you will see phpmyadmin, when accessed via the URL.
The GitHub Runner
Installing and setting up a GitHub Runner itself is a pretty simple process, as covered in this previous article. However, as the runner will have a light workload, I have installed it on the Kubernetes master node.
The Kubernetes credentials and the Kubernetes server URL are stored as GitHub secrets, and this allows the workflow to be used on different Kubernetes clusters without being rewritten.
The GitHub workflow is below. First you can see the checkout of the GitHub repository into a temporary location, the GitHub reference is exported to the environment, then four scripts are run, one for each stage. Each script extracts the GitHub branch name being pushed from the GitHub reference and populates a template, which is piped into the stdin of a kubectl create command, kubectl uses the authentication token and IP address of the Kubernetes master server which are stored as GitHub Secrets, keeping the script generic.
In order of execution, these are the main steps in the script below:
- Check-out your repository
- Set the Github reference in the environment
- Clone the production PVC to a new PVC
- Deploy a clone MySQL instance using the new clone PVC
- Deploy a phpMyAdmin web GUI
- Add the clone phpMyAdmin GUI service to Traefik
And here is the yaml configuration for the github runner:
create-demo-environment.yaml
name: Create Demo Environment
on:
  push:
    branches-ignore:
      - 'main'
jobs:
  Provision-Demo-Env-from-Cloned-PVC:
    runs-on: KubeTridentCVO
    steps:
     # 1) Check-out your repository under $GITHUB_WORKSPACE, so your job can access it
     - uses: actions/checkout@v2

     # 2) Take the passed Github reference and set it in the environment of the script
     - name: Set GITHUB_REF in env
       env:
         GITHUB_REF: ${{ github.ref }}
       run: echo "$GITHUB_REF"

     # 3) The first script, this Flexclones a new PVC from the production PVC
     - name: FlexClone MySQL Prod PVC
       run: ./pvc-clone-mysql-prod-pvc.sh | kubectl --token="${{ secrets.SA_TOKEN }}" --server="$ {{ secrets.KUBE_SERVER }}" create -f -

     # 4) The second script deploys MySQL using the clone PVC as its storage.
     - name: Deploy MySQL With clone PVC
       run: ./deploy-mysql-clone.sh | kubectl --token="${{ secrets.SA_TOKEN }}" --server="${{ secrets.KUBE_SERVER }}." create -f -

     # 5) The third script deploys the phpMyAdmin service using new MySQL as its backend.
     - name: Deploy phpMyAdmin clone
       run: ./deploy-phpMyAdmin-clone.sh | kubectl --token="${{ secrets.SA_TOKEN }}" --server="${{ secrets.KUBE_SERVER }}" create -f -

     # 6) The forth script adds a new ingress to Traefik for the new phpMyAdmin
     - name: Add to Traefik Ingress
       run: ./ingress-phpMyAdmin-Clone.sh | kubectl --token="${{ secrets.SA_TOKEN }}" --server="${{ secrets.KUBE_SERVER }}" create -f -
To trigger the workflow, create a new repository branch, make a change, commit the change, and push the branch.
Testing with a branch named NetApp, we see the workflow executed successfully.
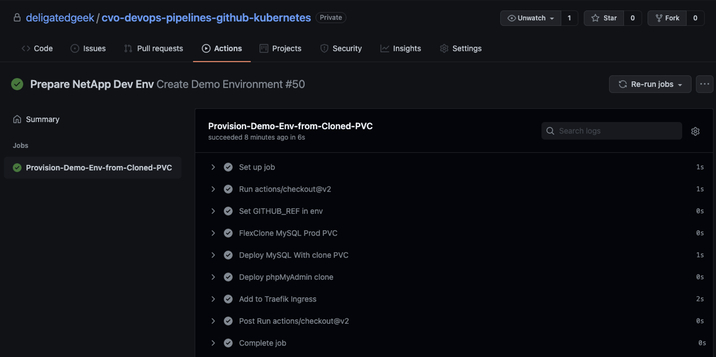
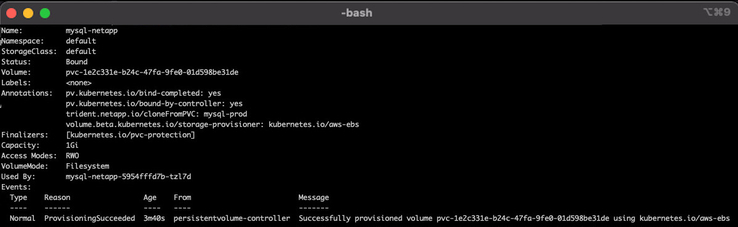
And running kubectl describe on the mysql-netapp PVC shows that PVC was cloned from the myql-prod PVC:
bash:> kubectl describe pvc iscsi
Conclusion
We have shown how easy it is to use Astra Trident to deploy a Kubernetes cluster using BlueXP Console. Just adding a Kubernetes cluster to BlueXP Console triggers the entire installation process.
Also, we have demonstrated how using GitHub Runners can create arbitrarily complex Kubernetes systems, provisioning complete environments.
We have also shown how fast ONTAP backed PVCs are to deploy and clone, substantially increasing the speed of provisioning demo environments and other CI/CD processes where large volumes of data are duplicated as data for testing.
These processes will reduce costs substantially by cloning volumes to reduce consumed space but will also save costs due to reduced compute waiting for storage to be ready.
For more on how Cloud Volumes ONTAP is being used in CI/CD pipelines, check out these case studies.

