Share
When developing cloud-native applications it is important to understand the basic building blocks at our disposal when it comes to Google Cloud storage and compute options. One of the most critical aspects is where and how data can be safely stored and used while still taking in consideration aspects such as performance and availability.
In Google Cloud, a popular choice for highly performant storage is to use a Persistent Disk backed by compute with Google Cloud Compute Engine instances. In this post we’ll show how to set up and mount Persistent Disks with a single Cloud Compute Engine instance, and see how Persistent Disk use can be enhanced with NetApp® Cloud Volumes ONTAP®.
What Is a Google Cloud Persistent Disk?
Using a virtual machine (or cloud instance) it is sometimes hard to see the different underlying components that compose it. Google Cloud Compute Engine is a powerful service that can be used to manage all the different aspects of virtual instances in Google Cloud. In cloud virtual instances, the computing and storage are often decoupled. This means that the instance block storage is managed separately from the virtual instance, which enables attachment and detachment as needed and thus, improving reusability, availability, and safekeeping.
In practice, you can create a Persistent Disk and attach it to a cloud instance to perform operations and store data. Later, the disk can be detached and reattached to a different cloud instance for any other operation using that data.
Why Use Multiple Persistent Disks in the Same Instance?
While each cloud instance has by default one independent Persistent Disk with the baseline operating system, there are use cases that require or benefit from using multiple Persistent Disks in the same instance.
A common approach is to use separate Persistent Disks for both operating system and application data. As an example, if your cloud instance is running a database, you might want to have three Persistent Disks: one for the operating system, one for the database data, and one for the transaction log.
Having different Persistent Disks enables us to meet different requirements such as independent Google Cloud backup policies for each disk, or different storage performance and availability requirements that wouldn’t be possible otherwise. For example, a regional Google Persistent Disk can’t be used as a boot disk for a cloud instance.
How to Use Multiple Persistent Disks with a Google Cloud Compute Engine Instance
Step 1: Create a New Instance
To understand how to use multiple google Persistent Disks in Google Cloud Compute Engine we will start by creating a Google Cloud Instance. The creation process is quite straightforward and should be identical to the one described in this blog post.
Step 2: Create One or More Persistent Disks
By default, the instance will already have a small Persistent Disk with 10 GB that contains the baseline OS. We will create one or multiple Persistent Disks with a bigger size that will later be attached to the instance.
1. Start by heading to the Disks section which is located on the panel on the left-hand side of the interface l. Press the “Create Disk” button to initiate the Persistent Disk creation process.
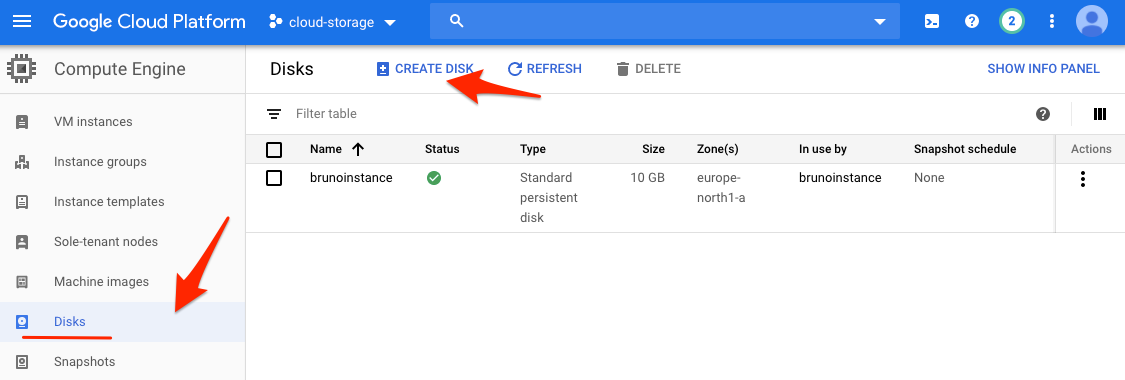 The list of Compute Engine Persistent Disks.
2. Provide a name for the Persistent Disk (e.g. brunodisk-1) and change the disk characteristics such as location (same as your instance), type and size.
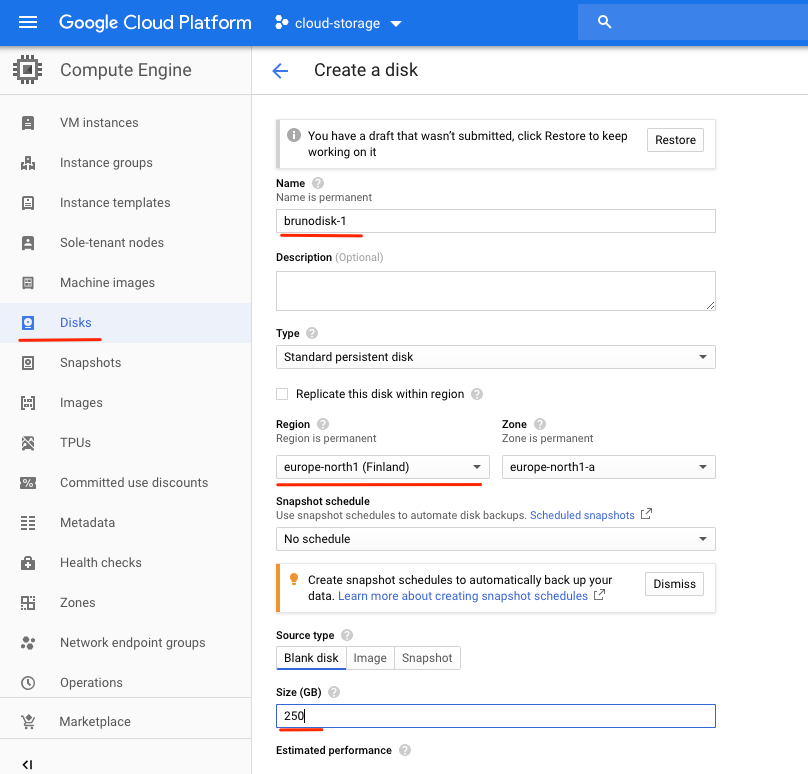 The Persistent Disk creation process
3. At the bottom of the page press “Create” to initiate the creation process.
4. If successful, the new disk will be available and visible in the cloud Persistent Disks list.
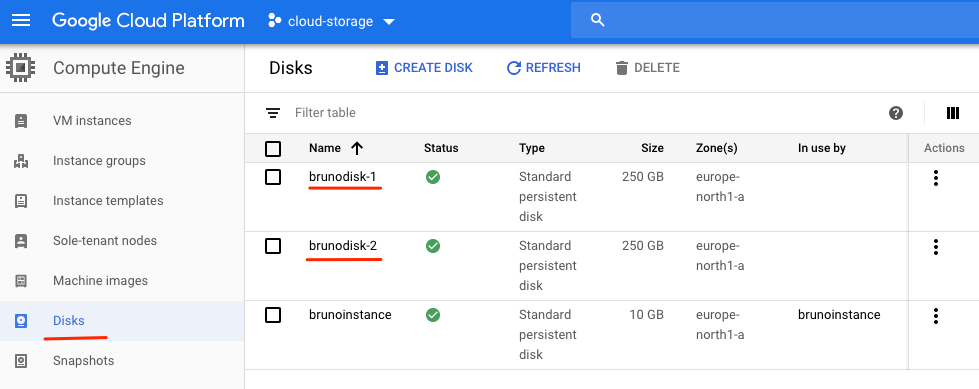 Compute Engine Persistent Disks list
5. Repeat instructions shown above (1-4) to create additional disks as needed. In the example above we created two independent disks named brunodisk-1 and bruno-disk2.
Step 3: Attach the Persistent Disks to Your Instance
With the Persistent Disks created and in an available state, we can attach them to the cloud instance and put them into use.
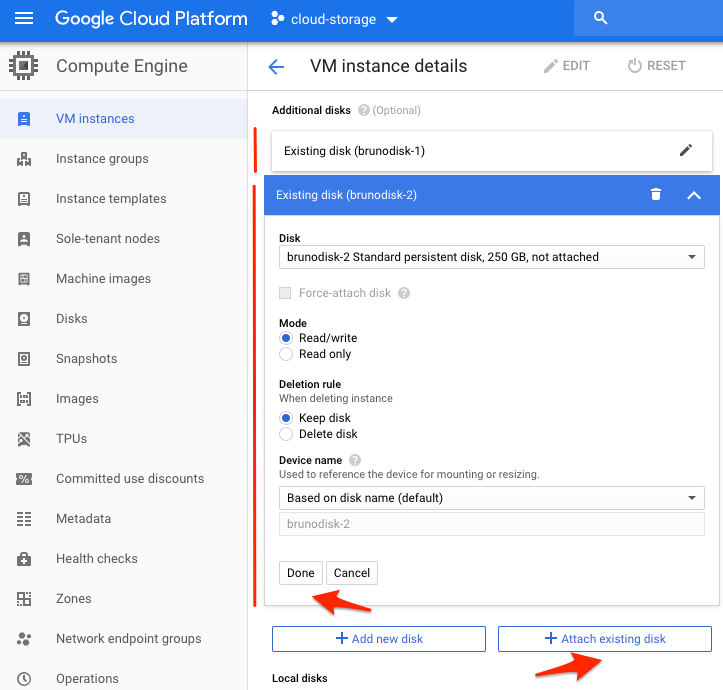
1. Navigate to the VM instances section on the left-hand panel and edit your instance details. Under the additional disks section, find the “Attach existing disk” button and click on it.
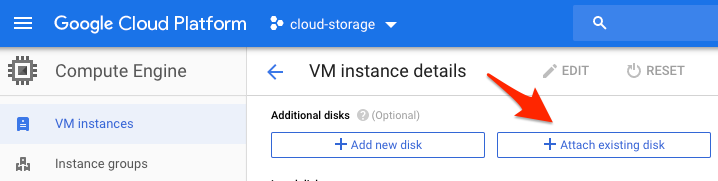 Compute Engine VM instance details
2. Select the Persistent Disk you previously created, and keeping the default options press “Done”.
 Compute Engine VM instance details
3. Repeat the steps 1 and 2 to attach any other Persistent Disks you previously created.
4. When all selected Persistent Disks are ready to be attached, press “Save” at the bottom of the page to initiate the process.
Step 4: Prepare and Mount the New Disk File System
With the newly created Persistent Disks attached to the cloud instance, we need to prepare the disk file systems and make them available to the operating system.
1. Navigate to the VM instances section on the left-hand panel and press the “SSH” connect button. This will initiate a browser-interactive SSH connection with the instance.
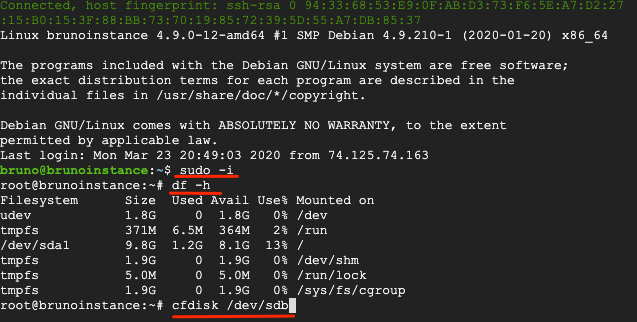
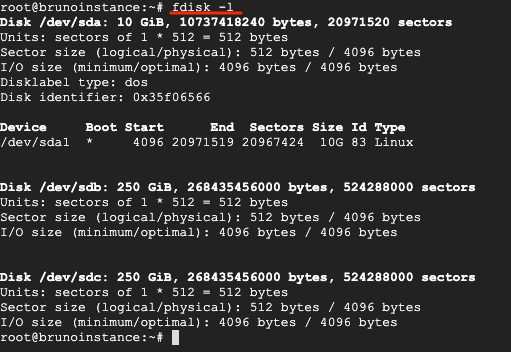
2. In the instance ssh session, use the sudo -i command to escalate your privileges. You use the command df -h to confirm that at this stage only the 10GB boot Persistent Disk (/dev/sda1) is being used.
3. The Persistent Disks we attached are named /dev/sdb and /dev/sdc. We will start by creating a disk partition using the command cfdisk followed by the disk we want to configure such as /dev/sdb.
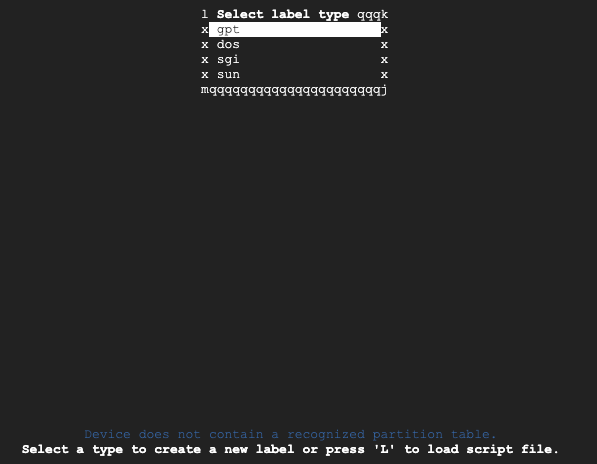
4. Select gpt as the disk partition table and press ENTER.
5. Keeping the default options Free Space and New selected press ENTER.
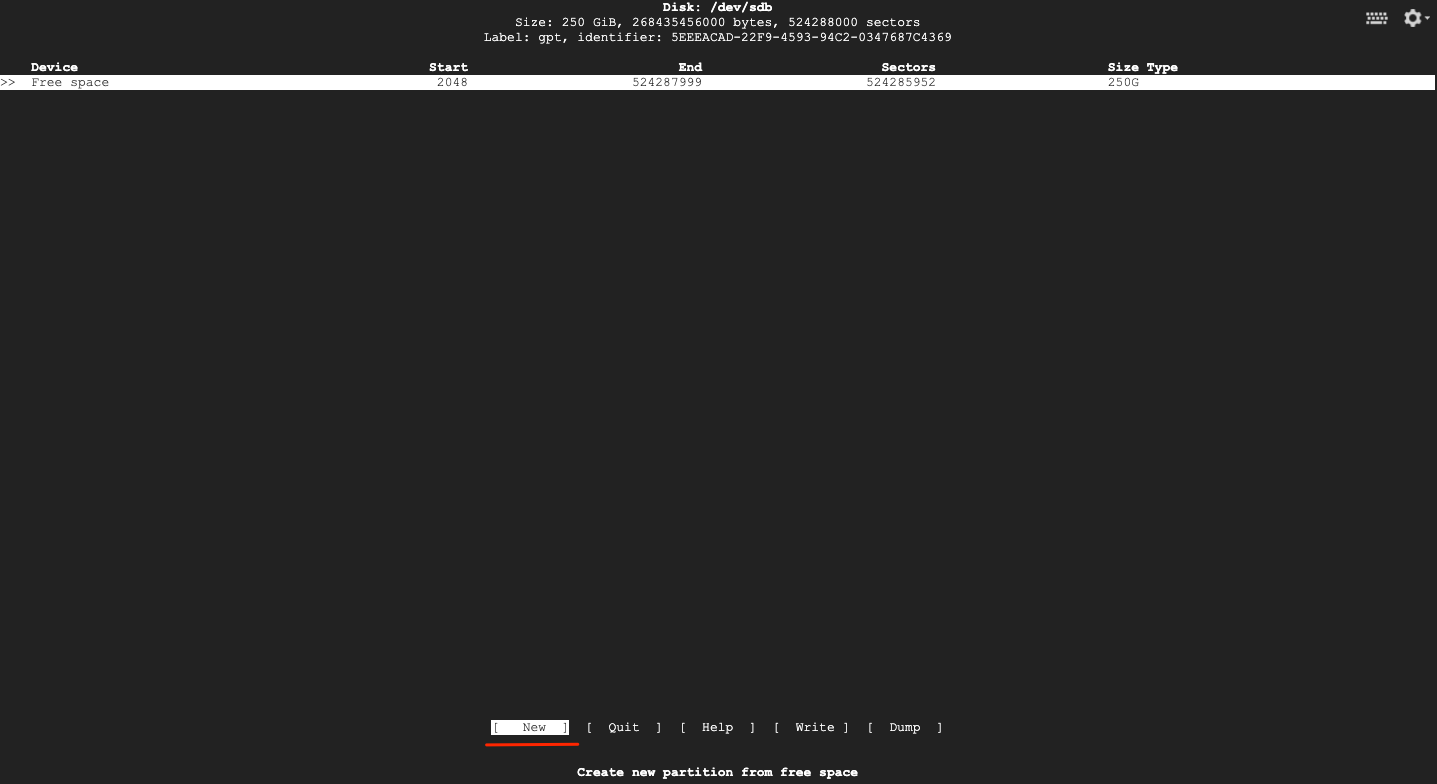
6. Now select the maximum available size for the partition and press ENTER.

7. Press ENTER to quit and save the changes.
8. Repeat the instructions 3 to 7 for each additional Persistent Disk you attached to the instance.
9. Confirm all the partitions were created by using the command fdisk -l.
 Browser-interactive SSH connection with the cloud instance
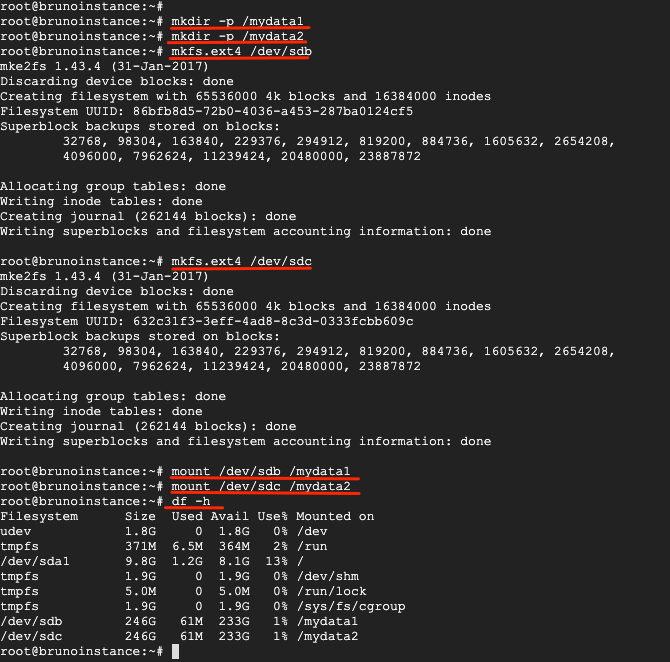
10. Create one directory for each of the additional Persistent Disks attached. This directory will be where the disk is going to be mounted and how we will be able to use the disk. In the example below, we created two directories using the commands mkdir -p /mydata1 and mkdir -p /mydata2
11. Format each disk partition using the command mkfs.ext4 followed by the disk (e.g. /dev/sdb).
12. Mount the Persistent Disk partition in the directory created above using the command mount /dev/sdb /mydata1.
13. Confirm the additional Persistent Disks are now available by running the command df -h again.
 Browser-interactive SSH connection with the cloud instance
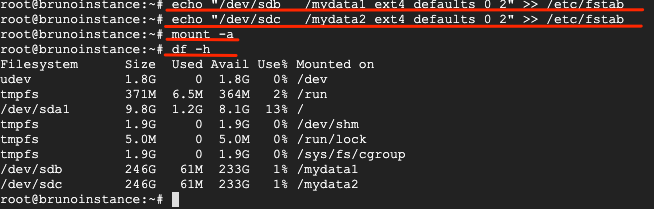
15. Confirm the fstab entries are correct by running the command mount -a.
 Browser-interactive SSH connection with the cloud instance
16. The Persistent Disks will now be available and ready to use even if your instance restarts.
Knowing how to fully leverage the capabilities and potential of google cloud Persistent Disks can offer is a must have for anyone designing cloud native architectures. Using one or more additional Persistent Disks in the same cloud instance enables you to build advanced retention, availability, and performance capabilities in your application.
Conclusion
How can Google Cloud users gain more advanced block storage capabilities? The storage efficiency, data protection, and cloning features that have made NetApp Cloud Volumes ONTAP essential for enterprise deployments on AWS and Azure are now available in Google Cloud. One of the major benefits that Cloud Volumes ONTAP brings to Persistent Disks is the ability to tier infrequently used data, such as backup Google Cloud snapshot data, from Persistent Disks to object storage on Google Cloud Storage, where latency is higher but costs lower. When the data is needed for performant use on Persistent Disk, Cloud Volumes ONTAP automatically tiers it back.

