Share
Snapshots are a key data protection and data availability feature of many cloud computing platforms, including Google Cloud. Snapshots are a central part of the Google Cloud Backup architecture—they allow you to create a point-in-time backup of a persistent disk attached to a virtual machine instance, and save it to Google Cloud Storage. You can also rapidly restore a snapshot to a persistent disk.
In this post, we explain how Google Cloud snapshots work and how to perform basic operations with snapshots, provide best practices that will help you make the most of Google Cloud snapshots, and show how NetApp Cloud Volumes ONTAP can help reduce snapshot storage costs and improve performance.
In this article, you will learn:
- How Google Cloud snapshots work
- Google Cloud snapshots considerations
- Creating a snapshot: ad-hoc and scheduled
- 4 Google Cloud snapshots best practices
- Google Cloud Snapshots with Cloud Volumes ONTAP
How Google Cloud Snapshots Work
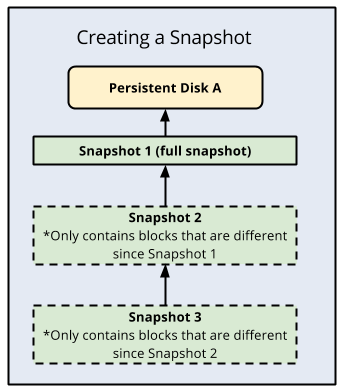
Google Cloud lets you take snapshots of persistent disks attached to your instances. A snapshot is an incremental copy of your data—the first snapshot contains all the data, while the next snapshots only save data blocks that changed in the interim. The difference between storage snapshots and backups is that snapshots are point-in-time copies of an entire disk while backups can contain individual files from multiple locations.
 Source: Google Cloud Platform
Google Cloud Snapshot Considerations: Storage Location and Network Costs
Snapshots are stored in Google Cloud Storage. You can choose between two storage location options when saving a snapshot:
- Multi-regional location—this is an entity that represents a large region such as a continent (for example “Asia”), and includes several Google Cloud regions (asia-east1, asia-east2, asia-northeast1, asia-northeast-2). Saving a snapshot in a multi-regional location means the snapshot will be replicated across multiple regions.
- Regional location—this is one specific Google Cloud region (for example, asia-east1). Saving a snapshot to a regional location means the snapshot will be stored in one region only, and allows you to choose the specific region it will be stored in.
The following table explains how Google Cloud charges for network egress (data transfer), depending on the location option you select, and the region from which you retrieve the snapshot.
| Retrieving snapshot from... |
Multi-Regional Location NW Egress Charge |
Regional Location NW Egress Charge |
| The same region the snapshot is stored in | None | None |
| A different region within the multi-regional location | No | $0.01 / GB |
| Outside the multi-regional location | $0.01 / GB | $0.01 / GB |
Now that you understand where snapshots are located and how they are priced by Google, let’s discuss how to work with snapshots day-to-day.
Google Cloud Snapshot Operation: Creating Ad-Hoc and Scheduled Snapshots
There are two common ways to create a snapshot: you can create an ad-hoc snapshot at a certain point in time, or schedule to have a snapshot created automatically on a periodic pre-defined schedule.
You can create and schedule snapshots using the Google Cloud Console, the GCloud CLI, or the Google Cloud Platform API. Below we explain the process with the Google Cloud Console, for other methods and additional snapshot operations, see Google’s official documentation.
To create an ad-hoc snapshot for a persistent disk:
- Prepare the disk for backup—see snapshot best practices below.
- In the Google console, go to the Create a Snapshot page.
- Enter a snapshot name and description.
- Select the Source disk.
- Select the snapshot storage location:
- By default, the snapshot is stored in a different region of the same multi-regional location as the persistent disk. For example, if the VM and its persistent disk are running in a region within Asia, the snapshot will be stored in the “multi-regional location” of “Asia”. This means it will be replicated between several regions within Asia.
- If you want to save the snapshot in a different multi-regional location, for example, “Europe”, change the storage location to Custom and select the multi-regional location.
- If you want to save the snapshot in a specific region you define, Change to Custom and select a specific region.
- Click Create to create the snapshot.
In Google Console, go to the Snapshots page and click Create Snapshot Schedule.To automatically backup persistent disks using a snapshot schedule:
- Enter a name for the schedule.
- Select a Region for the snapshot schedule—this must be the same region that houses the persistent disks you want to backup.
- Optionally, select a snapshot storage location for the snapshots created by the schedule. This is the same setting as we defined when creating an ad-hoc snapshot in step 5 above.
- Select your Schedule frequency:
- To set up an hourly schedule, choose the start time and select a snapshot interval in hours.
- Set the frequency to daily if you want a snapshot to be taken once per day. The snapshot will be generated every day at the start time.
- Set the frequency to weekly and select days on which you want the snapshot to be taken throughout the week. You can set different start times for different days.
- Select after how many days the snapshot should autodelete.
- Select a Deletion rule—this specifies what happens to the snapshot if the source disk is deleted.
- Choose the number of days to retain snapshots.
- Optionally, enable VSS (Volume Shadow Copy Service) for Windows instances, to generate local shadow copies of your snapshots, and add labels that can help you find the snapshots later.
- Click Create.
Note: Each persistent disk can have up to one snapshot schedule attached to it, and a schedule can be used for up to 1000 disks. Snapshot schedules cannot be modified, and if you want to delete one, ensure it is not attached to any persistent disk.
Note: Google Cloud Platform provides two types of persistent disks—zonal and regional disks. A zonal disk only exists in one availability zone, while a regional disk is replicated across multiple zones in a Google region. When creating snapshots using the Google Console, the procedure is identical for both types of disks. However, when creating snapshots using the GCloud CLI or the API, the procedure may be different for zonal or regional disks - consult the documentation.
Google Cloud Snapshot Best Practices
Follow these best practices to get the most out of Google Cloud snapshots, minimize errors and prevent data loss.
1. Prepare Persistent Disks Before Taking Snapshots
Google Cloud does not guarantee consistency for snapshots. There are several measures you can take to ensure a snapshot is consistent with the current state of your disk.
- Flushing disk buffers—before you create a snapshot, pause applications that write data to disk, then flush disk buffers to synchronize the file system. For example, MySQL has a FLUSH statement you can use to flush all data from memory to persistent disk.
- Freeze and unmount your filesystem—this is a more reliable alternative to flushing buffers but is a bit more difficult. Unmount the persistent disk from your instance to ensure data is not written to it during the snapshot process. You can do this using the commands sudo fsfreeze -f [example-disk_location] and sudo umount [example-disk_location]. Remember to remount the disk after taking the snapshot.
2. Create an Image of a Frequently-Used Snapshot
Restoring the same snapshot to a persistent disk multiple times is wasteful, because you can incur network costs every time you retrieve the snapshot data to the disk. To speed up the process and avoid network costs, restore the snapshot only once, and create a custom image of that VM with the persistent disk attached. You can then start VMs from this image, instead of having to restore data from the snapshot.
3. Schedule Snapshots During Off-Peak Hours
You can create snapshots more quickly by scheduling them for off-peak hours. Snapshot activity is busiest at the end of a business day in the relevant region and at midnight. Avoid selecting those times and try to schedule snapshots early in the morning or at a different time during the day. If possible, schedule snapshots on weekends.
4. Organize Data on Different Persistent Disks
Larger disks create larger snapshots. To ensure you are only snapshotting the data you really need to backup, split up data into several persistent disks.
It is a good idea to have one “boot disk” which only holds the operating system, applications and configuration. This boot disk won’t change so often, so its snapshot frequency can be lower. You can then have one or more “data disks” that store different categories of application data. You can set separate snapshot schedules for each of these disks, depending on how critical or time-sensitive your data is.
Google Cloud Snapshots with Cloud Backup
NetApp understands ONTAP better than anyone else, which is why the best backup solution for ONTAP systems is NetApp Cloud Backup. Designed by NetApp specifically for ONTAP, Cloud Backup automatically creates block-level incremental forever backups. These copies are stored in object format and preserve all ONTAP’s storage efficiencies. Your backups are 100X faster to create, easy to restore, and much more reliable than with any other solution.
Cloud Backup simplifies the entire backup process. It’s intuitive, quick to deploy, and managed from the same console as the rest of the NetApp cloud ecosystem. Whether you’re looking for a less expensive way to store your backups, a faster, more capable technology than NDMP, or an easy way to enable a 3-2-1 strategy, Cloud Backup offers the best backup solution for ONTAP.
