Share
Enabling cloud automation through an infrastructure-as-code approach is of great importance to organizations adopting DevOps practices. Environment provisioning and updates should not become a bottleneck or introduce more risk when meeting the fast-growing demands of a line-of-business application. The ease of use and repeatability of Infrastructure as Code helps to bridge this gap.
There are multiple options to enable infrastructure-as-code automation of NetApp® Cloud Volumes ONTAP and NetApp Cloud Manager, allowing this approach to form the central piece of the storage management strategy for any organization. This blog will show you step by step how to automate Cloud Volumes ONTAP and Cloud Manager deployment using Terraform and Ansible.
Infrastructure as Code and DevOps
Infrastructure as Code (IAC) helps enterprises maintain the configuration of environments using all the same constructs through application code. IAC creates definitions of environments using a descriptive model; this can be considered the source code of your infrastructure, and you can use that source code to create environments with the same configuration every time you need it deployed. Any changes to the target environment are achieved by updating this source code in the DevOps pipeline. IAC fits into the DevOps paradigm of continuous delivery which implements a lean process for building, testing, configuring, and deploying environments.
The concept of IAC stretches beyond just automating infrastructure deployment. Along with automation, it brings the following benefits to the table:
- Manages infrastructure as code using a source control, and that way it’s easy to maintain different versions and audit for changes.
- Improves collaboration between development and operations teams through validation and correction of integration points before deployment and through unit tests, function tests, integration tests, and more.
- Allows for rapid deployment of multiple environments at scale through automated deployment processes.
- Provides a unified set of tools and processes to be followed by teams for deployment of applications and infrastructure.
- Avoids configuration drift and ensures idempotency of target environment status. This repeatability reduces the overall risk for mistakes while provisioning.
Now let's see how to perform infrastructure as code Ansible and Terraform deployments.
Automating NetApp Cloud Manager Deployment Using Terraform and Ansible
When implementing Infrastructure as code, Ansible and Terraform are two popular tools used by DevOps team. NetApp Cloud Manager and Cloud Volumes ONTAP deployment and configuration can be easily automated using these Terraform and Ansible. In this section we’ll show you how to do that, starting with the prerequisites and deployment options.
Note that for this demo, Terraform is being installed using an Ubuntu machine.
Also note that our demonstration takes place using AWS, however the process could be carried out using a deployment in Azure just as easily.
Prerequisites
To deploy Cloud Manager and Cloud Volumes ONTAP using terraform and Ansible, the following prerequisites need to be completed:
Install Terraform
1. Download the appropriate version of Terraform for your operating system from https://www.terraform.io/downloads.html.
2. Download the file using the wget command
#wget
https://releases.hashicorp.com/terraform/0.12.6/terraform_0.12.6_linux_amd64.zip
# unzip ./terraform_0.12.6_linux_amd64.zip /usr/local/bin/
4. Verify the installation by running the terraform command: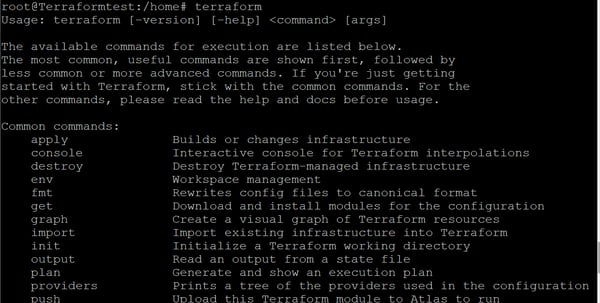
Install Ansible
The following steps will show you how to install Ansible.
1. Start by installing Ansible with the following commands:# sudo apt update
# sudo apt install software-properties-common
# sudo apt-add-repository --yes --update ppa:ansible/ansible
#sudo apt install ansible
2. Next, we need to install boto and botocore. Boto is a Python interface required for AWS.Install boto3 and botocore using the following commands:
$ sudo apt install python-pip
$ pip install boto3
$ pip install botocore
3. Import boto to Python using the following commands:$ python
$ import boto
$ exit()

AWS Connection Configuration
Now, you’ll need to configure your connection to AWS through the AWS Command Line Interface (AWS CLI).
1. Install the AWS CLI:# apt-get install awscli
2. Confirm that the AWS CLI is installed:
3. Configure AWS CLI using the following command. You will be prompted to enter the AWS Access key ID and your secret access key.
[terraform]
aws_access_key_id = <AWS access key id>
aws_secret_access_key = <AWS secret access key>
In this step, we’ll show you how to generate a refresh token. The refresh token enables you to generate access tokens which you add to the Authorization header for each Cloud Manager API call you make.Generate a Refresh Token
1. To get a refresh token, log in to NetApp Cloud Central using the following link:https://services.cloud.netapp.com/refresh-token
2. Click on “Generate Refresh Token” for cloud manager API: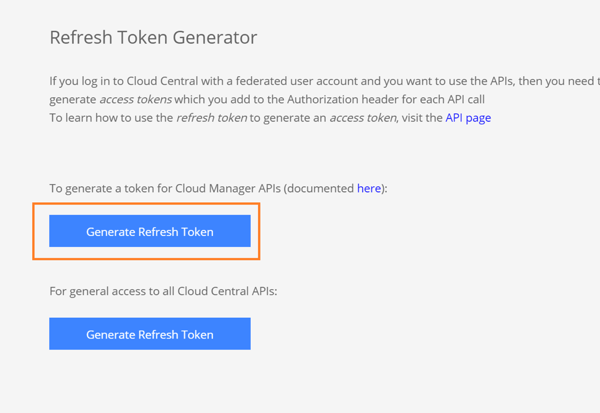
3. Click on “Copy to clipboard” to copy the refresh token. Save the token by pasting it in a text editor as this token will be used later in the Terraform configuration.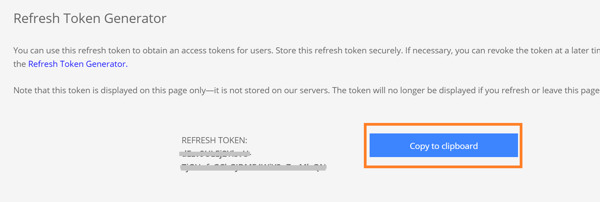
This entire process can be seen demonstrated in the video in this post.
Deploying Cloud Manager Using Terraform
The deployment process of Cloud Manager using Terraform is illustrated in the following diagram: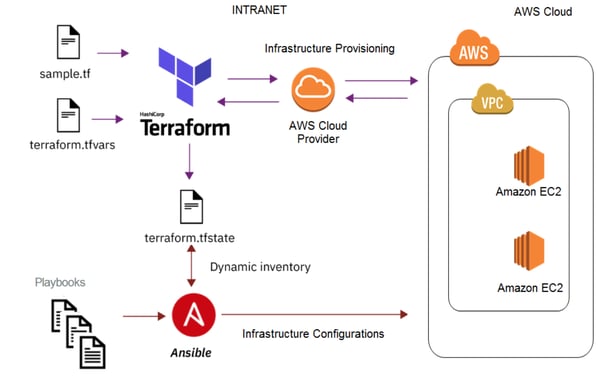
In this section we will cover the configuration files required for deploying Cloud Manager in AWS using Terraform and walk you through all the deployment steps involved.
Note: The same process can be followed for deployment of Cloud Manager in Azure also. The configuration files and deployment process for that cloud are explained here: https://github.com/edarzi/cloud-manager-automation-samples/tree/master/terraform/azure
Configuration Files
Download and edit the following Terraform and Ansible files as explained below for deploying Cloud Manager using Terraform and Ansible.
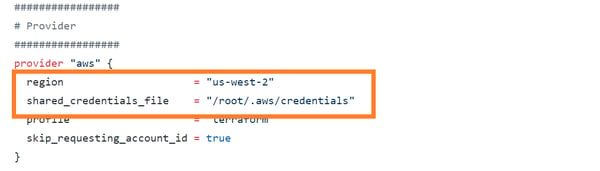
Main.tf: Available here. This is the main configuration file for Terraform and can be used with the following changes:
- Update region to your preferred AWS region for deployment.
- Update location of the AWS credential file.
Outputs.tf : Available here. This file specifies the output of deployment. It can be used as is without any changes.
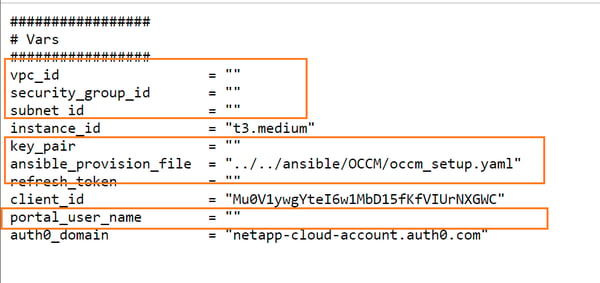
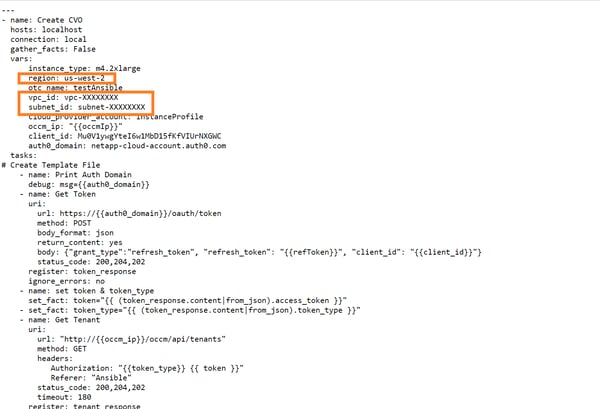
terraform.tfvars: Available here. The Terraform variable file should be updated with environment specific values as listed below:
- vpc_id: Add the ID of an existing AWS VPC.
- security_group_id: Update with ID of existing security group. The group should be configured to allow all required ports for Cloud Manager communication.
- subnet_id: Update with ID of your existing subnet.
- key_pair: For this variable, use the name of the existing keypair in AWS.
- ansible_provision_file: Update the location of the Ansible playbook file with the Cloud Manager file (Cloud Manager_setup.yaml).
- refresh_token: Use the refresh token generated in prerequisites section.
- portal_user_name: Username for logging in to the portal.
Cloud Manager_setup.yaml: Available here. Download the file to the same location as the Terraform files and update the path of the file in the variable ansible_provision_file.
Deployment
1. Download the Main.tf, Outputs.tf, terraform.tfvars, and Cloud Manager_setup.yaml files listed above to a single location:
2. Execute Terraform commands:
#terraform init
A. This command will download and install the Terraform AWS plugin:
#terraform plan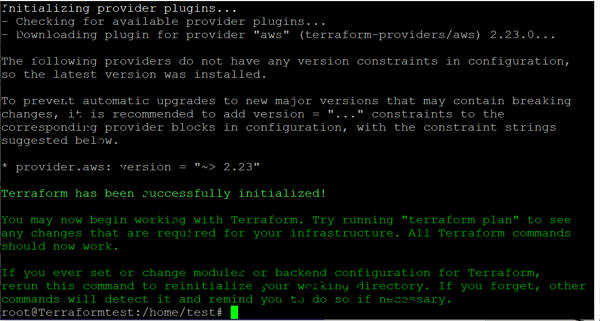
#terraform apply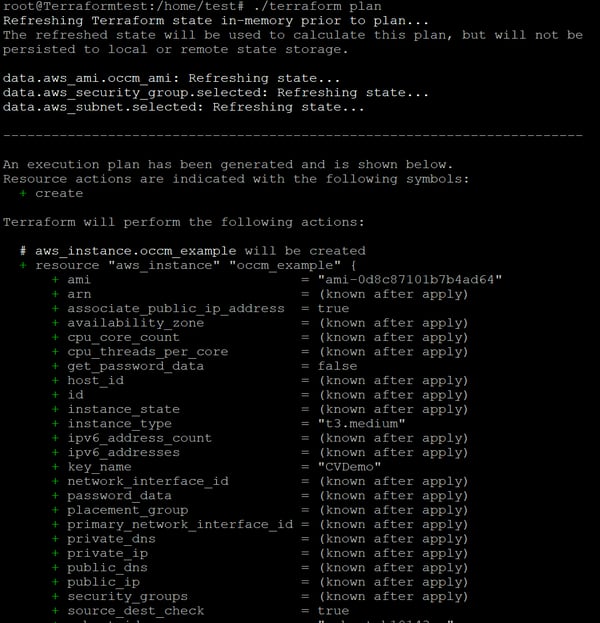
This command will apply the changes and create the deployment. Type ”Yes” when prompted if you want to apply the Terraform plan, as shown below:
3. Once the Terraform deployment is completed successfully, you will get the Cloud Manager ID and IP as output: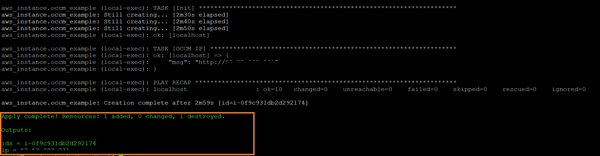
4. You can also view the Cloud Manager deployed in AWS console: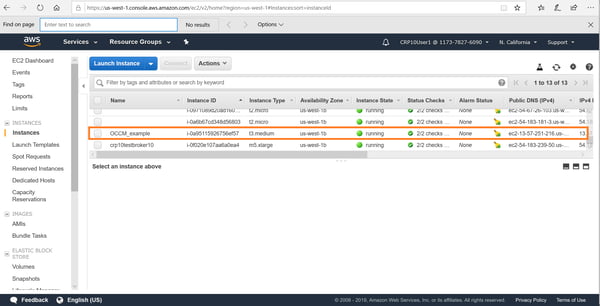
5. You can connect to the deployed Cloud Manager from http://cloud.netapp.com. Go from Cloud Central-> Fabric view-> View Cloud Managers.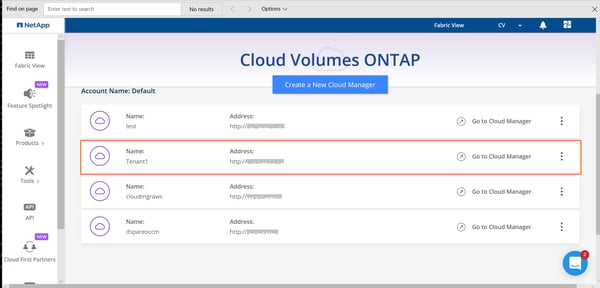
Deploy Cloud Manager Using Ansible
In this section we will cover the configuration files required for deploying Cloud Manager in AWS using Ansible and walk you through the deployment steps involved.
You’ll start by downloading the configuration file, createCloud Manager.yml. Update the following values in the yaml file:Configuration File
- security_group: Update with the ID of an existing security group. The group should be configured to allow all required ports for Cloud Manager communication.
- keypair: Use the name of an existing keypair in AWS.
- vpc_id: Add the ID of an existing AWS VPC.
- subnet_id: Update with the ID of an existing subnet.

Deployment
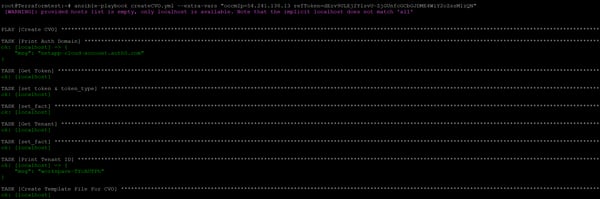
1. Run the following Ansible command to deploy Cloud Manager:ansible-playbook createCloud Manager.yml --extra-vars "AWSAccessKey=[access key] AWSSecretKey=[secret Key] region=us-west-2 instancename=Cloud ManagerTest IAMRole='' refToken=[refresh token string] portalUserName=[portal user mail]"
2. Replace values of the variable as follows:- AWSAccessKey: AWS access key ID.
- AWSSecretKey: AWS secret access key.
- Region: This is the target deployment region in AWS.
- IAMRole: The IAM role to be assigned to the instance (note, this variable is optional).
- Instancename: Enter the name of the Cloud Manager instance.
- refToken: Use the refresh token that was obtained from Cloud Central (as described in the prerequisites section above).
- portalUserName: This is the username to be associated with Cloud Manager.
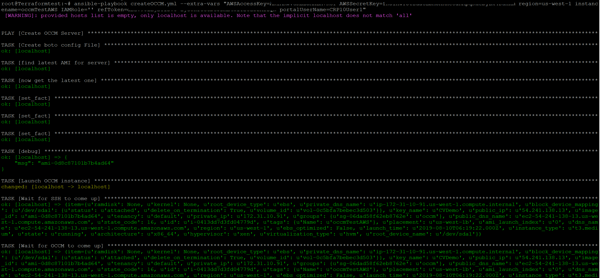
3. Once this information has been entered, you will be able to see the Cloud Manager instance being provisioned in the AWS console.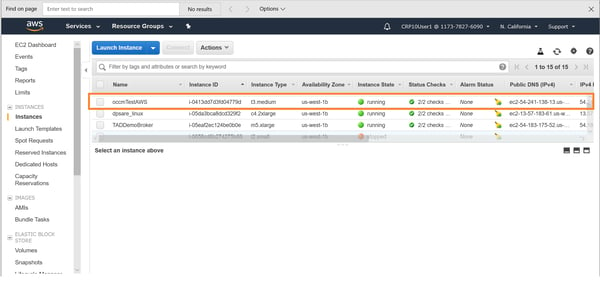
4. Once deployed, you can connect to the deployed cloud manager from Cloud Central-> Fabric view->View cloud managers.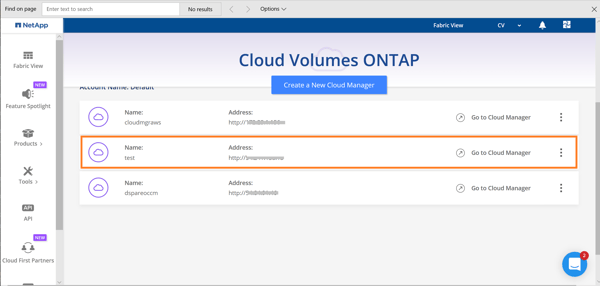
Deploying Cloud Volumes ONTAP Using Ansible
In this section we will cover the configuration files required for deploying a single node Cloud Volumes ONTAP in AWS using Ansible and give you step-by-step instructions for all the deployment steps involved.
Configuration Files
Start by downloading these required config files:
createCloud Volumes ONTAP.yml: Update the following values in the yaml file:
- Region: Select the region of deployment.
- Vpc_id: Update this variable with the value of your AWS VPC ID.
- Subnet_id: Enter the ID of the AWS subnet that will be used.
Cloud Volumes ONTAP_single.j2: Available here. Download the file to ../templates/ folder in the local machine, corresponding to the location from which the Ansible command will be executed. This is the template file for configuring Cloud Volumes ONTAP properties such as the export policy, tiering policy, snapshot policy, etc.
Deployment
Run the following Ansible command to deploy Cloud Volumes ONTAP:
ansible-playbook createCloud Volumes ONTAP.yml --extra-vars "Cloud ManagerIp=[Cloud Manager IP] refToken=[refresh token string]"
Replace values of the variable as follows:
- Cloud ManagerIp: Use the IP of the Cloud Manager instance deployed in the section above.
- This is the same refresh token that was obtained from Cloud Central (refer prerequisites section above).
You should now have a fully functional Cloud Volumes ONTAP deployment up and running thanks to using infrastructure as code.
Turn Your Infrastructure to Code with Terraform, Ansible, and More
To make you IAC deployment possible both Cloud Volumes ONTAP and Cloud Manager are completely API driven. Cloud Volumes ONTAP offers enterprise class data management features in the cloud over NAS and SAN protocols (NFS, SMB /CIFS, and iSCSI) of your choice. In addition to providing efficient storage solutions for enterprise applications and databases, it is the go-to solution for other use cases including data migration to cloud, Disaster Recovery (DR), Backup and Archive.
Cloud Volumes ONTAP is highly geared towards automating cloud operations. Cloud Volumes ONTAP and Cloud Manager deployment through infrastructure- as- code automation helps to address the DevOps challenges faced by organizations when it comes to configuring enterprise cloud storage solutions. As demonstrated in this blog, when implementing infrastructure as code, Ansible and Terraform go hand in hand to achieve the level of efficiency expected in large scale cloud storage deployment in both Azure and AWS.
 .
.
