Share
Some things in life are so good they have to be shared. NetApp Cloud Volumes Service can be shared over NFS and SMB, but can you share Cloud Volumes Service among AWS accounts? With a little help from RAM (AWS Resource Access Manager), you can, in fact, do just that.
The AWS Resource Access Manager enables various resources to be shared among AWS accounts. RAM enables customers to create Cloud Volumes in one account and to make them available to additional accounts, thereby circumventing the potential overhead of subscribing to Cloud Volumes Service from each account.
How Do I Share Cloud Volumes Among AWS Accounts?
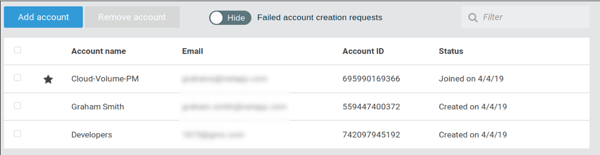
In the following scenario, one AWS account (Cloud-Volume-PM) has subscribed to NetApp Cloud Volumes Service in one or more regions. The company needs to use Cloud Volumes Service from additional AWS accounts, but does not want to subscribe from each account.
The first step to enabling sharing among AWS accounts is to add the master account to an AWS Organization, then, add the additional AWS accounts that will share resources.
Now that the accounts are in the same AWS Organization, RAM can be used to share subnets between the account with a CVS subscription and the additional account(s).
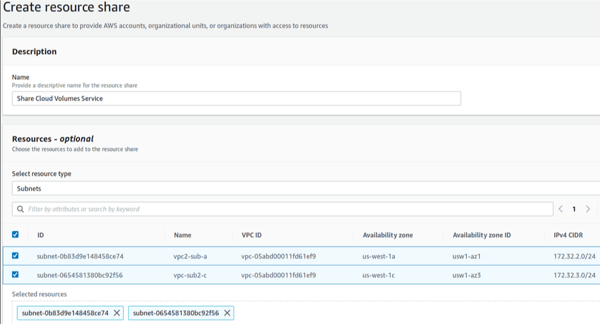
- Login to the AWS account with the CVS subscription, open the RAM page, and click “Create resource share”. Name the resource share before selecting “Subnets” as the resource type. Select the subnets to be shared i.e. those that have routes to Cloud Volumes Service.
- Then select the “Principals” to share the resources with, type or paste the account number(s) of the additional accounts before pressing “Add” for each account.
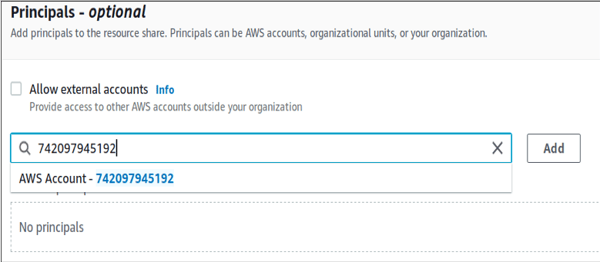
- Deselect the “Allow external accounts” option as subnets cannot currently be shared outside of an organization.
- Click “Create Resource Share” and within a few minutes the subnets will be shared to the additional accounts.
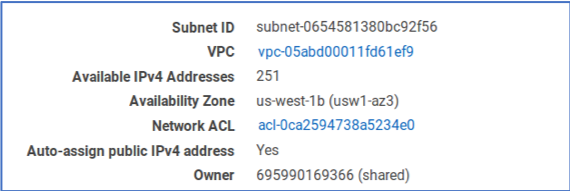
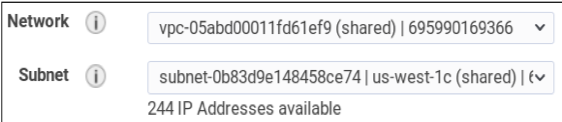
- Login to an account that now shares the subnets and go to the VPC page. Notice that a VPC has been added from the master account, as have the shared subnets. If you select one of the subnets, you’ll notice that the owner is labeled “<master-account#> (shared)”.
Routes have also been shared. They now include the routes to Cloud Volumes Service.
- To test connectivity, create an EC2 instance in the shared VPC and choose one of the shared subnets.
The instance will be able to access and mount a Cloud Volume, just like an instance running in the master account. Export policies and access permissions still apply, so the Cloud Volume is just as secure as before.
- Login into the EC2 instance and mount a Cloud Volume. In the Linux example below, the Cloud Volumes Service IP is 172.17.51.84.
root@ip-172-32-2-200:~# showmount -e 172.17.51.84
 Export list for 172.17.51.84:
 /                       (everyone)
/arcadian-pedantic-shaw (everyone)
 /dreamy-hopeful-lovelace (everyone)
/ebullient-mad-leakey (everyone)
/graham-test-123456 (everyone)
/oracle-1             (everyone)
/oracle-2             (everyone)
/prickly-bellicose-archimedes (everyone)
/test1                (everyone)
root@ip-172-32-2-200:~# mount 172.17.51.84:/arcadian-pedantic-shaw /mnt/cv/
root@ip-172-32-2-200:~# df -Th -t nfs
 Filesystem                Type Size Used Avail Use% Mounted on
172.17.51.84:/arcadian-pedantic-shaw nfs 100T 41G 100T 1% /mnt/cv
Want to Learn More?
Watch the video demo that accompanies this blog. If you’re ready to take the plunge, sign up to start using Cloud Volumes Service for AWS, or request a demo to try it out today.Available dates for us next week:
.jpeg?width=75&height=75&name=0%20(6).jpeg)