
- Product
- Resources
 LEARN
LEARN- Cloud Storage
- IaaS
- DevOps
 CALCULATORS
- TCO Azure
- TCO AWS
- TCO Google Cloud
- TCO Cloud Tiering
- TCO Cloud Backup
- Cloud Volumes ONTAP Sizer
- Azure NetApp Files Performance
- Cloud Insights ROI Calculator
- AVS/ANF TCO Estimator
- GCVE/CVS TCO Estimator
- VMC+FSx for ONTAP
- NetApp Keystone STaaS Cost Calculator
 BENCHMARKS
- Azure NetApp Files
- CVS AWS
- CVS Google Cloud
- Blog
- AWS
- Azure
- Google Cloud
- Data Protection
- Kubernetes
- General

Global File Cache Overview
As Global File Cache deploys transparently on a Microsoft Windows Server instance enterprises can consolidate local storage and embed services like Microsoft Active Directory, DNS/ DHCP, DNS, DFS Namespaces, and SCCM software distribution in their unified IT infrastructure. GFC is optimized to work with your existing Azure NetApp Files (ANF), Cloud Volumes ONTAP (CVO), or Cloud Volume Services (CVS) infrastructure.
This guide will show you how to add the building blocks to deploy the Global File Cache Core and Edge instances. We will guide you through the process of deploying the Core Instance in the public cloud and provide you with the instructions to start off your branch office deployment(s), the Edge instance(s).
Important: If you are using Cloud Manager to enable Global File Cache, you should use https://docs.netapp.com/us-en/occm/concept_gfc.html for a step-by-step walkthrough.
Cloud Manager automatically provisions the GFC Management Server instance alongside the GFC Core instance and enables entitlement / licensing.
Click on one of the specific architecture diagrams below to consult the details of the deployment
GFC + Cloud Volumes ONTAP
GFC + Cloud Volumes Service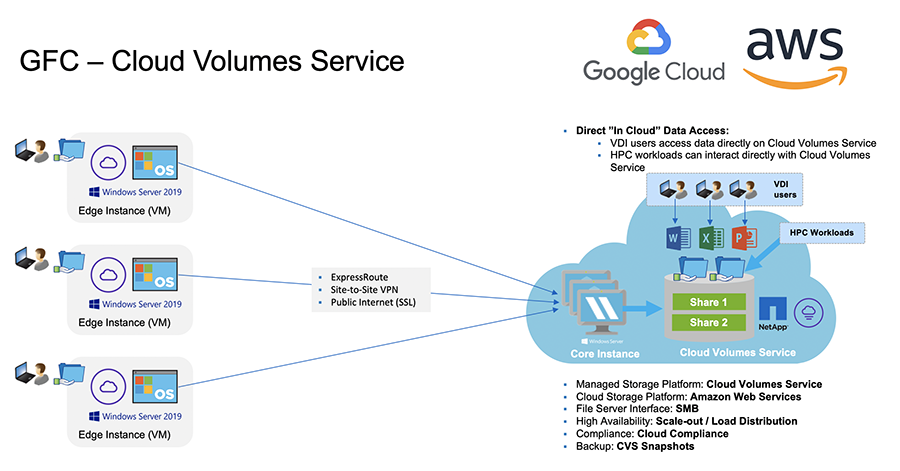
GFC + Azure NetApp Files
1. Preparations
To prepare for optimal deployment of the NetApp Global File Cache solution, we would like to share the essential solution requirements and potential change requests required.
IMPORTANT: Consult the latest NetApp Global File Cache User Guide for more detail around the solutions' hardware / software, virtualization requirements, integration options along with Global File Cache and end user application best practices (i.e. Autodesk AutoCAD, Autodesk Revit).
BEFORE WE BEGIN
To complete a successful installation you must have your customer ID. The customer ID is sent via email after registering for the GFC service. If you have not received your customer ID please stop and contact your NetApp account representative.
The following configuration changes must be completed in the environment before we can start the implementation of the NetApp Global File Cache software.
Implement Firewall Rules
There are several TCP ports used by the NetApp Global File Cache software services. These ports must be excluded from any WAN Optimization devices or Firewall restriction policies for the NetApp Global File Cache software to operate properly.
- Global File Cache LMS and LMC Licensing TCP Port: 443
- Global File Cache LMS instance needs to be able to connect to the subscription service (Azure Services / NetApp Service) using HTTPS (TCP port 443) to obtain licensing credentials.
- The following URL’s are accessed by Global File Cache Management Server to connect to the cloud provider subscription service:
- The following URL’s are accessed by Global File Cache Management Server to connect to the cloud provider subscription service:
Configure Service Account
The Global File Cache Edge instances will connect to the Core instance to access public cloud file storage resources. The services on this instance run as a specific domain user account. This account, also known as the “Service Account”, must have the following privileges on each of the SMB servers that will be associated with the Core instance:
- The provisioned Service Account must be an Active Directory Domain User
- Depending on the level of restrictions and GPOs in the network environment, this account may require domain admin privileges
- It must have the “Log on as a Service” privileges
- The password should be set to “Never Expire”
- The account option “User must change password at next logon” should be DISABLED (unchecked)
On ONTAP System Manager, in the top bar click "Return to classic version"
- Navigate to Storage \ Storage VMs
- Click on the respective Storage VM Name
- Go to Storage, SVMs, click your SVM, SVM Settings (top right)
- Scroll down to "Host Users and Groups"
- Select "Windows"
- Open "Groups" Tab
- Select "BUILTIN\Backup Operators" group
- Click "Edit"
- In the "Members" section, click add
- Provide the Active Directory Service Account and add to the group
- Click "Modify" to commit the changes
- Scroll down to "Host Users and Groups"
Cloud Volumes Service:
- The Service Account MUST be a member of the Domain Administrators group in the Active Directory (resource) domain where both GFC Core and Cloud Volumes Service resides
Azure NetApp Files:
- You can include additional accounts that require elevated privileges to the computer account created for use with Azure NetApp Files. The specified accounts will be allowed to change the NTFS permissions at the file or folder level. For example, you can specify a non-privileged service account used for migrating data to an SMB file share in Azure NetApp Files
- Please consult https://docs.microsoft.com/en-us/azure/azure-netapp-files/azure-netapp-files-create-volumes-smb to enable the “ANFBackupOperator” feature and add the Global File Cache service account to the Azure NetApp Files “Backup Policy Users” list.
Configure Antivirus Exclusions
Antivirus software or other third-party indexing or scanning utilities should never scan drive D:\ on the Global File Cache Edge instance. Scanning the Global File Cache Edge instance server drive D:\ will result in numerous file open requests for the entire cache namespace. This will result in file fetches over the WAN to all file servers. This will cause WAN connection flooding and create unnecessary load on the Edge instance resulting in significant performance degradation.
In addition to the D:\ drive, the following NetApp Global File Cache directories, files and processes should be excluded from all antivirus applications:
- C:\Program Files\TalonFAST\
- \Device\TalonCacheFS
- C:\Program Files\TalonFAST\Bin\LMClientService.exe
- C:\Program Files\TalonFAST\Bin\LMServerService.exe
- C:\Program Files\TalonFAST\Bin\Optimus.exe
- C:\Program Files\TalonFAST\Bin\tafsexport.exe
- C:\Program Files\TalonFAST\Bin\tafsutils.exe
- C:\Program Files\TalonFAST\Bin\tapp.exe
- C:\Program Files\TalonFAST\Bin\TService.exe
- C:\Program Files\TalonFAST\Bin\tum.exe
- C:\Windows\System32\drivers\tfast.sys
- C:\Program Files\TalonFAST\Bin\TappN.exe
- C:\Program Files\TalonFAST\Bin\FTLSummaryGenerator.exe
- C:\Program Files\TalonFAST\Bin\RFASTSetupWizard.exe
- \\?\TafsMtPt:\
PowerShell: Windows Defender Exclusions
The following commands must be executed from PowerShell to enable exclusions for Microsoft Windows Defender:
Write-Host "Adding GFC exclusions to Windows Defender (local)"

Add-MpPreference -ExclusionPath \\?\TafsMtPt:\
Add-MpPreference -ExclusionPath "\Device\TalonCacheFS\"
Add-MpPreference -ExclusionPath "C:\Program Files\TalonFAST\bin\"
Add-MpPreference -ExclusionProcess "C:\Program Files\TalonFAST\Bin\LMClientService.exe"
Add-MpPreference -ExclusionProcess "C:\Program Files\TalonFAST\Bin\LMServerService.exe"
Add-MpPreference -ExclusionProcess "C:\Program Files\TalonFAST\Bin\Optimus.exe"
Add-MpPreference -ExclusionProcess "C:\Program Files\TalonFAST\Bin\tafsexport.exe"
Add-MpPreference -ExclusionProcess "C:\Program Files\TalonFAST\Bin\tafsutils.exe"
Add-MpPreference -ExclusionProcess "C:\Program Files\TalonFAST\Bin\tapp.exe"
Add-MpPreference -ExclusionProcess "C:\Program Files\TalonFAST\Bin\TService.exe"
Add-MpPreference -ExclusionProcess "C:\Program Files\TalonFAST\Bin\tum.exe"
Add-MpPreference -ExclusionProcess "C:\Windows\System32\drivers\tfast.sys"
Add-MpPreference -ExclusionProcess "C:\Program Files\TalonFAST\Bin\TappN.exe"
Add-MpPreference -ExclusionProcess "C:\Program Files\TalonFAST\Bin\FTLSummaryGenerator.exe"
Add-MpPreference -ExclusionProcess "C:\Program Files\TalonFAST\Bin\RFASTSetupWizard.exe"
Add-MpPreference -ExclusionProcess "tum.exe"
Add-MpPreference -ExclusionProcess "tapp.exe"
Add-MpPreference -ExclusionProcess "TappN.exe"
Add-MpPreference -ExclusionProcess "FTLSummaryGenerator.exe"
Add-MpPreference -ExclusionProcess "LMClientService.exe"
Add-MpPreference -ExclusionProcess "LMServerService.exe"
2. Provisioning
Download the software packages, templates and documentation listed below. Copy these, or make them available, to all sites before you begin the local deployments.
NetApp GFC Software & Documentation
WINDOWS SERVER 2016 Virtual TemplateWindows server 2016 .ova
Windows server 2016 .vhdx
WINDOWS SERVER 2019 Virtual Template
Windows server 2019 .ova
Windows server 2019 .vhdx
Global File Cache Edge Software & Documentation:
NetApp GFC Software Installation Package (.exe)Netapp Cloud Insights Dashboard (.Zip)
NetApp Global File Cache User Guide (.PDF)
For all onboarding information and prerequisites, please check https://docs.netapp.com/us-en/occm/concept_gfc.html
QUICK STEPS:- Deploy Virtual Template (or your own) to the public cloud
- Deploy Virtual Template(s) to the branch offices in scope
- Ensure all the RFC's are in place and that Firewall Rules and Antivirus Exclusions are implemented
- Designate a Global File Cache Service Account to use for the configuration of the Global File Cache core instance
- Join the Global File Cache instances to your Active Directory Domain, preferably in a separate OU
Once you have implemented the respective RFC’s, provisioned the core/edge VM instances and joined to your organization's Active Directory Domain, consult the deployment video below to configure the License Management Server, Global File Cache Core and Edge instances.
NOTE:
To enable the Global File Cache License Management Server (LMS), your customer ID will be required. You should have received this email from NetApp’s Global File Cache Support/Operations team.

3. Validation Onboarding
This is the final phase of the Global File Cache deployment, the end-user implementation phase.
In order to prepare and streamline the on-boarding of end-users please use the email template linked below that will help you to ‘educate’ the end users on what it means to work in a ‘central data’ environment. This will help your users leverage all of the benefits of the Global File Cache solution. We have also published a video that can be shared to ‘train’ the users where needed.


Customize and forward the following resources to the end-users to prepare them for roll-out:
EMAIL TEMPLATE
Email Template (.emltpl)
ONBOARDING COMMUNICATIONS
Word Document (.docx)
4. Contact Support
Customer support for Global File Cache users with Cloud Volumes ONTAP is available through these channels:
Guided Problem Solving, Product documentation, Case Management, Knowledgebase, Downloads, Tools, and more: get support here
Immediate assistance for a P1 issue call: +1 888.463.8277
Customer support for Global File Cache users utilizing Cloud Volume Services and Azure NetApp Files is available through your standard support from your provider. Please contact Google Customer Support or Microsoft Customer Support respectively.