Share
Recent additions to Cloud Insights mean that it’s now possible to ingest any metric, from any device, on any platform using open collectors like Telegraf. Having a tool that can collect metrics from thousands of different devices is a key part of solving the observability challenge in modern environments.
Cloud Insights uses a suite of powerful visualization tools to display metrics from across your environment. You can collect data from storage, virtualization and cloud resources without the use of agents, where Cloud Insights uses native APIs. However, to collect granular metrics directly from hosts and their applications, you can also ingest metrics from open agents such as Telegraf.
Cloud Insights makes it easy to get started with visualization and alerting on agent data metrics, even at extreme scale, but to help with the logistics of large-scale agent deployments, Ansible can help.
In this post, I’ll cover how to deploy Cloud Insights collector agents en-masse using Ansible. If you’re not familiar with Cloud Insights already, you should sign up for a free trial to check it out in your own environment. You can refer to this article to help you get to grips with the basics. I’d recommended that you first install at least one Cloud Insights Collector manually just to see how it works. Previous experience with Ansible, though not strictly required, will also help.
After the deployment, you’ll have the ability to quickly create visualizations on dashboards like the examples below, showing CPU and memory usage across groups of hosts, applications or services.
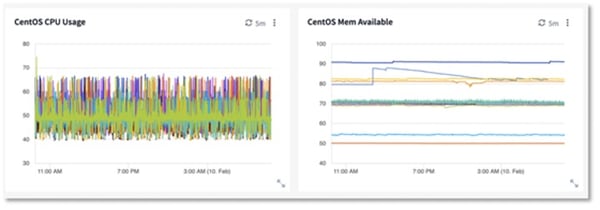 CentOS Graphs
How does it work?
In a nutshell, the process consists of the following three steps.
Extract the Telegraf Configuration file for a specific collector, in this example, we’re using the CentOS node agent.
Once you have the file, you make a few modifications to as detailed below.
Finally, deploy the configuration with the Telegraf agent through Ansible to the target hosts
Preparing the Telegraf configuration file
The goal here is to prepare a Telegraf configuration file that we can use with Ansible, to insert our own data dynamically based on the host we are deploying it to. If you have already deployed a Cloud Insights agent manually, you could copy the Telegraf configuration file from that machine to save a few steps.
The most commonly monitored hosts and applications are represented with collector tiles in Cloud Insights, where the install and configuration strings are included for convenience. You can of however use any Telegraf input plugin alongside the Cloud Insights output – you just need your Cloud Insights tenant ID and the appropriate integration token represented in the output section of your telegraf.conf. Be sure to check out Insight 2020 breakout SPD-1327-3 for more detail on DIY agents.
Log into Cloud Insights
Browse to Admin > Data Collectors
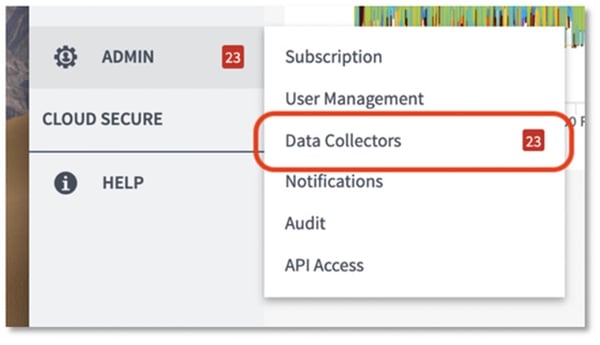 Data Collector Menu
Click the Data Collectors button
Select RHEL & CentOS from the list (Use the filter input to search)
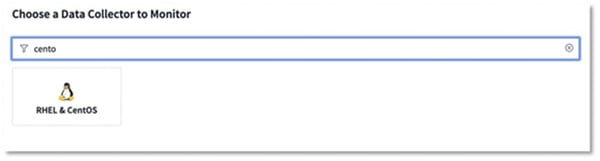 CentOS Collector
Click the button to copy the agent installer snippet to your clipboard
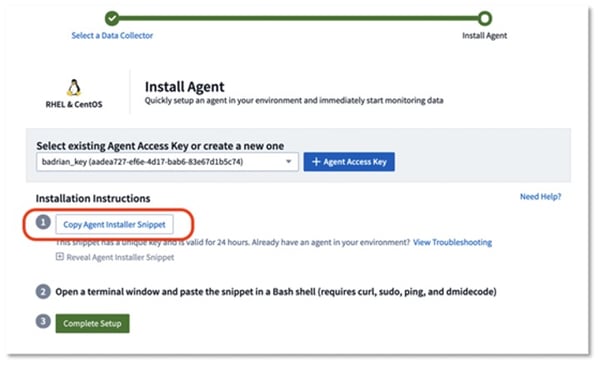 CentOS Installer
- Paste into a text editor. It should look something like this:
- installerName=cloudinsights-rhel_centos.sh && token=<very_long_token_string> && domain=<instance>.cloudinsights.netapp.com && curl -k -X GET -H "Authorization: Bearer $token" -H "X-CloudInsights-IntegrationAccessKey: <access_key>" -o $installerName https://$domain/rest/v1/integrations/raw/telegraf/installer/rhel_centos.sh && chmod +x $installerName && sudo DOMAIN_NAME=$domain JWT=$token ./$installerName
- Remove the installation part at the end of the command:
- && chmod +x $installerName && sudo DOMAIN_NAME=$domain JWT=$token ./$installerName
- Then run what’s left to download the installer script
- Open the script and copy the DEFAULT_CONFIG string (the part inside the quotes) into a file named telegraf.conf
- In the file, search and replace all escaped quotes with regular quotes, i.e. \" becomes "
Installing and configuring Telegraf through Ansible
Before continuing, if you haven’t already, you should install Ansible from the website. Lets cover some basic Ansible terms:
Inventory: A group of hosts or systems in your infrastructure to apply Ansible commands against.
Playbooks: YAML files that express configurations.
Role: A set of configuration tasks (i.e. Install a product, mysql, telegraf, etc).
Ansible Galaxy: A public hub that maintains and serves Ansible Roles.
To install the Telegraf agent, we will use the Ansible role “sbaerlocher.telegraf”. The role will handle the installation and running of the agent. To retrieve the role for use we use ansible galaxy:
ansible-galaxy install sbaerlocher.telegraf
Let’s create a simple playbook to to install Telegraf and replace some items in the configuration, using localhost as an example:
   - hosts: localhost

     roles:
       - { role: sbaerlocher.telegraf }
     tasks:
       - name: Copy telegraf conf file
         copy:
           src: telegraf.conf
           dest: /etc/telegraf/telegraf.conf

       - name: Update hostname in config file
         replace:
           path: /etc/telegraf/telegraf.conf
          regexp: '\$NODE_UUID'
           replace: ""

       - name: Update OS in config file
         replace:
           path: /etc/telegraf/telegraf.conf
           regexp: '\$NODE_OS'
           replace: ""

       - name: Update ip in config file
         replace:
           path: /etc/telegraf/telegraf.conf
           regexp: '\$HOSTIP'
           replace: ""
Let’s cover this playbook line by line:
Our inventory is shown by “hosts” which is set to localhost only for this example
We are enforcing the Telegraf role “sbaerlocher.telegraf”
A task is used to copy the Telegraf configuration file to the default location
Then we have 3 tasks to replace variables that the installer script would have replaced with host specific values
To deploy it, we use the command:
ansible-playbook playbook.yml
Conclusion
Using this method, you can deploy and maintain the Cloud Insights Telegraf agent to any number of systems easily. You can also adapt this process to perform the same bulk deployment and management of agents for any number of Cloud Insights collectors such as Elasticsearch, Cassandra, Redis, nginx and so on. In addition to this, you can use Ansible to enforce this configuration, in case one of the agents is removed.
Links and References:
Sign up for a free Cloud Insights trial for 30 days
Ansible: https://www.ansible.com
Ansible Documentation: https://docs.ansible.com/ansible/latest/index.html
Telegraf Role: https://galaxy.ansible.com/sbaerlocher/telegraf
