Share
The Azure Backup Service offers various options for backing up on-premises and cloud-based workloads to Azure storage. Azure Backup Server is the most powerful option, which can perform application-aware backups of complete machines, as well as individual files and folders, from Windows and Linux machines running on-premises or in Azure VMs.
In this post, we’ll explain how Azure Backup Server fits into the Azure backup architecture, show how to deploy the server and use it to restore backups, and explain how NetApp Cloud Volumes ONTAP can make Azure backups faster and more cost-efficient.
In this article, you will learn:
- What is the Azure Backup Server
- Azure Backup Server vs. MARS agent
- How to deploy the server
- How to restore data from backup
- Azure Backup with Cloud Volumes ONTAP
What is the Azure Backup Server?
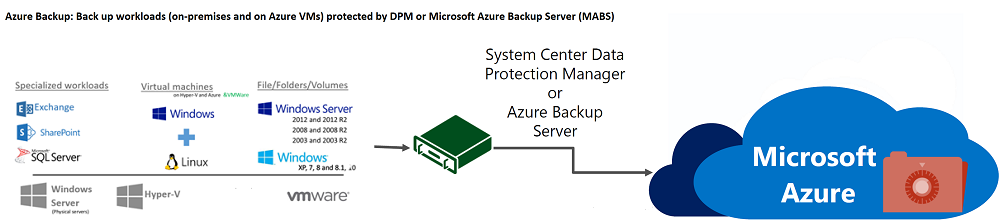
Microsoft Azure has the ability to backup entire on-premises machines, entire Azure VMs, or perform a backup of specific data from your workloads.
The Microsoft Azure Backup Server (MABS) is a software component you can deploy either on-premises or in the Azure cloud, and is used to:
- Backup on-premises workloads, such as databases, exchange servers, Windows and Linux machines
- Backup Azure VMs (only if MABS is deployed in Azure)
You can configure your on-premise machines or Azure VMs to backup to MABS, and in turn, MABS backs up the data to a Recovery Services Vault in the Azure Cloud.
MABS comes with the System Center Data Protection Manager (DPM), a software package that provides near-continuous data protection and data recovery in Microsoft Windows environments.
Source: Microsoft Azure
An alternative to MABS is the Microsoft Azure Recovery Services (MARS) agent, which can be deployed on Windows machines and Azure VMs on the cloud, to backup individual files and the system state.
Also check out our post on Azure database backup, which follows another process.
Azure Backup Server vs. MARS Agent
Backing up workloads using Azure Backup Server or DPM has several advantages, compared to the alternative method, Microsoft Azure Recovery Services.
Azure Backup Server supports:
- App-aware backups—optimized machine backups for specific workloads, including SQL Server, Microsoft Exchange, and Microsoft Sharepoint.
- Windows or Linux—the MARS agent does not support Linux.
- File backups—can backup files, folders, file system volumes, and the system state.
- Granular scheduling options—schedule backups for specific machines, files, folder, or file system volumes.
- Central management—backup management for multiple machines in a central console. This also allows you to backup multiple machines together in one operation.
While Azure Backup Server is more powerful than MARS in almost every respect, its downside is that it requires installation of a dedicated server, whereas MARS is a light agent that can be deployed directly on target machines.
How to Deploy the Azure Backup Server
You can install Azure Backup Server on any Azure server (Microsoft recommends starting with a gallery image of Windows Server 2016 Datacenter or Windows Server 2019 Datacenter), or on a local server running Windows Server 2019 or Windows Server 2016 with the latest Service Packages.
The general process for installing Azure Backup Server is as follows:
- Create a vault—In the Azure Portal, select Recovery Services and create an Azure Recovery Services vault.
- Configure the Recovery Services vault—select an Azure subscription, resource group and location
- Set Storage Replication—choose between geo-redundant storage and locally redundant storage
-
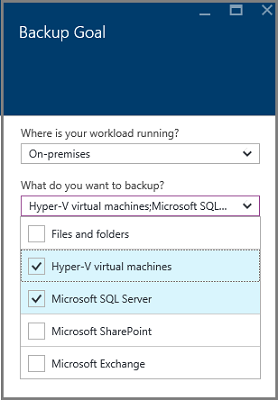
Download the Azure Backup Server software package—access your Recovery Services vault and click Backup. In the Getting Started wizard, select where your workload is running and what type of workload you want to backup. The wizard provides a download link for the server software package that suits your needs.
- Run the Setup Wizard on the target server. As part of the wizard:
a. Check your hardware and software prerequisites, and if they are met, complete the installation.
b. You can opt to install a new version of Microsoft SQL Server or use your own local SQL Server instance, if already installed on the machine.
c. Define a scratch location—a temporary place to save files before they are uploaded to Azure storage. This should be at least 5% of the size of the data that will be backed up.
d. Install the Microsoft Azure Recovery Services Agent (part of the Azure Backup Server installation).
e. Provide vault credentials in MARS agent setup. - Add backup storage—launch Azure Backup Server and define where backups should be stored. The first (mandatory) backup copy is saved on local storage on the backup server. The second (optional) backup copy is stored in Azure Backup vault.
-
Install DPM—install and update the System Center Data Protection Manager (DPM).
See complete installation instructions, and learn how to add storage volumes to your Azure backup server for the mandatory first local copy of your backups.
How to Recover Data from Azure Backup Server
Whenever necessary, you can use the Azure Backup Server to recover data you have backed up to your Recovery Services vault.
The general process for recovering data from an Azure Backup Server is as follows:
- Start the Azure Backup Server management console, select the Recovery tab of the Azure Backup Server management console, and click Add External DPM.
- Download new vault credentials from your Azure Recovery Services vault. Select the Azure Backup Server from which you wish to recover data, from the list of servers associated with the vault, and provide the encryption passphrase. Only Azure Backup Servers associated with the same vault can recover each other’s data.
- You can now browse the data of the remote Azure Backup Server from which you want to recover the data. Browse the production servers protected by the external backup server and select a data source to restore.
-
Select a month and year from the available Recovery points, and select the Recovery time. Below you can see the files and folders available as of that recovery time.
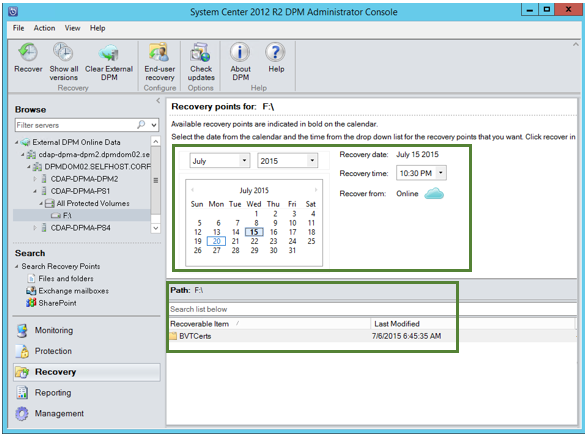
- Right-click any file or folder and click Recover.
- Review the Recover Selection, then select Recover to an alternate location. Select a location to which you want to recover the data.
- Specify if you want to create a copy, skip or overwrite if files already exist in the target location.
- Select whether to Restore security settings from the original production server or use security settings of the destination storage location.
- Review the summary screen and click Recover to copy the data from backup to your target location.
-
You can monitor the restore job in the Monitoring tab.
See the full instructions for recovering data from an Azure Backup server, or learn how to restore complete VMware virtual machines.
Azure Backup with Cloud Volumes ONTAP
NetApp Cloud Volumes ONTAP, the leading enterprise-grade storage management solution, delivers secure, proven storage management services on AWS, Azure and Google Cloud. Cloud Volumes ONTAP supports up to a capacity of 368TB, and supports various use cases such as file services, databases, DevOps or any other enterprise workload.
In particular, Cloud Volumes ONTAP provides data protection using NetApp Snapshot™ technology that requires no additional storage and does not impact application performance.

